Practice setup — integrations
Wire Hero EMR to the outside world: referral/external providers, Stripe, SRFax, SMS, and EPCS for controlled prescribing.
Practice setup — integrations
Wire Hero EMR to the outside world: referral/external providers, Stripe, SRFax, SMS, and EPCS for controlled prescribing.
Connect every third-party integration from one hub
External Providers is Hero EMR's integration center. Every third-party connection — patient communication, clinical, billing, and personal tools — lives behind a single modal with a sidebar of tabs. Org admins manage the org-wide tabs; individual physicians manage their personal SRFax credentials.
Patient communication
- Email — the outbound sender (Active sender shows your
Sender address, or Hero’s shared sender while the field is blank — “Leave blank to send from Hero’s shared sender.”) and inbound routing for patient replies. - SMS — provider-routed SMS for reminders and inbound replies. See §4.9.
- Video conferencing — pick Zoom or Google Workspace as the active telehealth provider, then map each physician to a host. See Part III.
- Phone agent — inbound phone routing via the Hero Phone Agent.
Clinical integrations
- SureScripts — platform e-prescribing status and physician directory.
- RadNet Connect — credentials for the RadNet ordering portal.
- Labs — Quest credentials, enabled lab compendiums, and the paper requisition form.
- Imaging visibility — which imaging providers show up at encounter completion.
- Calendar Sync — the clinician's own Google or Outlook calendar link. See §4.11.
Billing & payments
- Stripe — Stripe Connect onboarding for patient payments. See §4.7.
- Square — Square seller connection for portal payments.
- Office Ally — Service Center credentials.
- Office Ally SFTP — SFTP credentials for EDI claim transport. A practice that hasn’t saved its own login reads Connected with “Uses Hero’s shared Office Ally login until your practice saves its own.”
- Availity SFTP — SFTP credentials and EDI identifiers for Availity transport.
- Stedi — clearinghouse provider records, payer enrollments, and readiness. Its Settings choose how claims use Stedi in one Claims select — Off — Stedi doesn’t send claims, A biller sends claims through Stedi (nothing automatic), Stedi sends ready claims; the rest go to your other clearinghouse, or Stedi sends ready claims; nothing else sends them — and a Right now: line states the practice’s actual claims route. Claim files and the daily batch for everything else are set in
Billing → Claim Submission. Billing NPI by payer applies only to claims sent through Stedi. - Optum — Optum clearinghouse eligibility, claim status, and readiness.
Personal
- SRFax — your own SRFax credentials for personal inbound and outbound fax. See §4.8.
- Open
Admin > External Providers. The modal opens on the tab you used last (a deep link or a button that names a tab opens that tab instead). Tabs are grouped in the left sidebar by category. - Pick a tab. Each tab is self-contained — credentials, configuration, and a Verify/Test button. Status badges (Active, Disabled, Needs number, Not configured) tell you what's still missing. The claim channels (Office Ally SFTP, Availity SFTP) use the same words everywhere in Hero — Connected, Not connected, Needs attention, Turned off, or Manual billing only — so External Providers and Billing → Claim Submission never disagree.
- Refresh after external changes. If you change settings at the provider (e.g. add a new Office Ally payer), click Refresh in Hero to re-pull status.
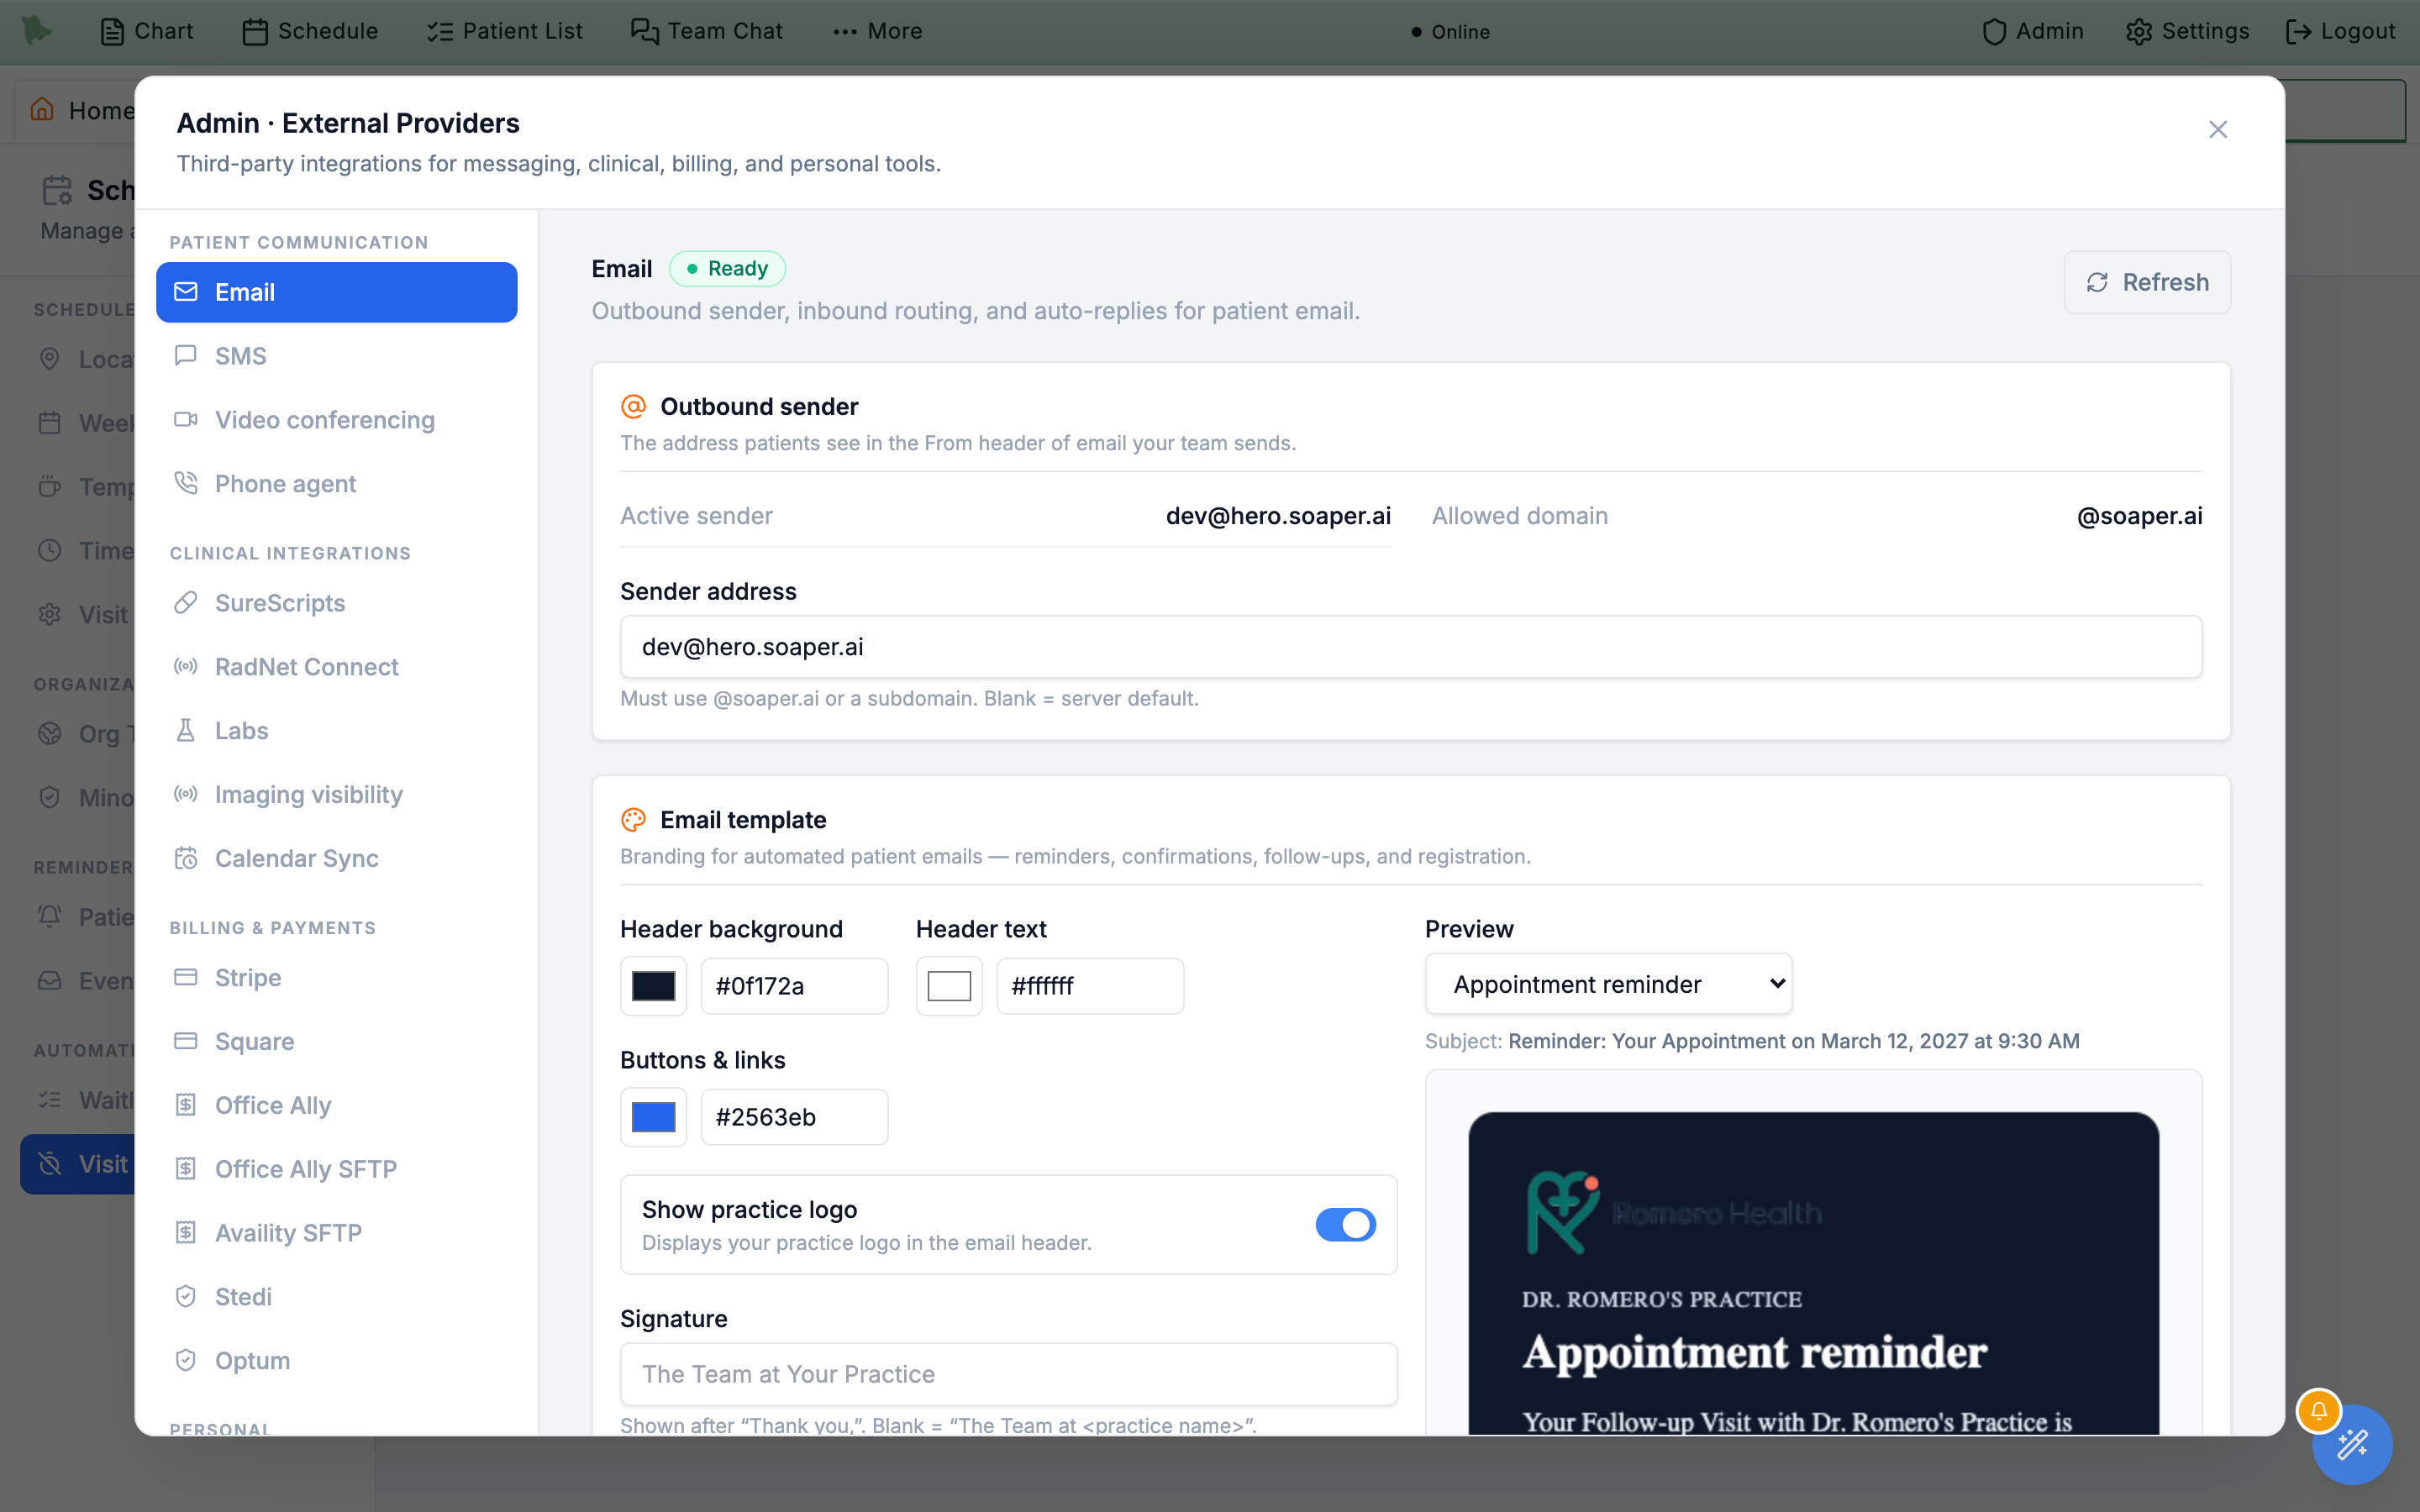
Sender address now reads “Must use @{domain} or a subdomain. Leave blank to send from Hero’s shared sender.” (was “Blank = server default.”), and a blank sender shows as Active sender: Hero’s shared sender.
?externalProvider=<tab> query string (e.g. ?externalProvider=stripe). Useful when sending a teammate to a specific integration. The older ?externalProvider=zoom link still works — it now lands on Video conferencing.
Admin > EPCS Enrollment & Access — see §4.10. Hero support configures approved connection credentials after enrollment; this tab has no credential-entry field.
Connect Stripe and set up billing for card payments, subscriptions, and balances
Stripe is the default payment processor for patient-facing card payments — copays collected at the front desk, cash-pay services, recurring memberships, balances posted from Billing, and card-on-file charges from the portal. Hero uses Stripe Connect, so each practice connects its own Stripe account. Payouts go directly to your bank; Hero never holds funds.
- Open
Admin > External Providersand pick the Stripe tab (under Billing & payments). Setup runs as a three-step card wizard. - Step 1 — Register your practice. Type your Legal entity name (e.g. Westside Family Medicine LLC) and click Create Stripe Account. The name is required; leaving it blank is refused with “Legal entity name is required before creating a Stripe account.” Nothing has left Hero yet at this point.
- Step 2 — Complete identity verification. Click Start Verification. This is the redirect into Stripe's hosted onboarding, which asks for business type, EIN, bank account, and a representative's SSN — the same onboarding any Stripe merchant does. Budget 5–10 minutes and have those details in hand. If Stripe has placed a hold, the reason prints on the card before the button.
- Step 3 — Go live. After you submit, the card reads “Verification submitted, awaiting Stripe approval.” Approval is usually minutes but can take days if Stripe pulls the account for manual review; click Refresh to re-check rather than restarting the wizard.
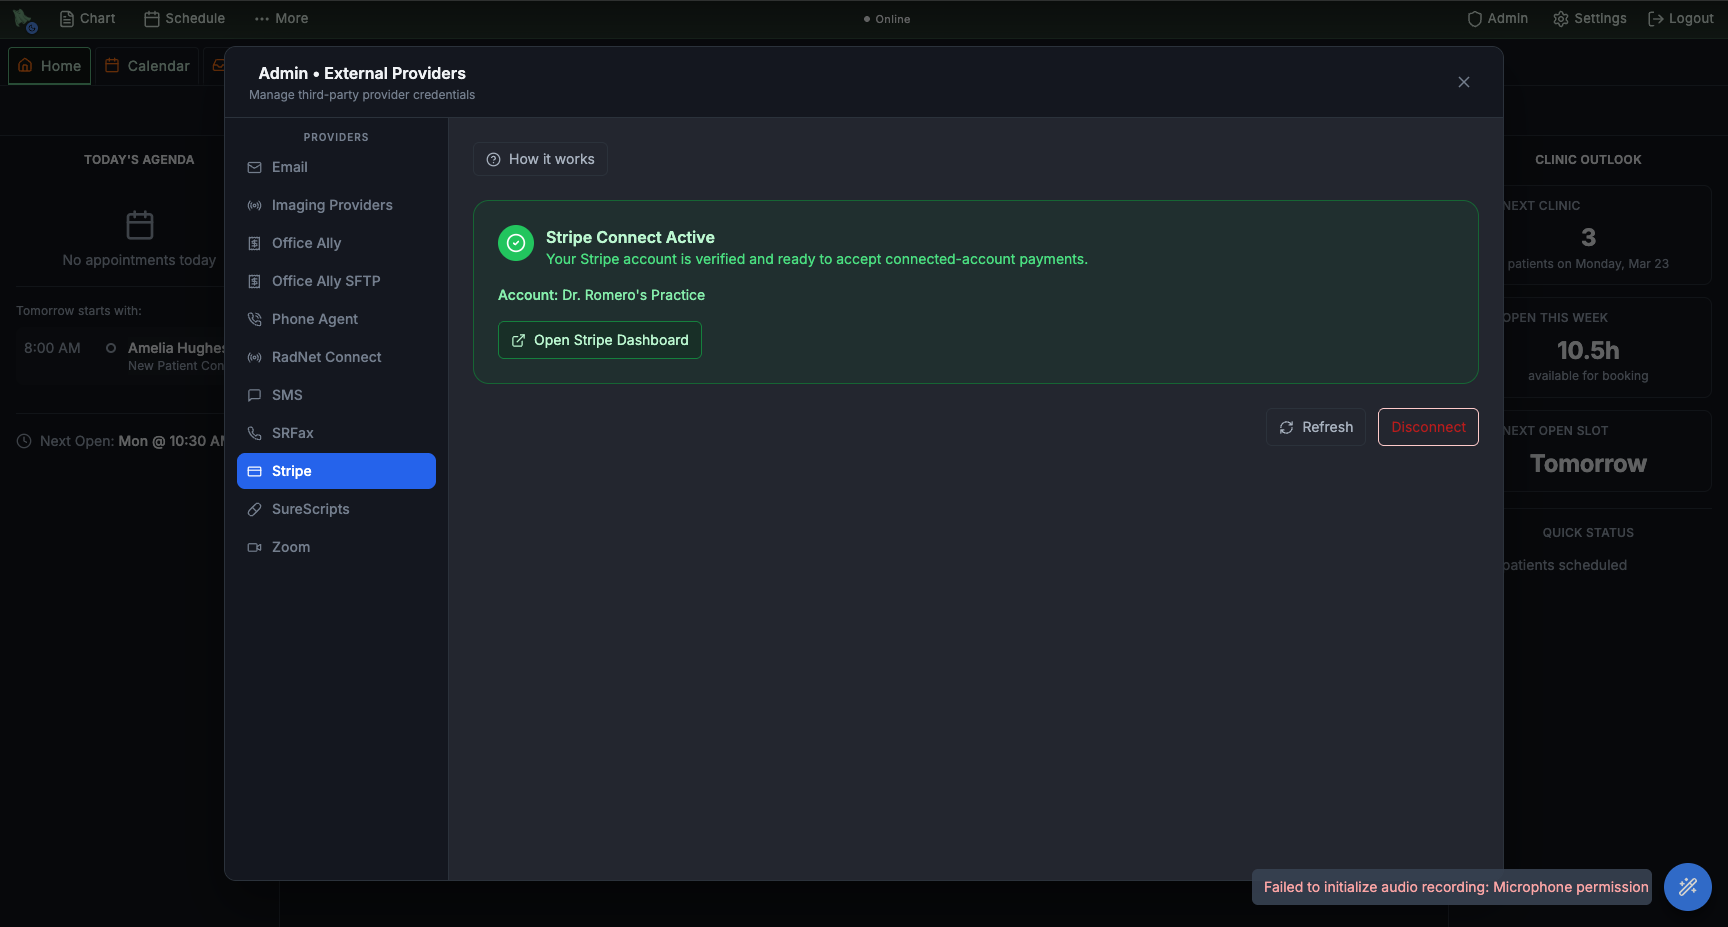
- Confirm Stripe Connect Active. The Stripe tab shows a green status badge with the connected account name (e.g. Dr. Romero's Practice) once Stripe has verified you.
- Open the Stripe Dashboard from Hero. Use the Open Stripe Dashboard button to review payouts, disputes, and refunds. Hero shows posted/refunded amounts in Billing, but Stripe is the source of truth for transaction-level detail.
- Disconnect to rotate. Use Disconnect if you need to attach a different Stripe account (e.g. merger, EIN change). Existing posted payments stay attributed to the original account; new charges land on the new one.
Admin > Kiosk → Payments, which Change in Kiosk settings opens (see Kiosk payments).
Set up the billing workflow after Stripe is active
Once the Stripe tab shows Stripe Connect Active, finish the billing configuration in Admin > Billing. Membership (DPC) and hybrid practices should publish their membership plans before inviting patients to enroll through the portal.
- Open
Admin > Billing. The Billing Command Center opens on the Dashboard. Confirm the practice name and payment model at the top, then use the left sidebar for configuration. - Set the Payment Model. Choose Insurance, Pure Cash, DPC (membership), or Hybrid Insurance + Cash. The switch dialog previews what changes before you confirm (see §5.1). Decide in Collections & Fees whether patients must keep a card on file.
- Price your services in the Service Menu. The Service Menu lists your visit types per provider — not products or plans. Give each its cash price, collection rule, and, in a DPC practice, its Membership coverage: Covered by membership or Cash only (members pay too) (see §5.3). There are no membership, enrollment-fee, or bundle items to add here.
- Create membership plans in Subscriptions. Each plan has a name, amount, billing interval (monthly or annual), an optional trial, and an optional plan group that pairs the monthly and annual versions; publish it to open enrollment. Plans aren’t attached to Service Menu items, and a membership starts when the patient completes enrollment. Enroll patients by texting, emailing, or copying the enrollment link (see §5.12).
- Set missed-appointment fees in Collections & Fees. No-show and late-cancellation fees come from the Missed Appointment Policy there (or a service’s own override) and land on the patient’s account when a visit is marked a no-show or cancelled late;
CPT List Pricesholds your price per billing code, not one-time fees. - Use Payments for verification. Post a small test charge or refund, then confirm it appears in Hero and in the Stripe Dashboard. Stripe remains the transaction-level source of truth for payouts, disputes, and refunds.
- Leave claims setup for insurance work. Only configure Claim Submission, Office Ally, Availity, Stedi, and payer enrollment when the practice is ready to submit insurance claims. A membership launch can start with Stripe, Service Menu, Subscriptions, and Payments first.
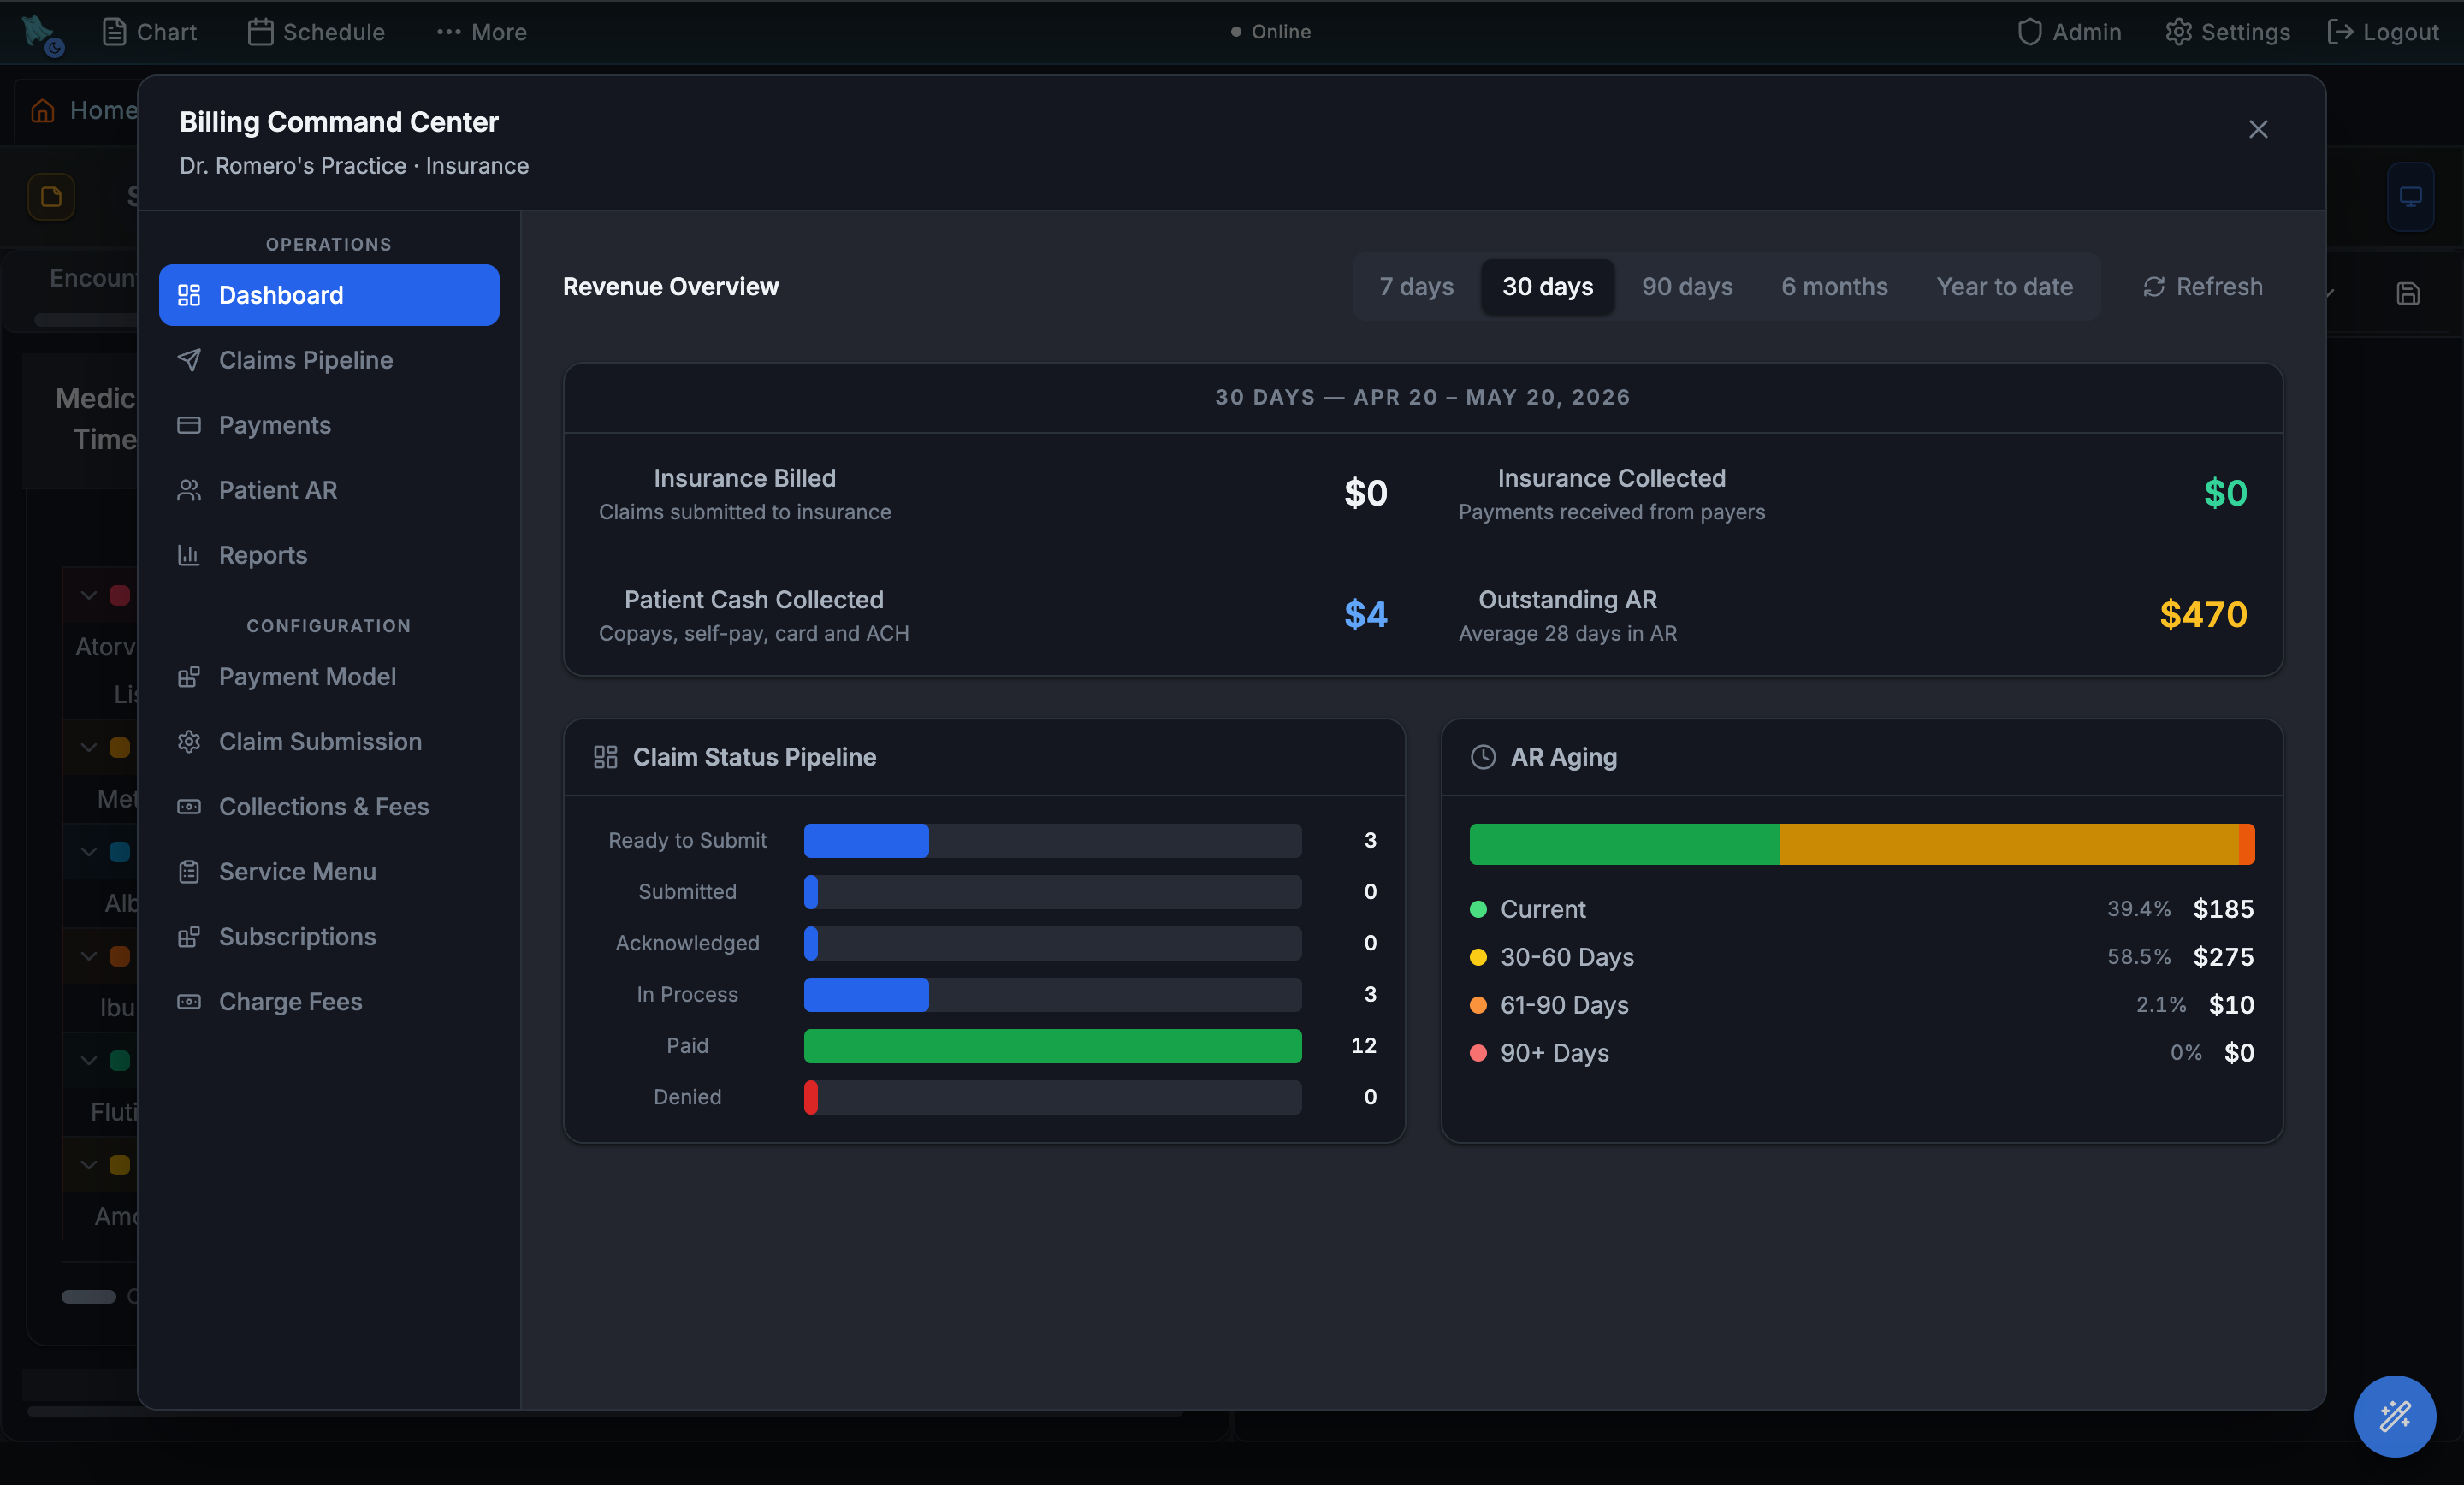
CPT List Prices (was Charge Fees), and Subscriptions sits under Programs.
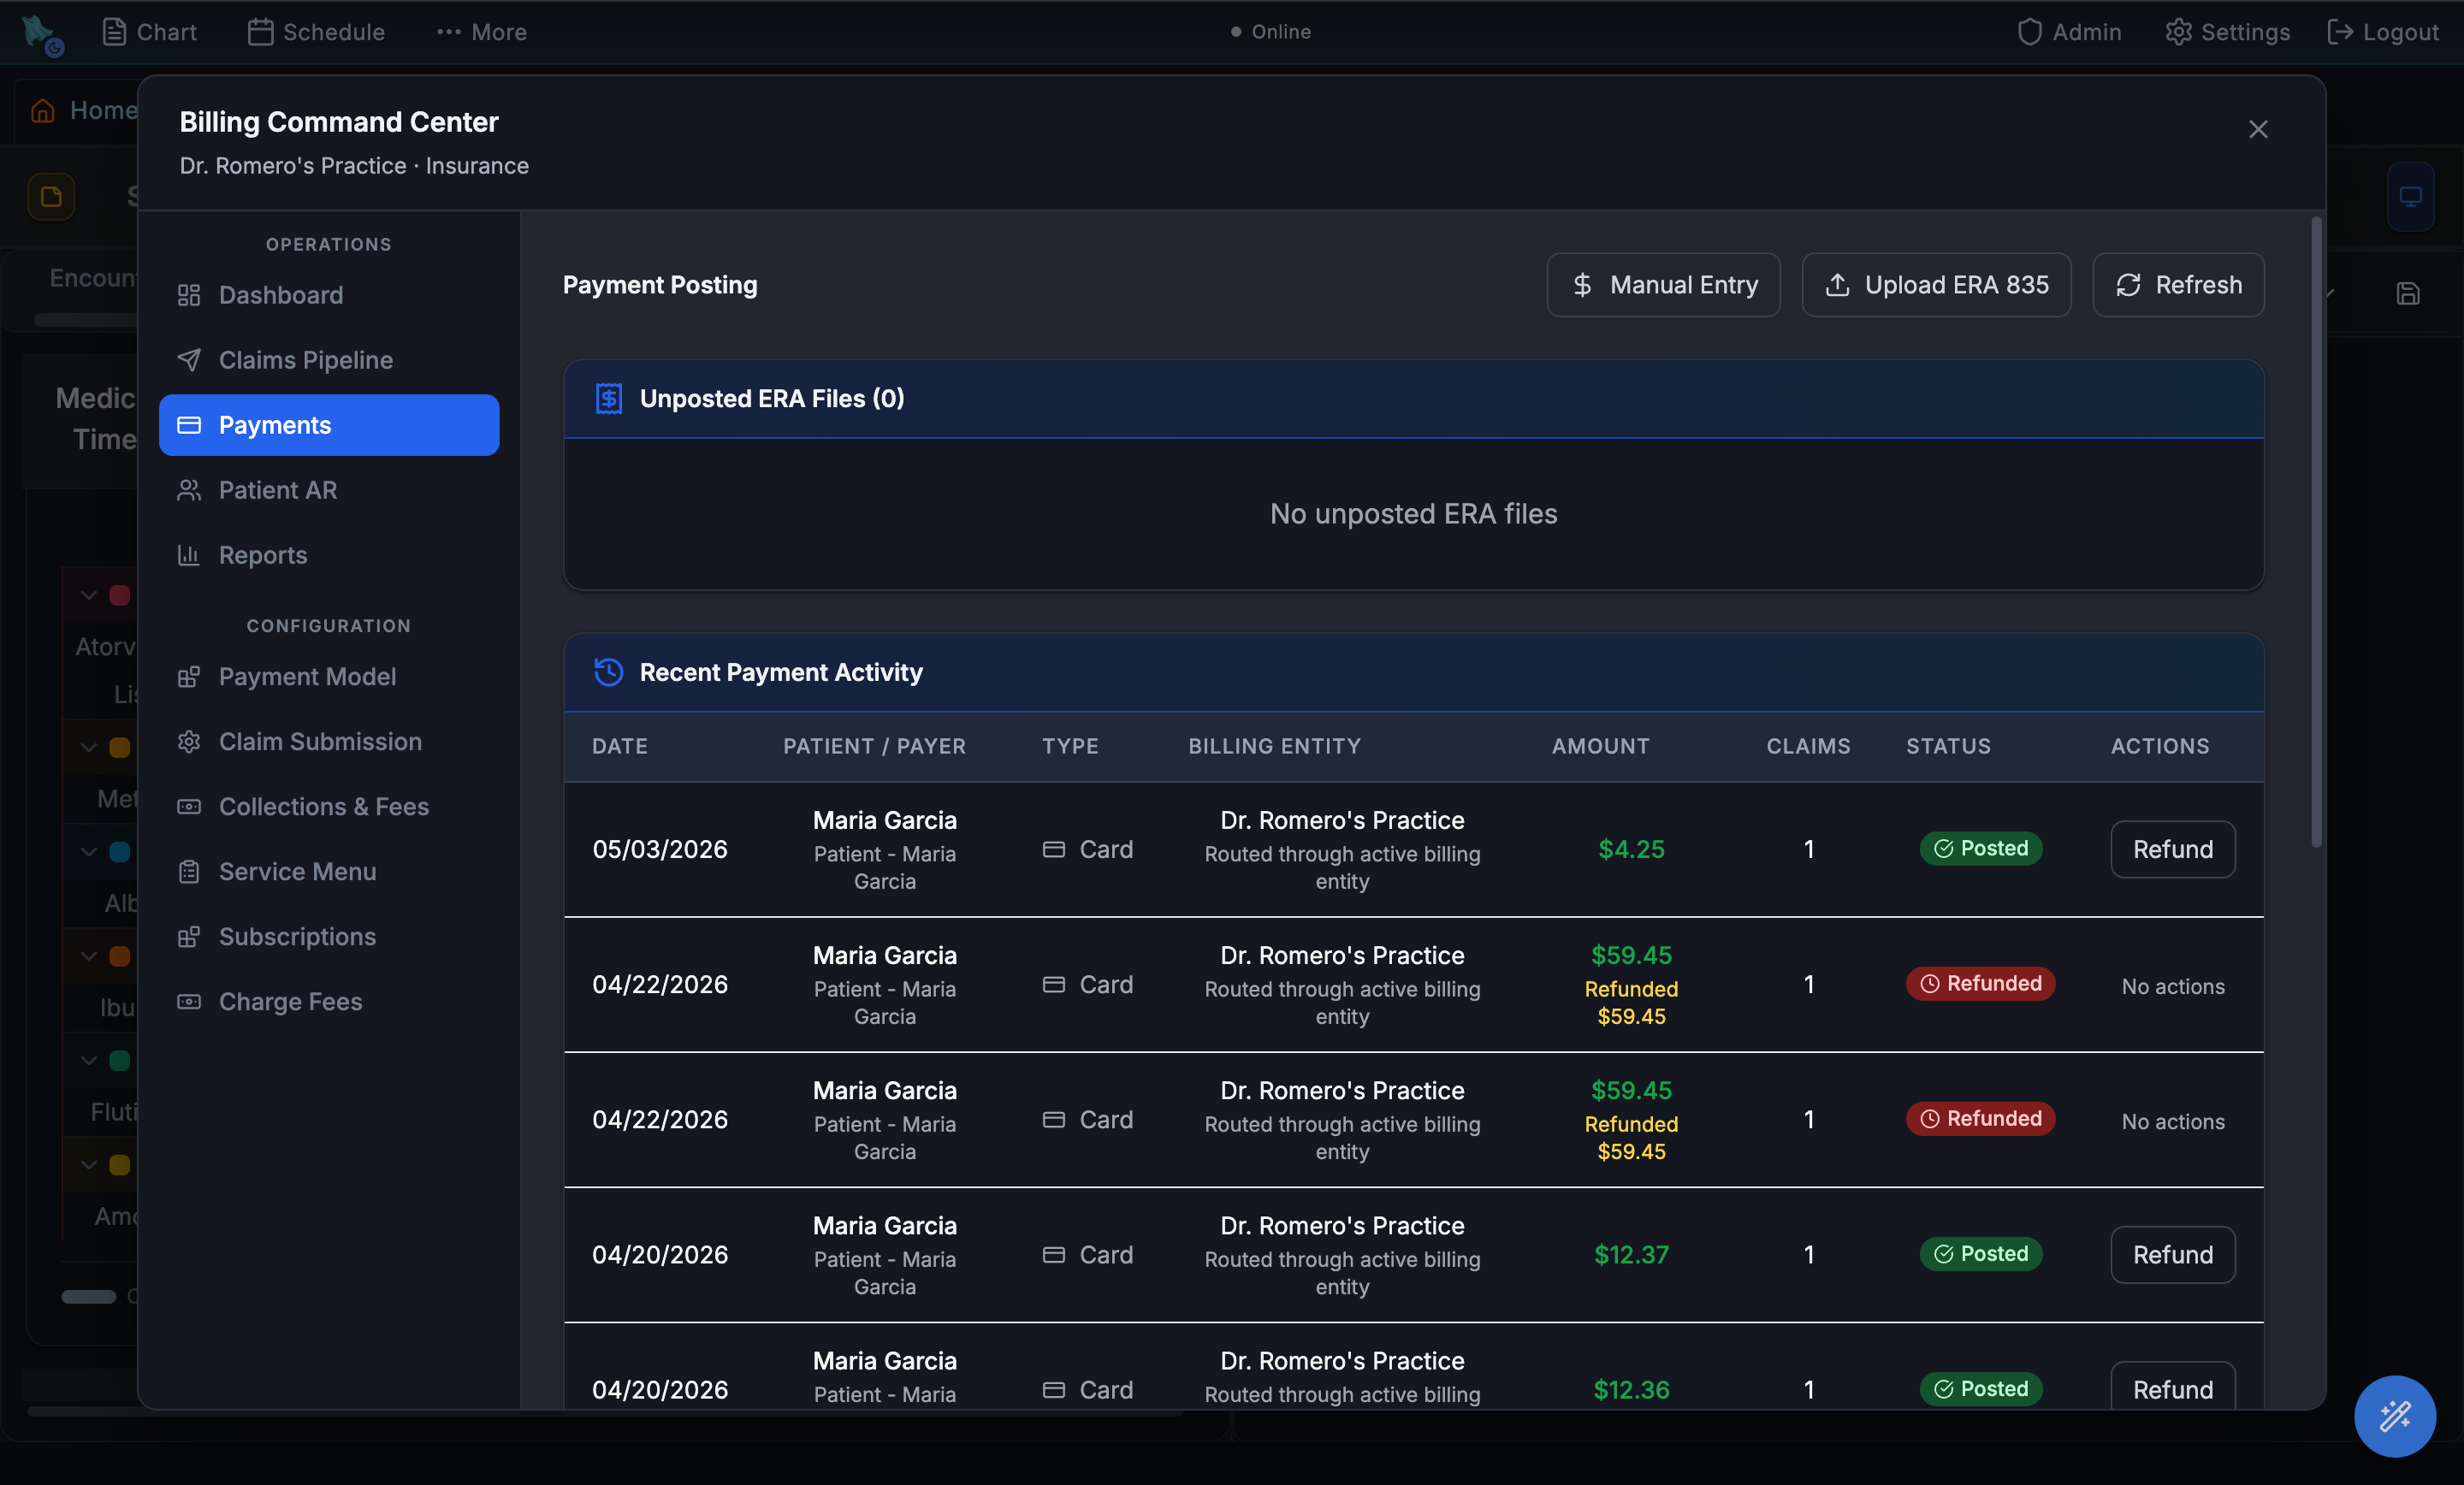
Post EOB button sits beside Manual Entry.
Set up SRFax for inbound and outbound fax
SRFax is the fax provider Hero EMR ships with. Use it to send referrals, prescriptions, and records to outside providers, and to receive faxes into the Inbox. Unlike Stripe or Office Ally, SRFax credentials are per user — each physician's SRFax account stays under their personal control — but the fax number you save also writes back to the org/physician fax-on-file fields used by claims and Practice Info.
- Create an SRFax account at secure.srfax.com. Pick a plan that includes the volume and number-porting features you need. If you have an existing fax number, ask SRFax to port it.
- Grab your credentials. Inside SRFax, go to My Account > Account Summary. Copy your account number (that's your Access ID in Hero) and use your SRFax login password as the API key.
- Open External Providers and go to SRFax. An admin finds it under
Admin > External Providersas the entry in the Personal group. A physician who is not an org admin sees a stripped-down version of the same modal — titled just External Providers, with no sidebar at all, showing only their own SRFax panel and their Calendar Sync. - Fill in the Credentials card. Enter Access ID, API key, Fax number (E.164 format, e.g.
15551234567), and an optional Sender email (used on the cover-page From line). - Click Verify & save. Hero hits the SRFax API with your credentials to confirm they work. If the fax number you entered differs from the one already stored on the org or physician record, Hero asks whether to overwrite or keep the existing number.
- Test by sending a fax. Open a chart, pick Send fax, choose any document, and address it to a known good fax number (your own phone, a service like faxzero.com, or a colleague). Confirm both delivery and inbox receipt.
- Disconnect to rotate. The credentials card locks once you're configured. To change them (password rotation, new SRFax account), click Disconnect, then re-enter and re-verify.
For admins, SRFax sits under Personal in the sidebar shown in §4.6 External Providers — the same screenshot above shows its position. Because credentials are per user, each physician has to complete this once for their own account; an admin cannot fill it in on their behalf.
Turn on SMS for reminders and patient replies
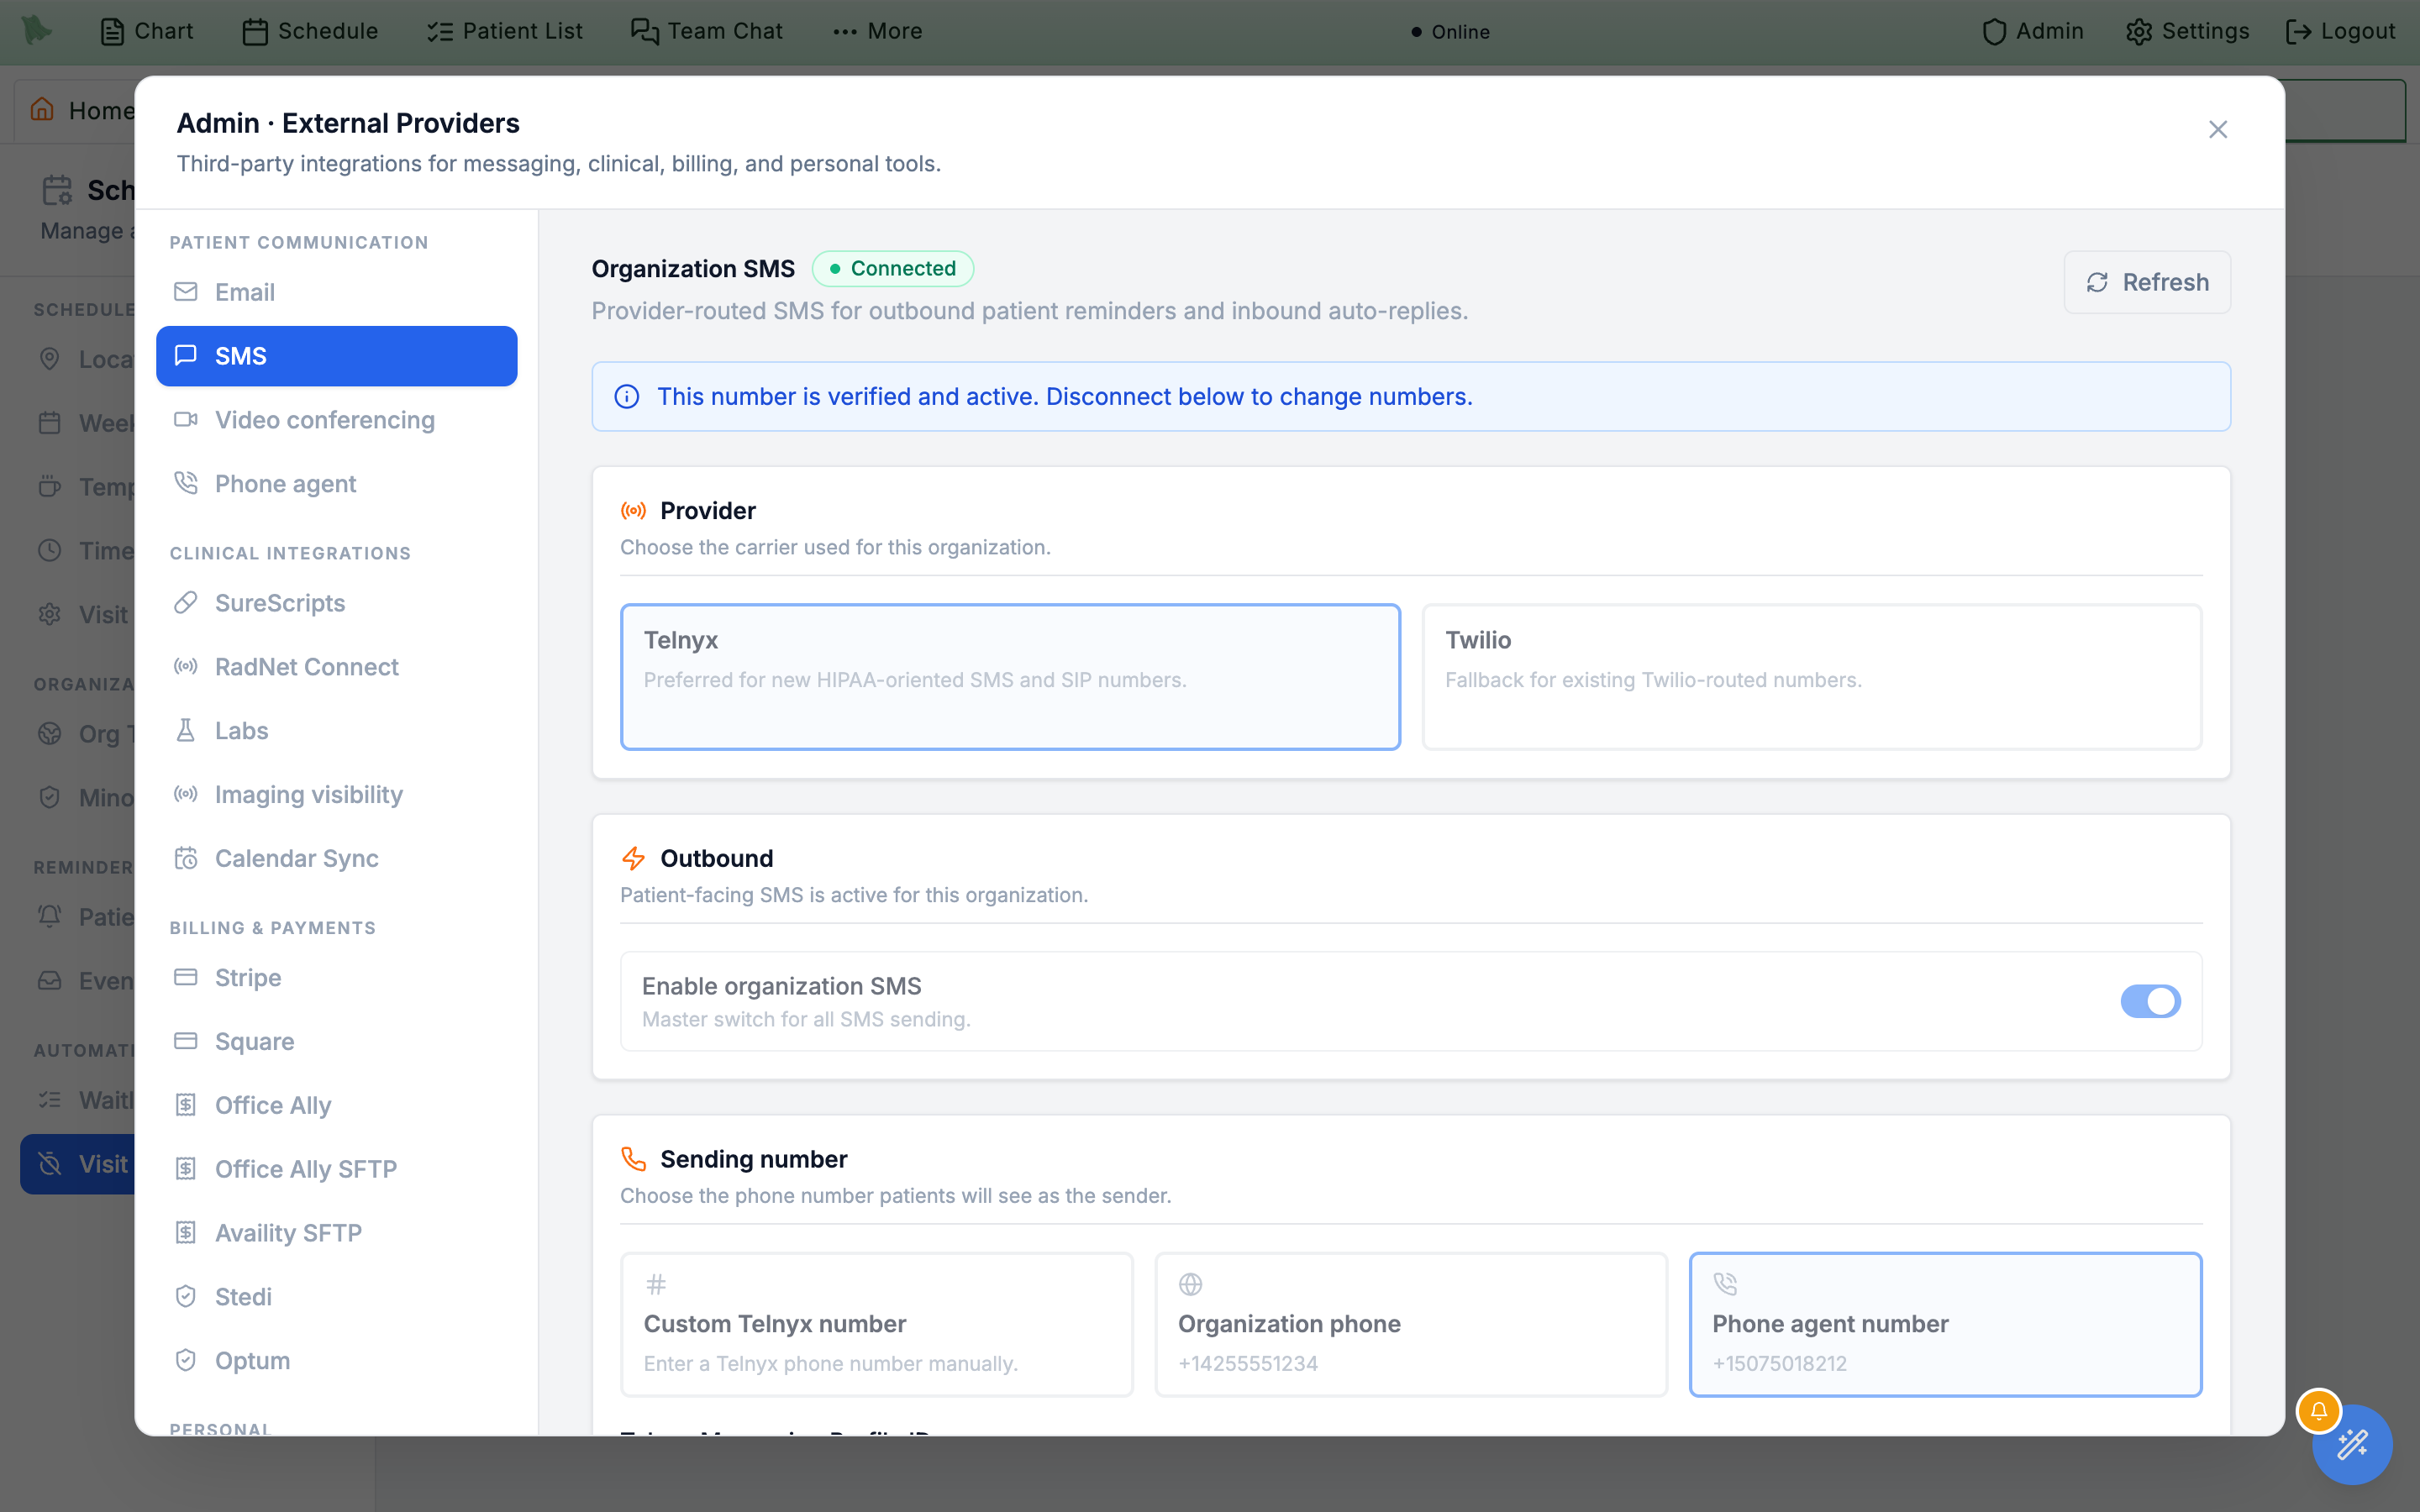
SMS powers appointment reminders, waitlist notifications, and two-way patient threads in the Inbox. The SMS tab in External Providers picks the carrier and the number SMS comes from, and holds the optional auto-replies and FAQ responder that fire on inbound texts. Configure SMS once at the org level; Scheduling > Patient notifications controls who receives what.
- Open
Admin > External Providers > SMS. If SMS hasn't been set up, the tab header shows Not configured. - Choose the carrier. The Provider card offers Telnyx (“Preferred for new HIPAA-oriented SMS and SIP numbers”) and Twilio (“Fallback for existing Twilio-routed numbers”). Pick Telnyx unless you are keeping a number that already routes through Twilio. Your choice renames the option below and, on Telnyx, adds a required Telnyx Messaging Profile ID field.
- Pick a phone-number source. Three options on the card:
- Custom Telnyx number / Custom Twilio number — the label follows the carrier you picked. Type an E.164 number (e.g.
+15551234567) provisioned on that carrier. - Organization phone — reuse the org phone from Practice Info.
- Phone agent number — share the same number as the Hero Phone Agent (only if the agent is enabled and configured).
- Custom Telnyx number / Custom Twilio number — the label follows the carrier you picked. Type an E.164 number (e.g.
- Set Inbound auto-replies (optional). Three fields — No patient match, Multiple patient matches, and Matched and routed — cover the three ways an inbound text can land. All three start empty: the greyed-out sentence in each box is placeholder text showing the shape of a good reply, not a default that will be sent. A blank field means Hero sends nothing at all for that case. Write your own wording if you want patients to get an acknowledgement.
- Consider the FAQ auto-responder. Further down, Enable FAQ auto-responder lets Hero text back answers to common, non-clinical questions — hours, address, appointment logistics — before they reach the Inbox. Add each pair with Add FAQ (Question / topic plus the Answer that gets texted), tick Active per entry, and click Save FAQ settings. Only a confident, non-clinical match is answered; anything uncertain or clinical falls through to the Inbox untouched.
- Click Verify number & configure webhook. Hero confirms the number is reachable, registers an inbound SMS webhook with the carrier, and flips the status to Active. Once verified, the number fields lock and the button becomes Save settings; use Disconnect to change numbers.
- Toggle Enable organization SMS. The master switch. Patients won't receive SMS at all until this is on, regardless of per-physician reminder policies.
- Test from a patient chart. Open any patient with a verified mobile, send a test message from the Inbox, and confirm both delivery and inbound reply routing.
- Run the STOP drill before go-live. Expand Test unsubscribe webhook, enter a phone you control, click Send test, reply
STOPfrom that phone, then click Verify unsubscribe. The summary should flip from “Waiting for verification” to “STOP received.” If it doesn't, inbound webhooks are not reaching Hero and opt-outs will be silently ignored — a carrier-compliance problem, not a cosmetic one. The panel only appears once the number is verified.
Enroll physicians for controlled-substance e-prescribing
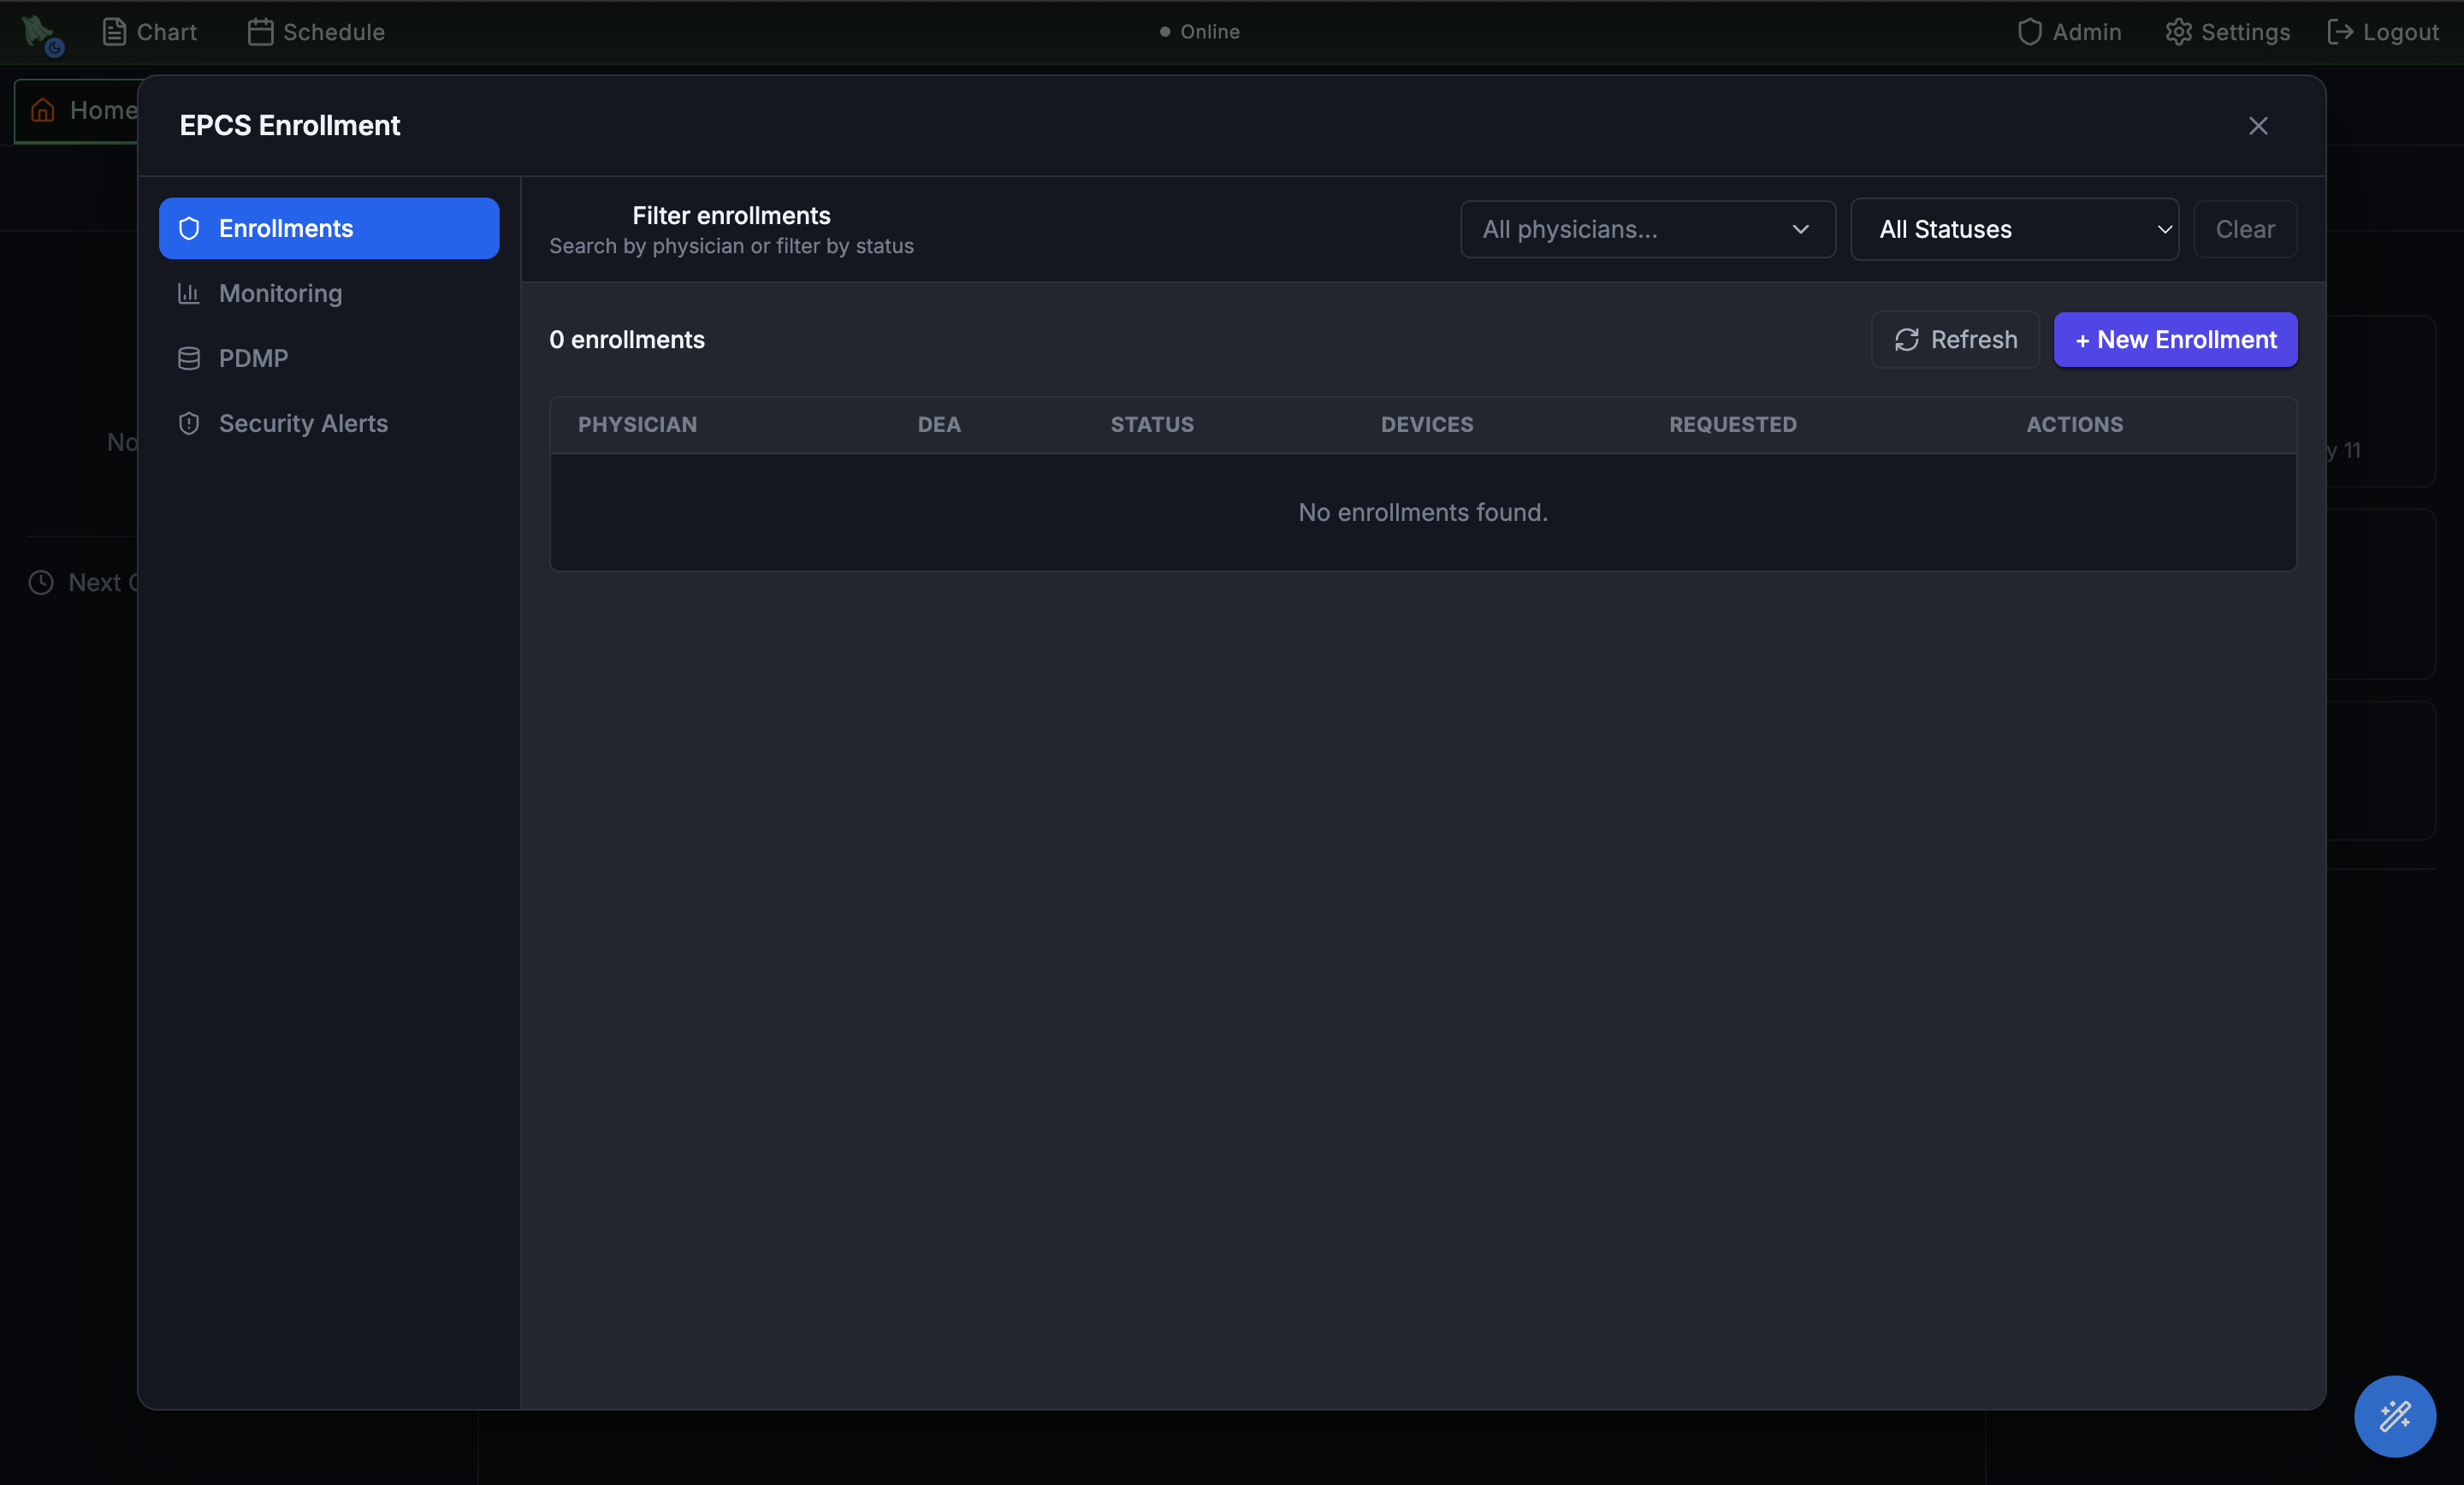
EPCS (Electronic Prescriptions for Controlled Substances) is the DEA-regulated workflow for prescribing Schedule II–V drugs electronically. Each prescribing physician enrolls separately: an admin creates the request and records identity proofing, a second admin countersigns it, and the physician then binds a signing device by registering a passkey. Once the enrollment reaches Active, that bound device is the physician's second factor when they sign controlled prescriptions inside Hero. The EPCS modal also configures PDMP (state-mandated controlled-substance database) checks per state.
- Open
Admin > EPCS Enrollment & Access. The modal opens to the Enrollments tab with a list of in-flight and completed enrollments. - Click + New Enrollment. Pick a physician (must already exist in Physician Management with a valid DEA) and confirm the DEA Number — Hero prefills it from the physician's identifiers and refuses a value that disagrees with the record on file.
- Record the Identity Proofing result. The dropdown offers Pending, Verified, or Failed. Identity proofing itself happens outside Hero; this field is where the admin records the outcome for the audit trail, so don't set it to Verified until you have the evidence in hand.
- Set the Privilege Template. Full Prescriber enables all five EPCS privilege flags; Enter Only allows draft entry with no signing or transmitting rights; Custom lets you tick the Privilege Matrix by hand. The five flags are Enter (create controlled draft orders), Alter (modify existing drafts), Ready (mark ready for sign), Sign (apply the EPCS signature), and Transmit (send to the pharmacy) — so this choice decides whether the clinician can only draft controlled orders or can actually sign and send them. At least one flag is required.
- Get a second admin to countersign. The new request lands as Requested. One admin clicks Approve to record the first approval, which moves it to Pending 2nd Approval; a different admin then clicks Second Sign and completes passkey verification. Only after that does the enrollment become Waiting Device. Revocation follows the same two-person path — Revoke records the first approval, and a different admin must click Second Sign Revoke before access is actually removed.
- Issue the device invite. On a Waiting Device row, click Issue Invite. Hero generates a one-time invite token with an expiry plus an app deep link, and offers Copy Token and Copy Link. Send the link to the physician through a channel you trust — it is what binds their signing device.
- Have the physician bind their device. Opening the link on their phone launches Hero EMR, where they sign in and register a passkey (Face ID / Touch ID / device unlock) against the invite. The bound device then shows in the Devices column as iPhone/iPad, Android Device, Web Browser, or Passkey Device, and the enrollment flips to Active. One bound device is enough — the status is Waiting Device, singular. If a phone is lost or replaced, use Lost Phone to revoke the active devices and issue a fresh invite in one step.
- Confirm with Test Device. On an active row, this sends a fictitious approval request to the prescriber's phone so you can confirm the approve/deny prompt works before a real controlled prescription depends on it. The result stays on the row rather than vanishing with a toast.
- Switch to Monitoring for active enrollments. Shows recent EPCS signing activity per physician — useful when compliance or DEA audits ask for a log.
- Configure PDMP per state. Each state mandates which substances trigger a PDMP check and how recently. The PDMP tab lets you flip rules (e.g. CA controlled substances, KY HB1, OH OARRS) on or off, and enforce Require PDMP check for controlled prescriptions or Require reason override when a check is skipped.
- Review Security Alerts. Hero surfaces unusual signing events (new device, new geo, off-hours) for follow-up. Investigate any alert flagged in red.
PDMP signup and EHR connection
Open Admin > EPCS Enrollment & Access > PDMP for PDMP settings and signup instructions. Each prescriber needs an active state PDMP account, and the practice needs separate approval for EHR integration. Completing EPCS enrollment does not enroll you in the PDMP.
Illinois: register for ILPMP and request PMPnow integration
- Register the prescriber. Open ILPMP registration and select Prescriber. Complete the application with your name, practice address, DEA number, Illinois license information, and business phone. If you already have an account, sign in or recover it through ILPMP.
- Request your practice connection. Email DHS.DBHR.PMPnow@illinois.gov to request PMPnow integration. Identify Hero EMR as your EHR and ask the team to confirm the available integration route. Contact the team for changes to an existing EHR connection too.
- Complete Illinois onboarding. Attend the required educational session, complete the Memorandum of Understanding (MOU), and submit the facility and provider template supplied by the PMPnow team. Integration can proceed after the required materials are approved.
- Coordinate activation with Hero. Contact Hero support with the approval or onboarding reference so we can coordinate connection setup and validation. Share connection secrets only through a secure channel arranged with support. Use the ILPMP website for direct access while integration is pending.
State approval and integration availability must be confirmed before activation. For other states, follow your state PDMP’s enrollment and EHR integration process with Hero support.
Official Illinois instructions: PMPnow integration and ILPMP FAQs.
Sync your schedule with Google Calendar or Outlook
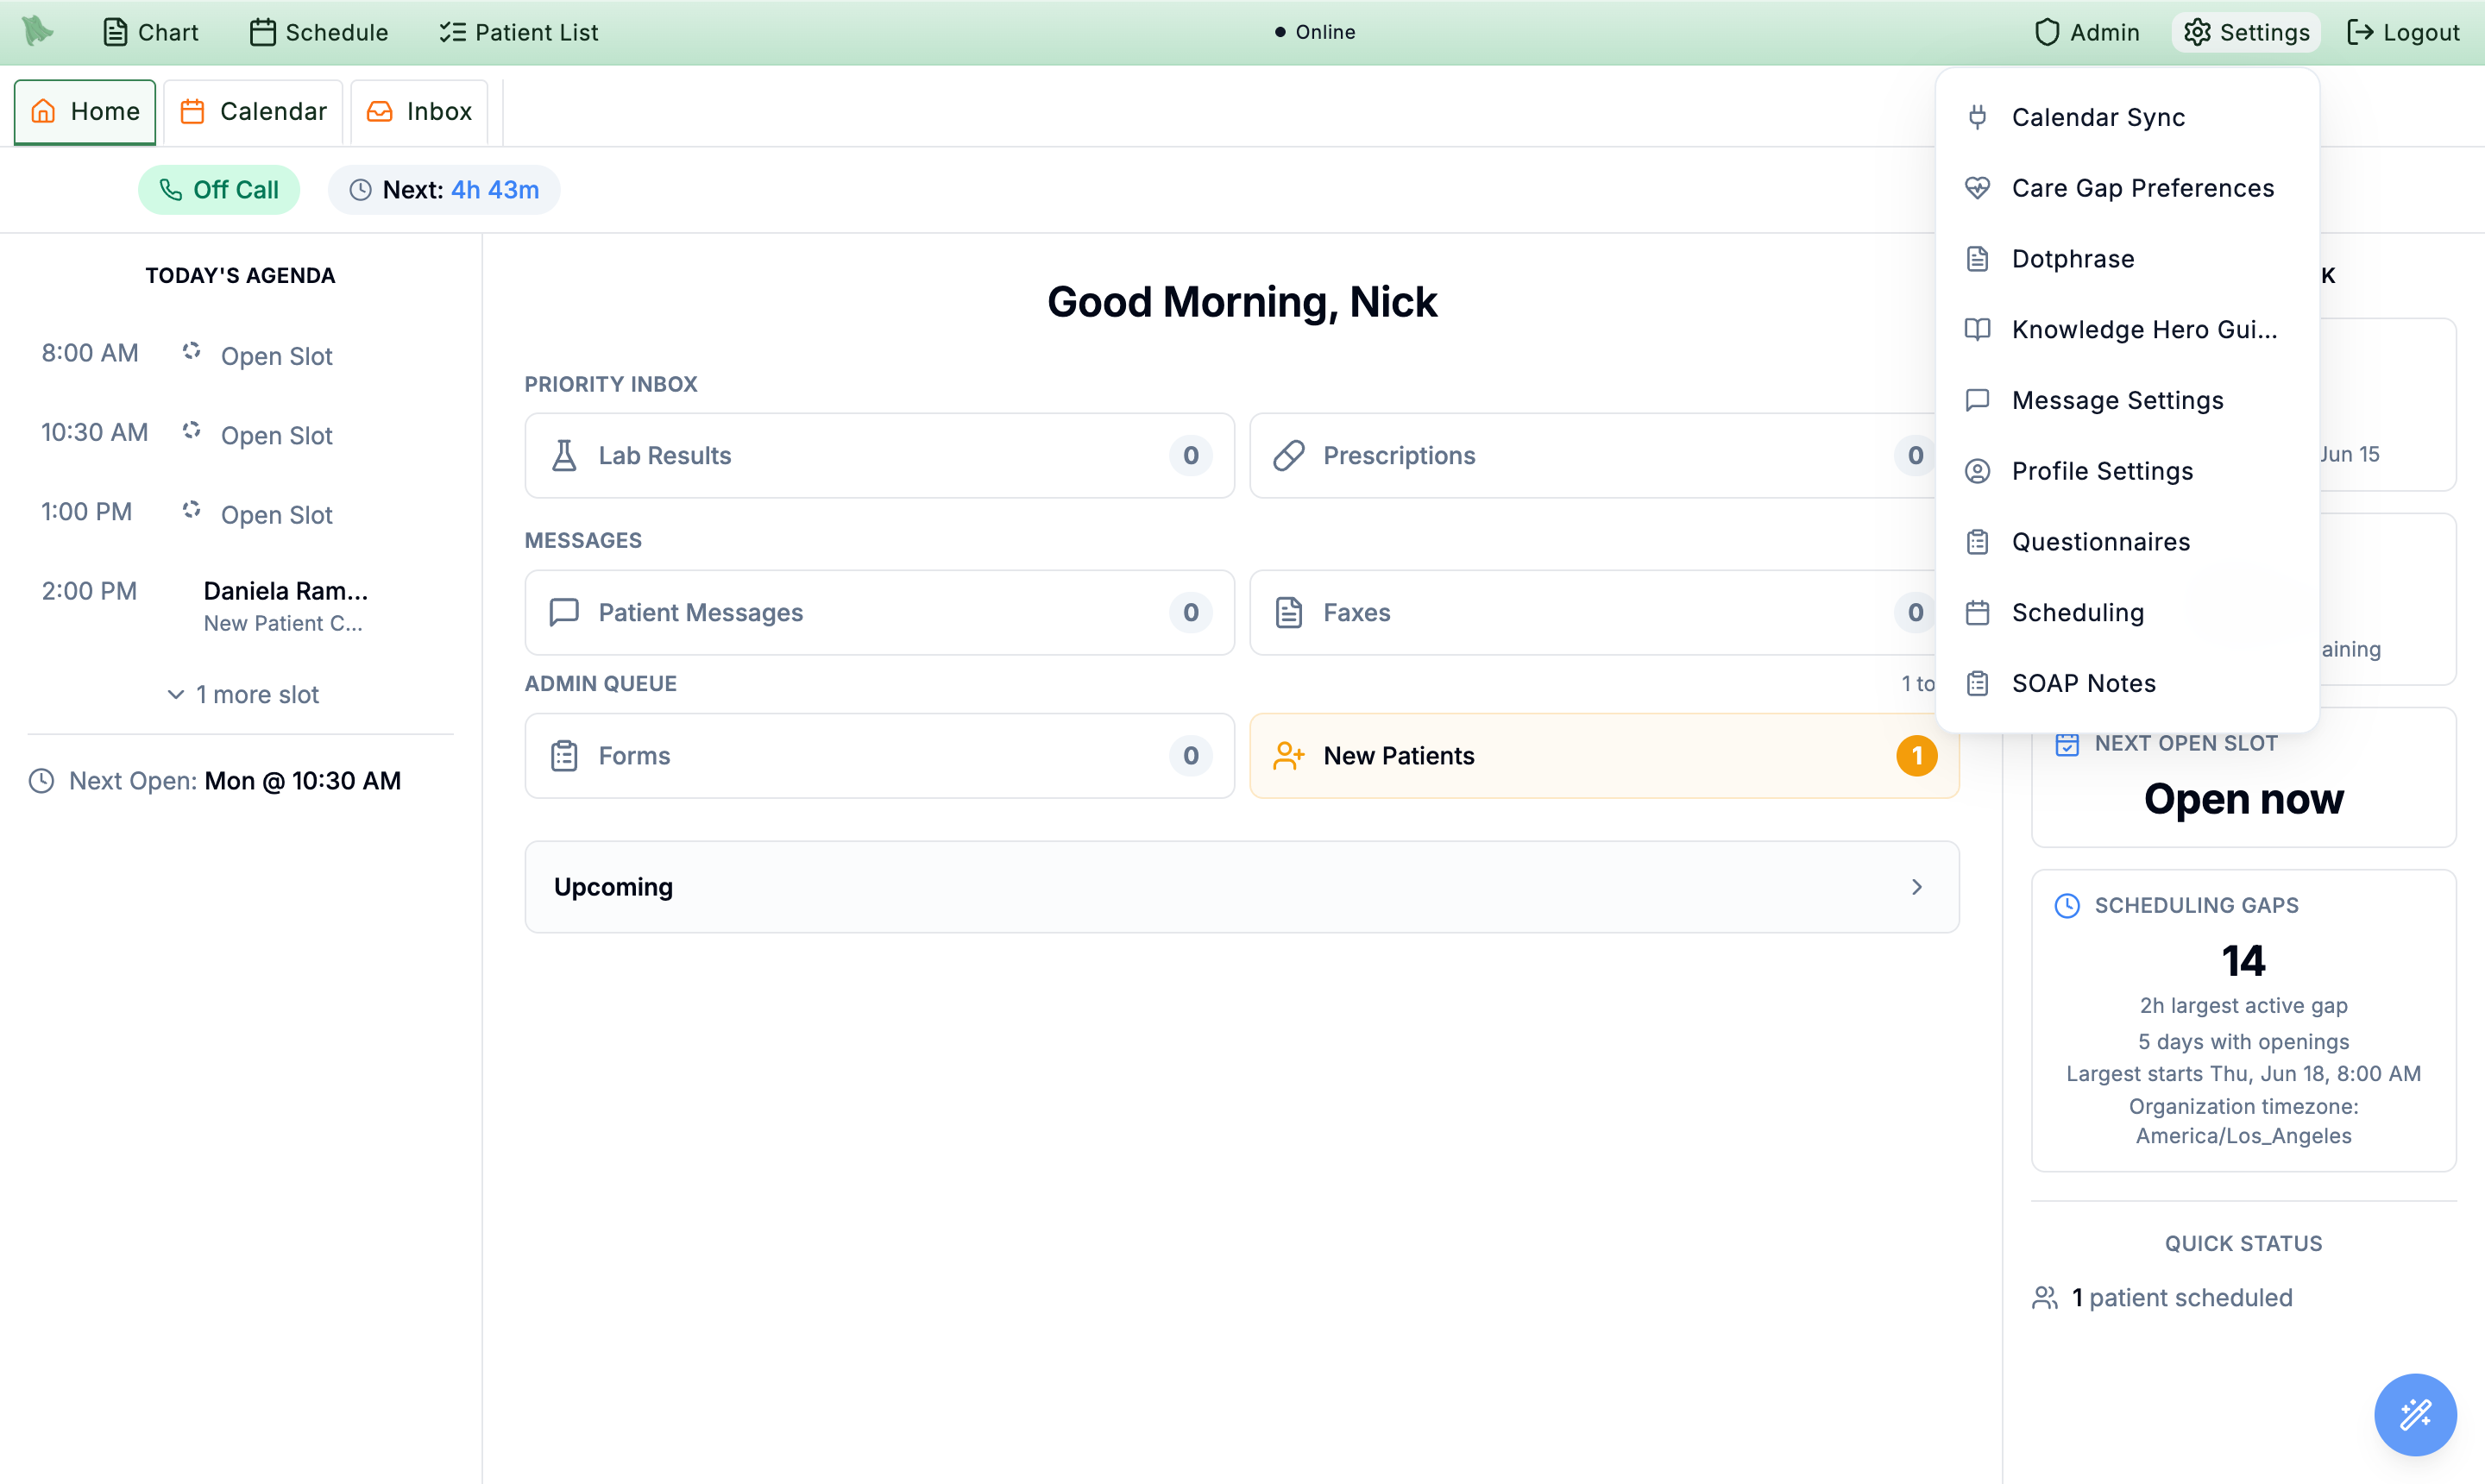
Calendar Sync links a clinician’s own Google Calendar or Outlook / Microsoft 365 account to Hero so the EMR schedule and their outside calendar stay aligned — outside commitments block time on the Hero schedule, and (optionally) Hero visits appear on the personal calendar. Unlike the other items on this page, Calendar Sync is per-clinician self-service: every clinician connects their own calendar from the toolbar Settings (gear) → Calendar Sync menu. Admins can also reach the same panel through Admin > External Providers, but there is no org-wide “connect everyone’s calendar” switch — each clinician authorizes their own account.
Two independent directions of sync are available, and they default differently:
Import (default ON)
Pulls busy events from your external calendar and blocks that time on the Hero schedule. Each blocked window is created as time off labeled with the outside event’s own title (plus its description when the two differ), so read the warning below before connecting a calendar that holds sensitive titles. Events you have marked Free are skipped entirely.
Export (default OFF)
Pushes your Hero scheduled visits into a dedicated SoaperEMR calendar in your linked account. This carries PHI, so turning it on requires acknowledging a PHI/BAA warning first.
Include full appointment details (PHI)
An optional export toggle. Off, exported events show busy time only. On, they add patient names and visit reasons to the events in your outside calendar.
- Open Calendar Sync. Click the toolbar
Settingsgear and chooseCalendar Sync. (Admins can also openAdmin > External Providersand pick the Calendar Sync tab.) - Connect a provider. Each provider card — Google Calendar and Outlook / Microsoft 365 — has a
Connectbutton that sends you through that provider’s OAuth consent screen. Sign in with the account you want to sync and approve the requested calendar access; you’re returned to Hero with the card now showing your connected account. - Choose what syncs. On the connected card, Import busy time is on by default — and imported blocks carry the outside event’s title onto your Hero schedule, so review the warning below before you leave it on. Leave Export visits off unless you want Hero visits on your outside calendar — turning it on opens a PHI/BAA confirmation you must acknowledge. If you enable export, decide whether to also turn on Include full appointment details (PHI); otherwise exported events stay busy-time only.
- Keep it in sync. Sync runs automatically in the background once connected. Click
Sync nowto force an immediate pass, orRefreshto re-read the current connection status. A Reconnect required badge means the authorization expired or was revoked at the provider — clickConnectagain to re-authorize. - Disconnect when needed. Click
Disconnectto stop syncing and unlink the account. The confirmation warns that imported busy times will stop blocking your availability — those blocks are removed from the Hero schedule — and that exported appointments will no longer be updated. If you have ever exported, the same dialog offers a checkbox, Also delete exported appointments from <provider>, which removes theSoaperEMRcalendar and every appointment Hero put in it. This is your only chance to use it: disconnecting revokes the access Hero needs to clean up later, so anything you leave behind stays in that calendar permanently.
Settings gear — not from an org-wide admin switch.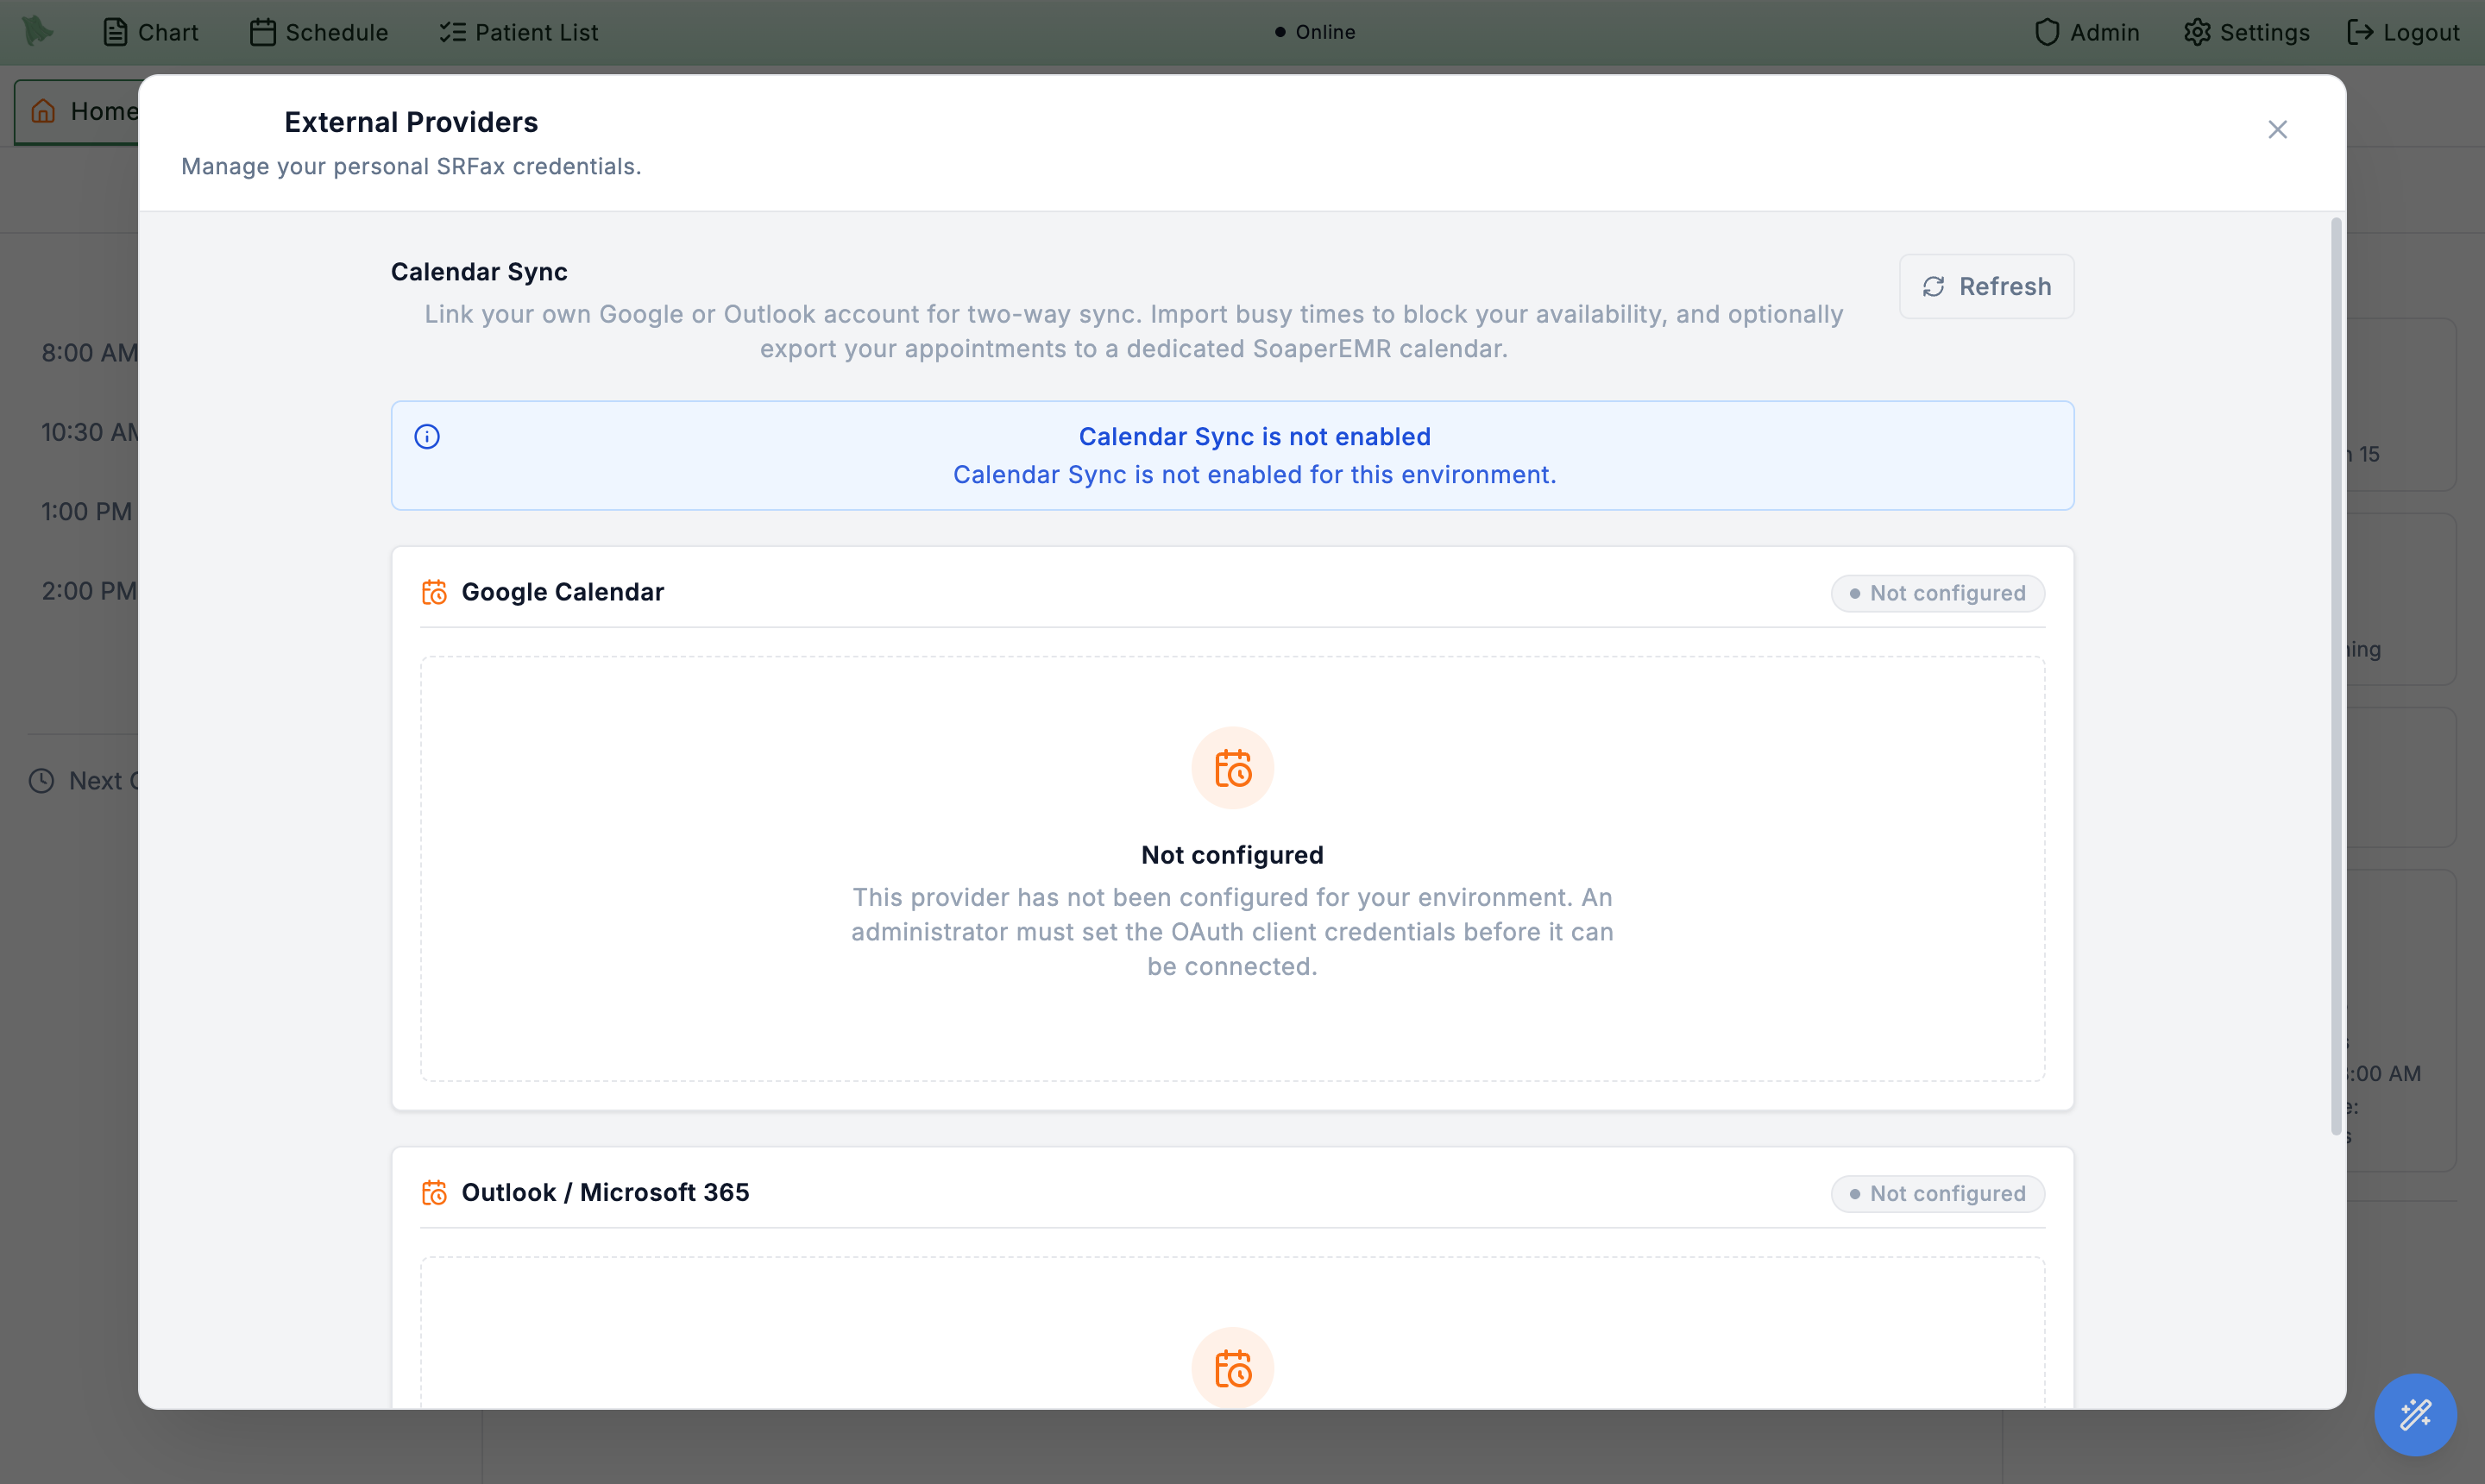
Once OAuth is configured, the connected card replaces the Not configured state with your linked account name, the Import busy time / Export visits / Include full appointment details (PHI) toggles, and the Sync now, Refresh, and Disconnect controls. Enabling export raises the PHI/BAA confirmation dialog described above before any visit data is pushed.
Need help? Email support@heroemr.com.