Billing setup
Configure how charges are priced and applied, layer by layer: organization defaults, service-level overrides, per-patient exceptions, the code prices and payer rates insurance claims bill, and the simulator that previews the result.
Billing setup
Configure how charges are priced and applied, layer by layer: organization defaults, service-level overrides, per-patient exceptions, the code prices and payer rates insurance claims bill, and the simulator that previews the result.
Find billing configuration and learn the three layers
All billing configuration lives in the Billing Command Center (Admin > Billing). The left sidebar groups screens into Operations (day-to-day work), Programs, and Configuration (setup). Everything in this part lives under Configuration, and the cash price and collection rules resolve through the same three-layer hierarchy. Insurance claims are priced separately, from your code prices and payer rates (§5.4b).
- Open
Admin > Billing. The Command Center opens on the Dashboard; when you come back to it in the same browser tab, it reopens the page you were on. Confirm the practice name and payment model in the header (for example, Dr. Romero's Practice · Insurance) — the payment model decides which configuration tabs appear. Other ways in are described in §5.7. - Find the Configuration group in the sidebar. It holds
Payment Model,Collections & Fees,Service Menu,CPT List Prices,Negotiated Rates,Claim Submission,Billing Identity,Rules & Overrides, andSimulator.Subscriptions(memberships) sits under Programs, next toAPCMand, when your practice turns them on,RPMandMaternity. - Learn the three layers. Collections & Fees sets the organization default; the Service Menu adds per-service overrides; a patient’s
Custom Billing Rulesadd per-patient exceptions. Each layer only changes what it explicitly sets — anything left on Use organization default inherits from the layer above. - Know what the payment model hides. Insurance, Hybrid Insurance + Cash, and Not Set show every tab. Pure Cash hides
Claims Pipeline,Negotiated Rates, andRules & Overrides; DPC also hidesCPT List Prices.Billing Identityshows in every model, because superbills print its NPI, tax ID, and address. When the model hides a tool you are allowed to use, the sidebar footer offersShow all tools(see §5.7). - Switch the payment model with the preview. Choosing a new model on
Payment Modelopens “Switch to DPC?” (or the model you picked) — “Review what changes before you switch.” While it reads Checking what changes… nothing can be saved. For DPC it lists, as they apply: the billing-type rules it turns off (they are kept, so you can turn them back on in Collections & Fees), whether a membership plan is published yet (until one is, patients can’t book membership-covered visits online; staff can book them with a recorded override unless staff membership exceptions are off), how many upcoming visits without charges it re-prices (visits that already have charges keep the terms they were booked with), patient cash rates that no longer apply, and “Existing payments and claims are kept.” Confirm withSwitch to DPC. If the preview can’t load, the switch stays disabled withRetry. Switching away from DPC says “Upcoming visits keep the terms they were booked with.” Switching into DPC or Pure Cash while patient-responsibility billing is on (§5.2) adds “Turns off automatic patient-responsibility collection (it follows insurance claims): no new estimate pre-charges and no charges after an insurer pays. Balances already billed and payment reminders continue.” The banner after a switch sums it up — for example “Switched to DPC. Turned off automatic patient-responsibility collection. Re-priced 2 upcoming visits.”
CPT List Prices (was Charge Fees) and Rules & Overrides (was Auto Modifiers), and Subscriptions moved from Configuration to Programs.
The Configuration tabs
- Payment Model — Insurance, Pure Cash, DPC, or Hybrid Insurance + Cash; decides which tabs apply.
- Collections & Fees — organization-wide collection, fee, guard, statement, and reminder defaults.
- Service Menu — per-service pricing and collection overrides.
- CPT List Prices — your practice’s price for each CPT or HCPCS code, used by insurance claims without a payer rate and by cash visits without a visit price (§5.4b).
- Negotiated Rates — each payer’s contract rates, plus the rates Hero learns from that payer’s payments; claims and patient cost estimates use them first (§5.4b).
- Claim Submission — how claims are sent (the route card), claim-file channels, and drug NDC defaults.
- Billing Identity — each clinician’s billing NPI, tax ID, and address for claims and superbills; filter by Needs setup and show or hide inactive clinicians.
- Rules & Overrides — billing code rules that adjust codes, modifiers, units, or place of service automatically, plus any legacy auto modifiers, each for all clinicians or one.
- Simulator — a full-lifecycle dry run of a visit from booking through payer response.
The three layers
- Organization default — Collections & Fees. The baseline for every visit and patient.
- Service override — Service Menu. Per provider + visit type.
- Patient exception — Custom Billing Rules. Per individual patient.
- Most specific wins — a patient rate beats a service price, which beats the org default.
Set organization billing defaults in Collections & Fees
Collections & Fees is the organization-wide baseline — the rules applied to every visit and every patient unless a service or patient overrides them. A Live summary across the top recaps the current posture (payment model, default collection, billing-type rules, missed-appointment fees, outstanding-balance guard, saved card) so you can see the effect of your changes at a glance.
- Default pre-visit collection. Collect a payment for the visit? (Yes / No), and if yes, What do you want to collect? — Copay only (use the eligibility copay when available) or a Fixed deposit. Turn on Use different rules per insurance or billing type? to vary by payer — for example, require a deposit from Cash Pay patients while collecting only copays from insured ones, with cash-pay upfront options of No upfront, Full cash price, Fixed deposit, Percent of price, or Office review. Turning that on also reveals a No-gate / no-charge insurance types checkbox grid — ticked billing types bypass organization-level visit collection, saved-card gating, and visit collection charges entirely (Service Menu overrides still apply). In a DPC practice this card is replaced by What to collect · Membership — “Set by the DPC payment model. Standard visits need an active membership at booking. Services set to Cash only in the Service Menu are billed as cash, and patients can book them without a membership.” — with
Change payment modelandOpen Subscriptions, plus a warning line while no membership plan is bookable online. Other models read “Membership-covered visits come with the DPC payment model.” - Saved card & autobilling. Require a saved payment method to book? (Yes / No), and Charge saved cards before visits? — Off, Simulate, or Live — with Provider readiness, a lead time (hours), retry count and backoff, and a failure action (Staff review or Mark unpaid). These controls always show, but automatic charging needs a saved card: while Require a saved payment method to book? is No they are disabled with “Turn on Require a saved payment method to book? to charge saved cards automatically.”, and picking No while charging is on warns “Automatic charging turns off too.”
- Patient responsibility billing. Automatically collect patient responsibility? turns on automatic collection of an insured patient's deductible, coinsurance, and copay from their eligibility (271) data. Turning it on opens an Enable patient-responsibility billing? confirmation that counts how many of your active insurers have a negotiated contract and names the ones that don't. Then choose When to collect — After adjudication (card on file, charge the real cost once the payer responds; recommended) or Estimate up front, which adds How much to pre-charge (Copay only or Full estimate) and an over-collection choice (Credit + manual; Auto-refund is shown but not yet available) — plus an Eligibility freshness window in days. After adjudication also offers Simulate post-adjudication collection only (record the amount; do not charge the card). An estimate only ever replaces the pre-visit collection of a visit you bill to the patient’s insurance: it never applies to a membership-covered or free visit, to a service set to Cash only in the Service Menu (billed as cash to everyone and collected by that service’s own policy), or to any visit in a DPC or Pure Cash practice. Because this billing follows insurance claims, a DPC or Pure Cash practice doesn’t see this block while it is off (unless
Show all toolsis on). A DPC or Pure Cash practice that still has it on keeps seeing it, and while the model hides the block the amber note “Your payment model (DPC) doesn’t bill insurance. Turn this off unless you still bill insurance for some patients.” appears — with Estimate up front it adds “Estimate up front never pre-charges anyone in this model.” - Missed appointment policy. Late cancellation: a Late-cancellation window — “Cancelling less than this long before the visit counts as late and gets the fee below. Earlier cancellations are free.” — and a Late-cancellation fee of No fee, Fixed $, or Forfeit deposit. No-show: a fee of No fee, Fixed $, or Forfeit deposit (keep the deposit paid for the visit instead of adding a fee; the patient disclosure then reads “No-show forfeits the deposit · Missing the appointment forfeits any collected deposit.”). Cancellation fees apply before the visit; no-show fees apply after the appointment time passes. The same card holds No-show handling — Manual (staff mark missed visits no-show) or Automatic, with a Timing preset, a Minutes after grace value, and a toggle for whether telehealth visits are included. The Live summary reflects the choice as Auto… or Manual no-showing. Staff can mark a visit a no-show from the calendar’s right-click menu (
Mark as No-Show) on its day and for 7 practice-calendar days after; the dialog shows the no-show policy this visit was booked under (“This visit was booked with a $50.00 no-show fee.”, or, for a forfeit, No-show policy: the deposit is kept). Older visits are resolved withCancel Appointmentinstead. - Refunds after a cancellation. Choose what happens to money the patient already paid when a visit is cancelled and the policy says it goes back: Staff approves each refund (Refunds wait in Billing → Payments) or Refund automatically (Card payments made in Hero go back to the card). “Cash, check and outside-terminal card payments always wait for staff.” Until the practice chooses, Hero’s default applies (staff approval, unless your Hero environment turns automatic refunds on). Only a billing manager or administrator can change it. The
Cancel Appointmentdialog then tells staff what will happen — for example “$20.00 goes back to the card automatically.” or “$20.00 waits for staff approval in Billing → Payments.”, or Deposit kept when the policy forfeits it. Fees are kept out of the money still on file for the visit, net of anything refunded earlier: the dialog’s Refund & deposit figures (Paid on file, Refund) already subtract earlier refunds, and only the part of a fee that money doesn’t cover becomes a new fee charge. Once the visit’s refund completes, its invoice reads Paid with an Appointment balance released line, and the balance no longer shows in Patient AR. - Outstanding balance & scheduling. Decide whether an unpaid balance blocks new appointments: Off, Any balance, Threshold (block above $X), or Threshold + age (also weigh how old the balance is). An optional payment-plan exception lets enrolled patients keep scheduling.
- What patients see. A live preview of the exact booking and check-in messaging your settings produce — useful for confirming the patient-facing wording before you save.
- Insurance & routing options. Collect patient share only applies the collection rules to the patient's portion (copay / coinsurance) rather than the full billed amount. The card can also show an Allow online fallback for cash-only offices toggle — when Stripe is ready and the default collection requires a deposit, or whenever the toggle is already on. In a DPC or Pure Cash practice the card is hidden unless
Show all toolsis on or one of its settings is still in effect; in that last case it reads “Your payment model (DPC) doesn’t bill insurance. This is shown because a setting in it is still on.” Those two models’ What patients see preview no longer lists Insurance claims are not the default upfront path. - Claims processing defaults. (Insurance-style payment models.) Organization-wide claim defaults — Accepts assignment and Participating provider — applied to professional claims; set here, not on physician profiles.
- Statements & Payment Reminders. Statement mode decides what happens to automatic statements: Off, Email, Print (office mails), or Email + print — “Hero never mails paper. With Print, automatic statements are only marked as queued for your office — to print one, open the patient’s Statement in Patient AR and download a current PDF.” Statement due date reads “Statements are due [30] days after the statement date (0 = due on receipt).” (0–90 days). Payment reminders are emailed on the Reminder days after the patient’s share is owed (default 0, 3, 7, 14, 30; the chip for day 0 reads When owed) — day 0 is when the patient’s share becomes owed: the due date for self-pay charges, or when the payer’s decision is posted.
- Validate and save. One save bar stays pinned to the bottom of the page and covers everything on it, statements and reminders included. With nothing pending it reads All changes saved · Policy v{n} · Last saved … beside
Validate policy; once you edit, it reads Unsaved changes withDiscard,Validate policy, andSave changes. Saving reports “Changes saved.”; if only the statements part fails you see “Collection settings saved, but Statements & Payment Reminders were not. See the message in that card.” Validating checks the combination for conflicts before you commit (Blocking errors, Warnings, or “Policy validation passed — no issues found.”). Switching to another Billing tab with unsaved edits asks before discarding them.
When the payment model hides sections of this page (for example in a Pure Cash or DPC practice) and you haven’t chosen to show all tools, a banner reads “Some sections are hidden in the {model} billing model.” with a Show all tools button and the note “Saved to your account.”
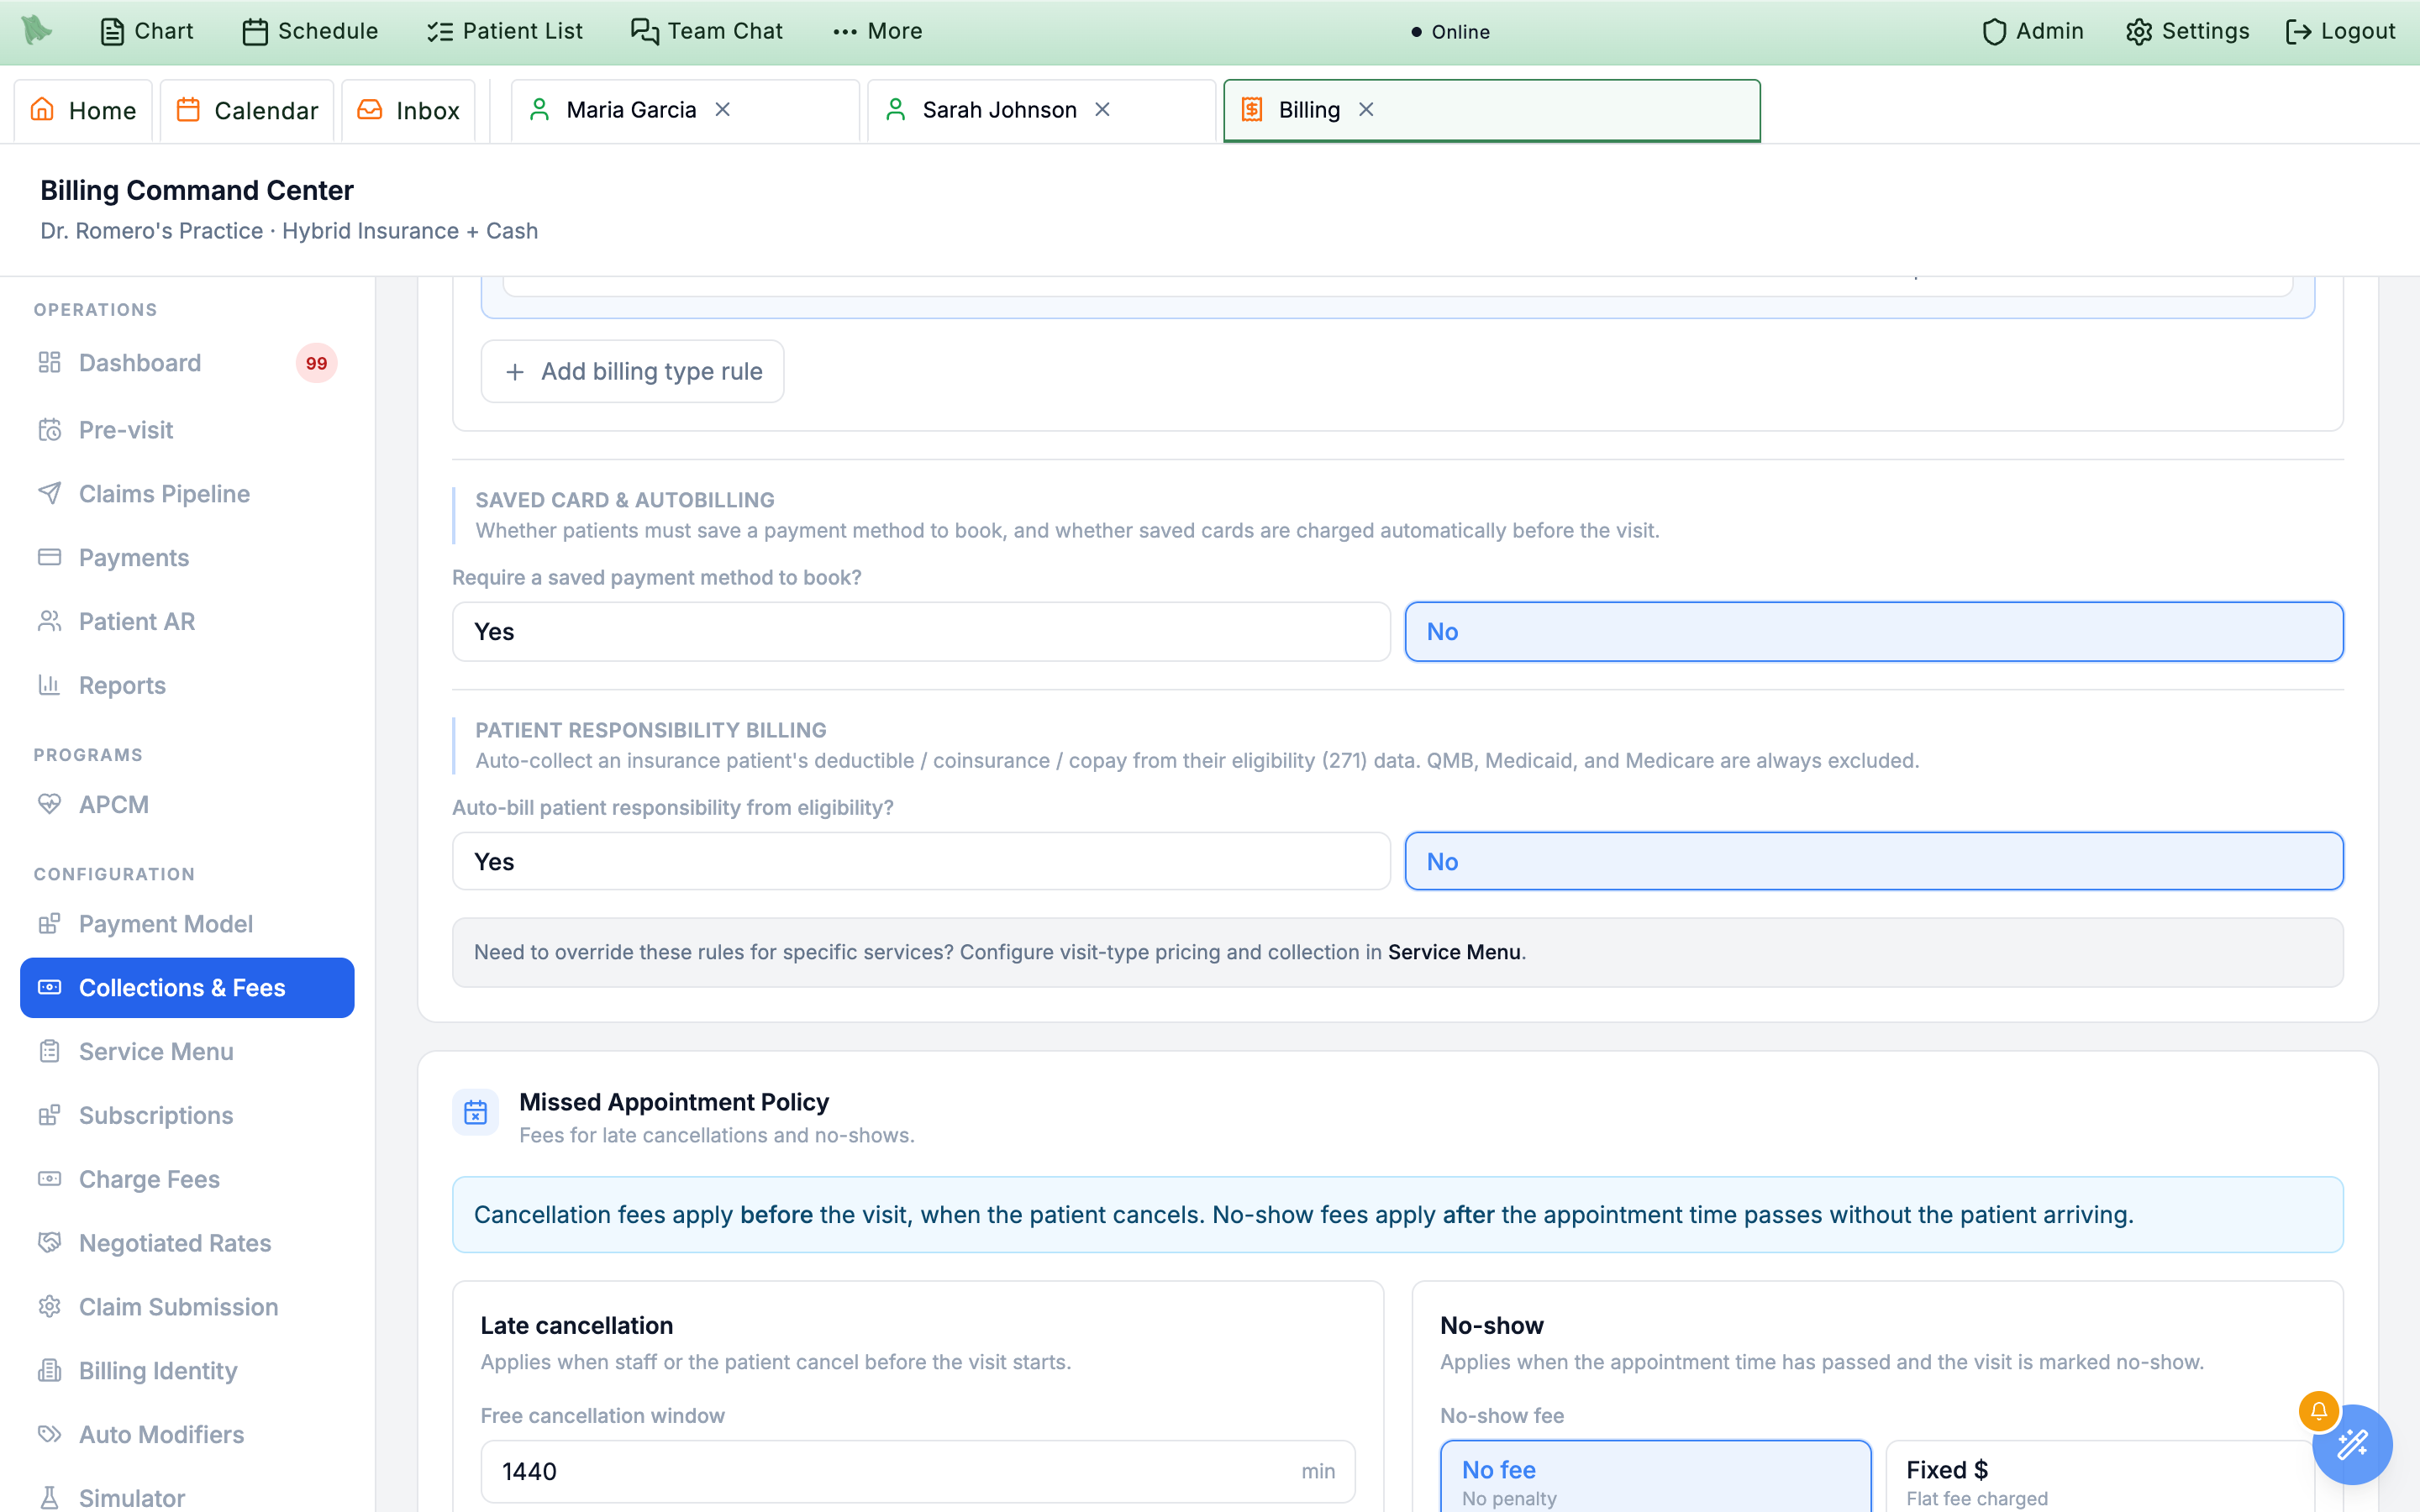
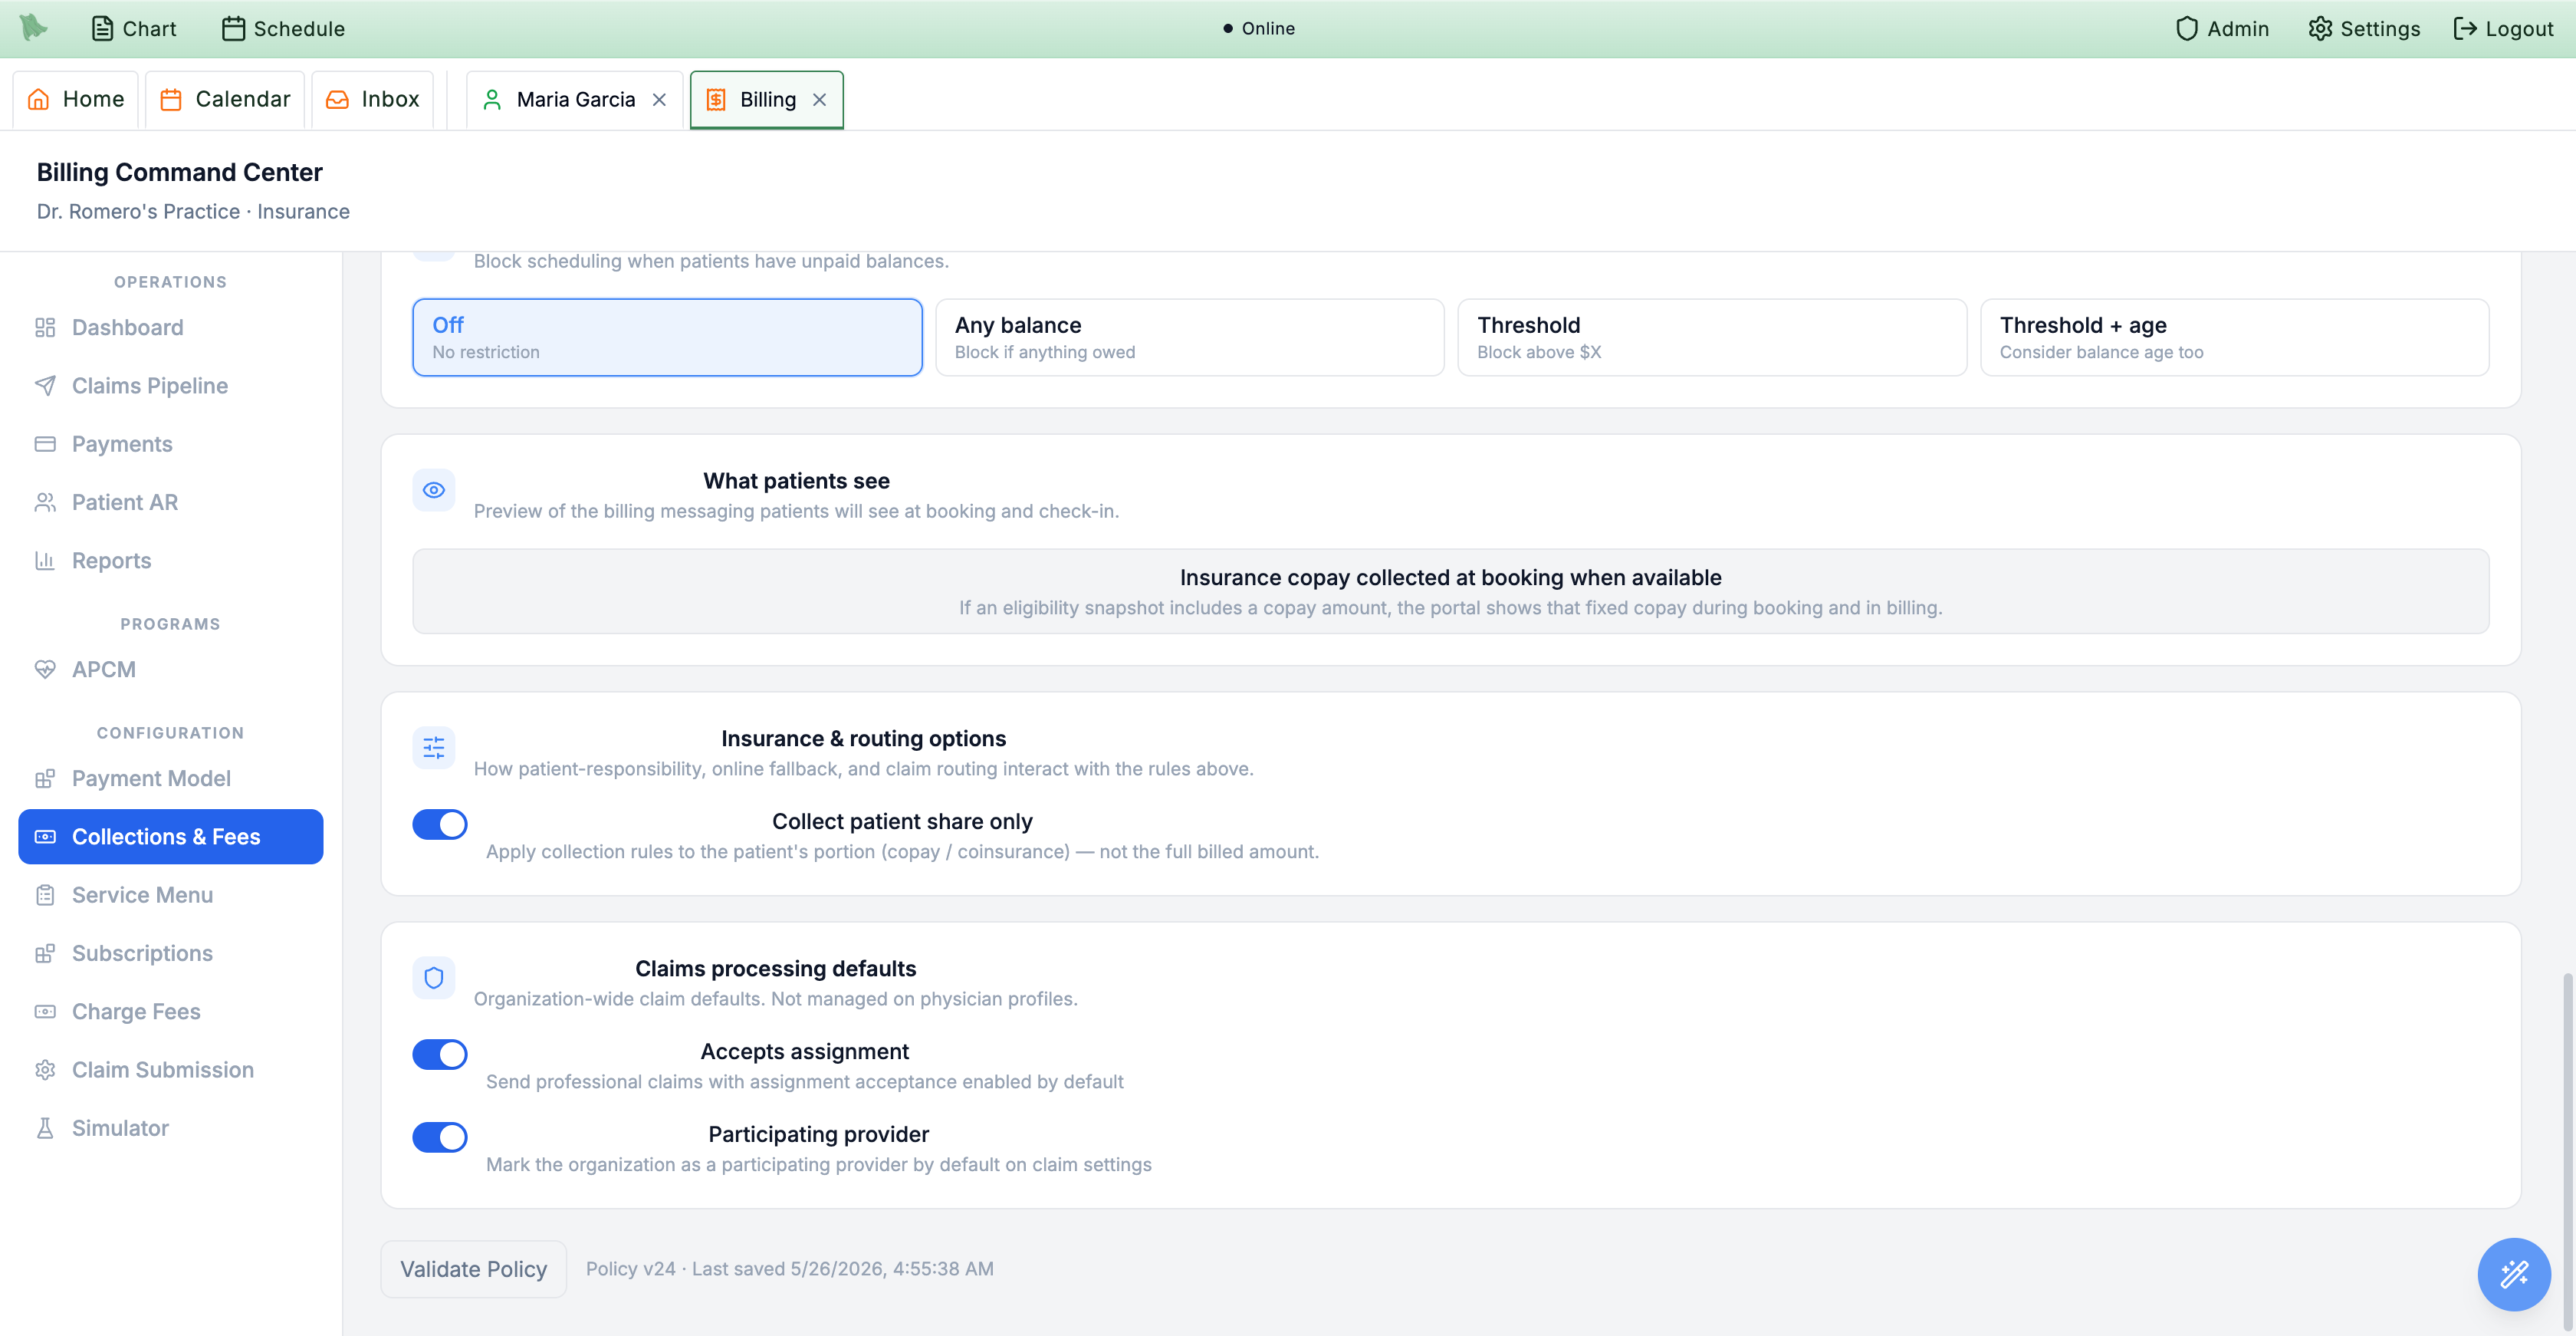
Validate Policy footer are now one save bar pinned to the bottom (Discard · Validate policy · Save changes); the cancellation field reads Late-cancellation window; the no-show fee adds Forfeit deposit, followed by the new Refunds after a cancellation choice; and the auto-charge controls always show, disabled with their reason when no saved card is required.
Override pricing and rules per service in the Service Menu
The Service Menu lists every service — a provider paired with a visit type — alongside the patient-facing price and collection rule. Any service can override the organization defaults from Collections & Fees; leave a field on Use organization default to inherit it. This is how a free telehealth check-in and a $250 cash physical can live in the same practice.
- Open the
Service Menutab. The table lists each service with Provider, Visit Type, Duration, Booking, Patient Sees, Collection, Status, and Actions. Booking reads Public (bookable from your public site), Portal (patients can self-schedule it from the portal), Public + Portal, or Staff only. A banner counts the online services that still need a price — “1 online visit type has no price set” or “12 online visit types have no price set” — and disappears when there are none. Click it (Show them) to list only those services; it then reads “Showing the 12 online visit types with no price set” and a second click (Show all) turns the filter off. TheShow only services with no price setcheckbox is the same filter, andSearch provider or visit typematches every word you type across both (a surname plus follow finds that provider’s follow-up visits). The Status column marks rows that carry service-level overrides. In a DPC practice, membership-covered services don’t need a price, so they don’t count in the banner and a covered service without its own rule reads Covered by membership; a Cash only service without a price still counts and reads Not configured — “Cash only needs a Fixed cash price or Free in a DPC practice; without one this service stays membership-covered.” A staff-only service without a rule reads Not configured in grey. A fixed price you hide from patients reads Contact office for pricing with the sub-line Billed $150.00 · hidden from patients, and a Hybrid practice’s custom cash label reads like $250 cash price. - Edit a service's pricing. Click
Edit. The Pricing card (“What this service costs and what patients see.”) offers a Price mode of Use organization default (“No price set for this service. Cash visits are charged the CPT list prices of the codes signed.”), Free (“No charge for this visit.”), Fixed cash price (“Cash-pay patients are charged this price.”), or Office review (“Staff set the price when the visit is signed. Patients see ‘Contact office for pricing’.”). Set the Cash price and an optional Display label (for example FREE, $150, or Contact office) that overrides the auto-generated price text. In a DPC practice, a Fixed cash price on a service that is Covered by membership isn’t charged to anyone, and the editor says so: the helper turns amber — “Not used: this service is covered by membership, so members book it with no visit charge. To charge this price, set Membership coverage to Cash only (members pay too).” — the field reads Cash price (not used while covered) with “Kept for when this service is Cash only.” under it (you can still edit it), and Show the price to patients is hidden. - Decide whether patients see the price. Show the price to patients is “Display only; it never changes what is charged. When off, patients see ‘Contact office for pricing’ in the portal and on your website.” It is hidden for Free and Office review. Turning it off on a fixed price shows “Patients won’t see the price, but visits are still billed at $150.00. If staff should set the price for each visit instead, use Office review.” with a
Use Office reviewbutton. - Set pre-visit collection for the service. Collection policy starts on Use organization default, which shows what it inherits (“Follows Collections & Fees: Required at booking · $20.00 deposit.”) and hides the deposit, balance, and hours fields. Pick Card on file, Required at booking, Suggested before visit, Required before visit, Collect at check-in, or Invoice after visit to set this service’s own deposit type (No deposit (full price), Full price, Fixed deposit, Percent deposit), balance collection, and hours-before-visit window. An older service that collects nothing but kept leftover deposit settings reads No collection (service override), with a note that Collections & Fees doesn’t apply to it and a
Use organization defaultbutton. - Choose insurance vs. cash handling. Insurance vs. cash handling lists only what your payment model offers: Use organization default and Cash only in an Insurance practice; those plus Office review in a Pure Cash practice (or one with no model set); all four, including Insurance when available, in a Hybrid practice. In a DPC practice the field is labelled Membership coverage, with Covered by membership and Cash only (members pay too) — “Covered by membership: members book it with no visit charge; others need a membership or a staff override. Cash only: everyone pays this service’s cash price, members too, and no membership is needed to book.” A stored value the model no longer offers shows disabled, (not offered in …), until you pick an offered one.
- Override cancellation & no-show (optional). By default the service inherits the organization policy. Tick Override for this service to set a service-specific Late-cancellation window (minutes) and fee and a no-show fee (No no-show fee, Fixed fee, Percent of visit price, or Forfeit collected deposit); leave it unchecked to keep using Collections & Fees.
- Override saved card & autobilling (optional). Card on file and Auto-charge mode each default to Use organization default; switch either to require or skip a card, or to Off for this service, Simulate for this service, or Live for this service. Live only runs while the organization is also set to Live in Collections & Fees — a service can narrow that setting, never widen it — and saving it asks you to confirm.
- Save, or copy to other providers.
Savesaves this service.Copy to other providers…opens a review of the other providers’ services with the same visit-type name: each row is a checkbox {provider} · {visit type} with what patients see now (active services start checked, inactive ones unchecked).Save and copy to N providerssaves this service, then gives the checked services the same pricing, collection, cancellation, and autobilling settings;Backreturns to the editor. The button is disabled when no other provider has a visit type with that name. If one of the services changed while you were editing, nothing is saved and the latest values reload. Closing the editor with an unsaved change —Cancel, ×, Esc, or a click outside — asks “Discard unsaved changes?” · “Your changes in this window haven’t been saved.” withKeep editingandDiscard.
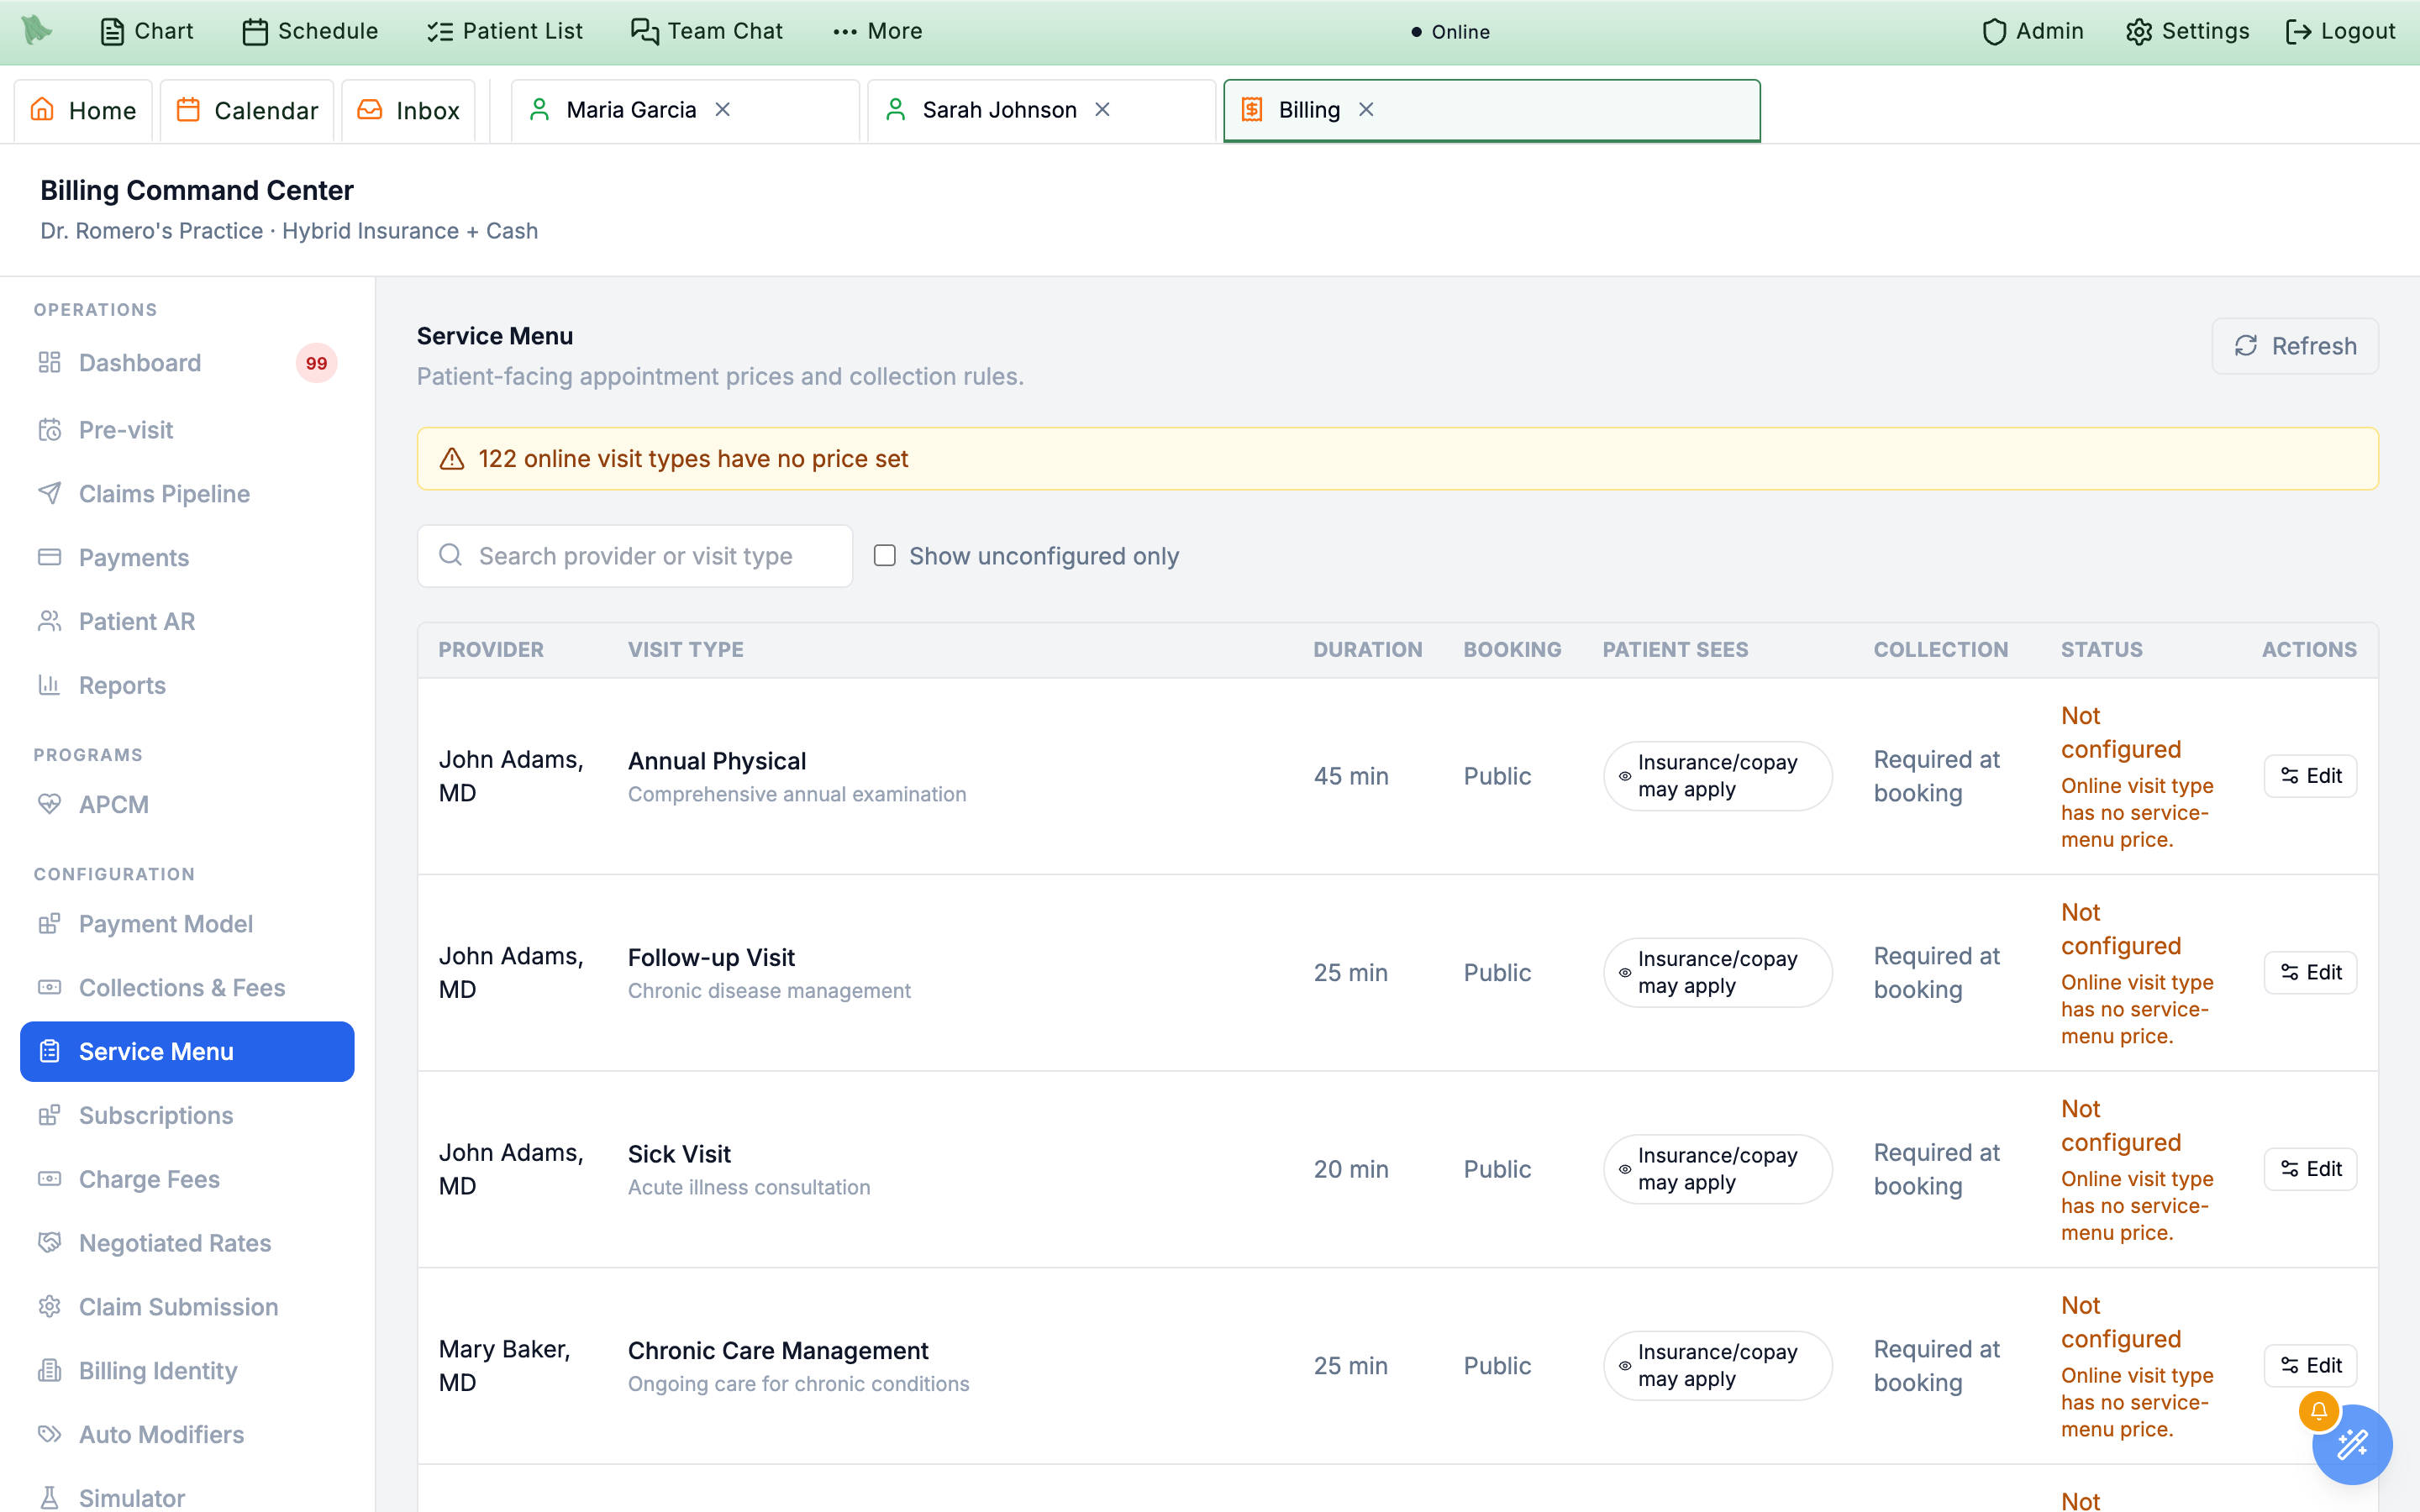
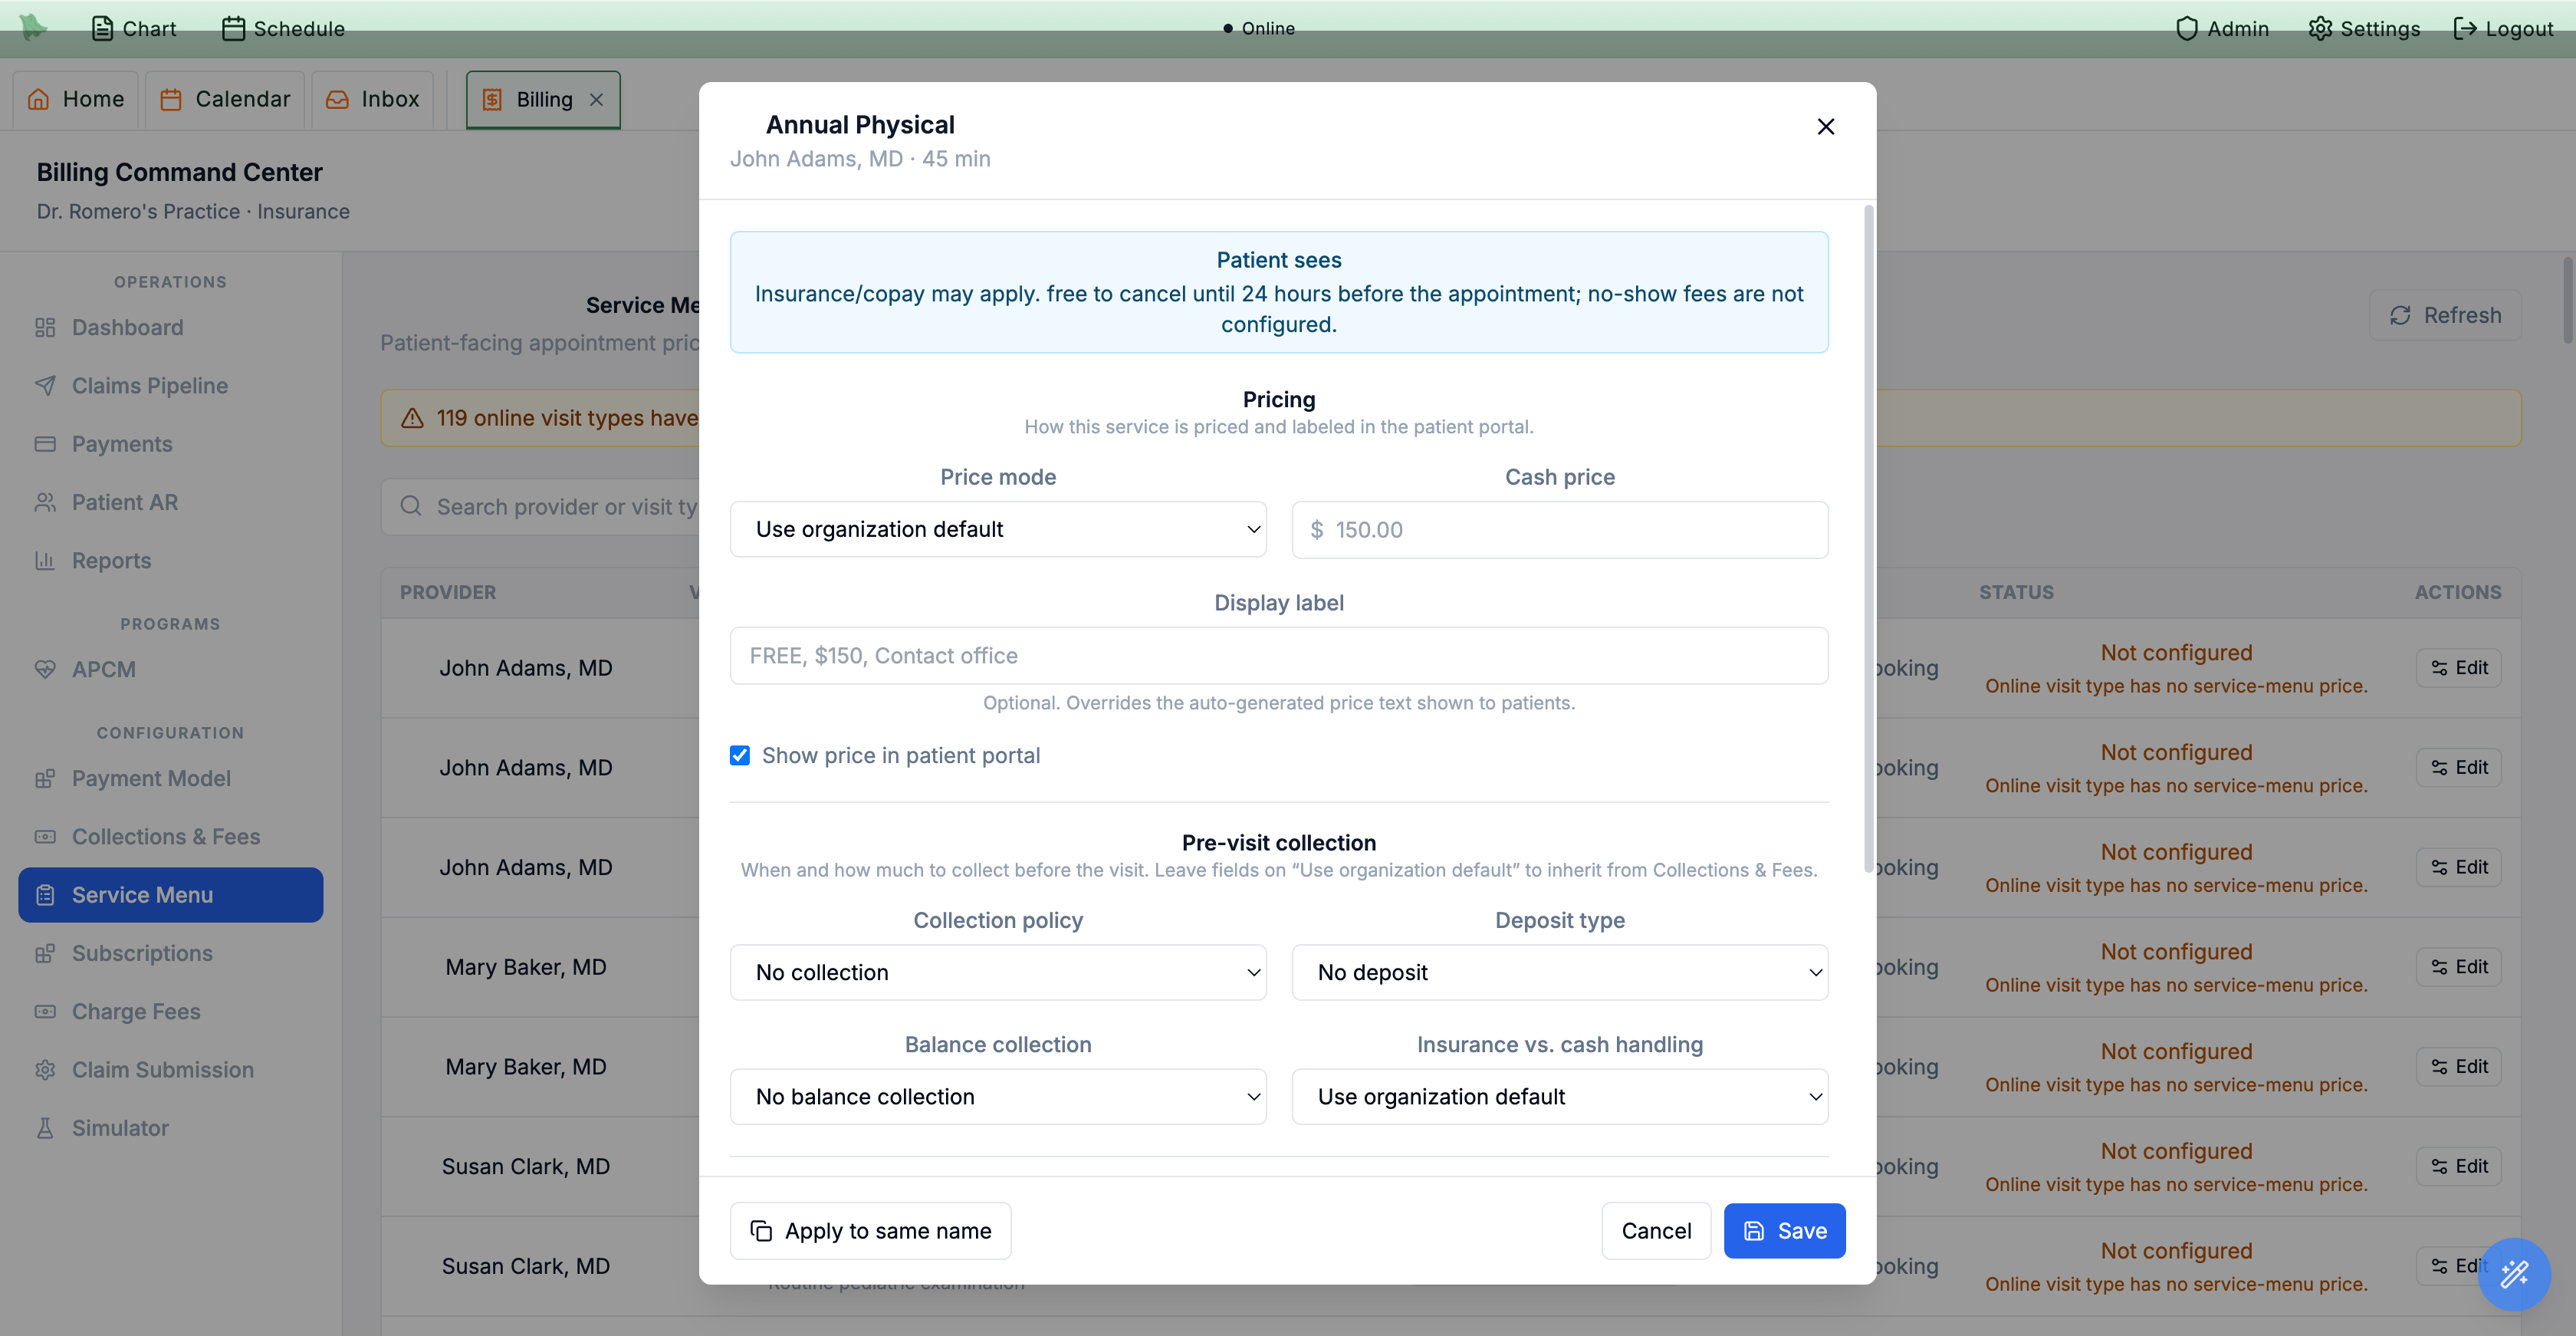
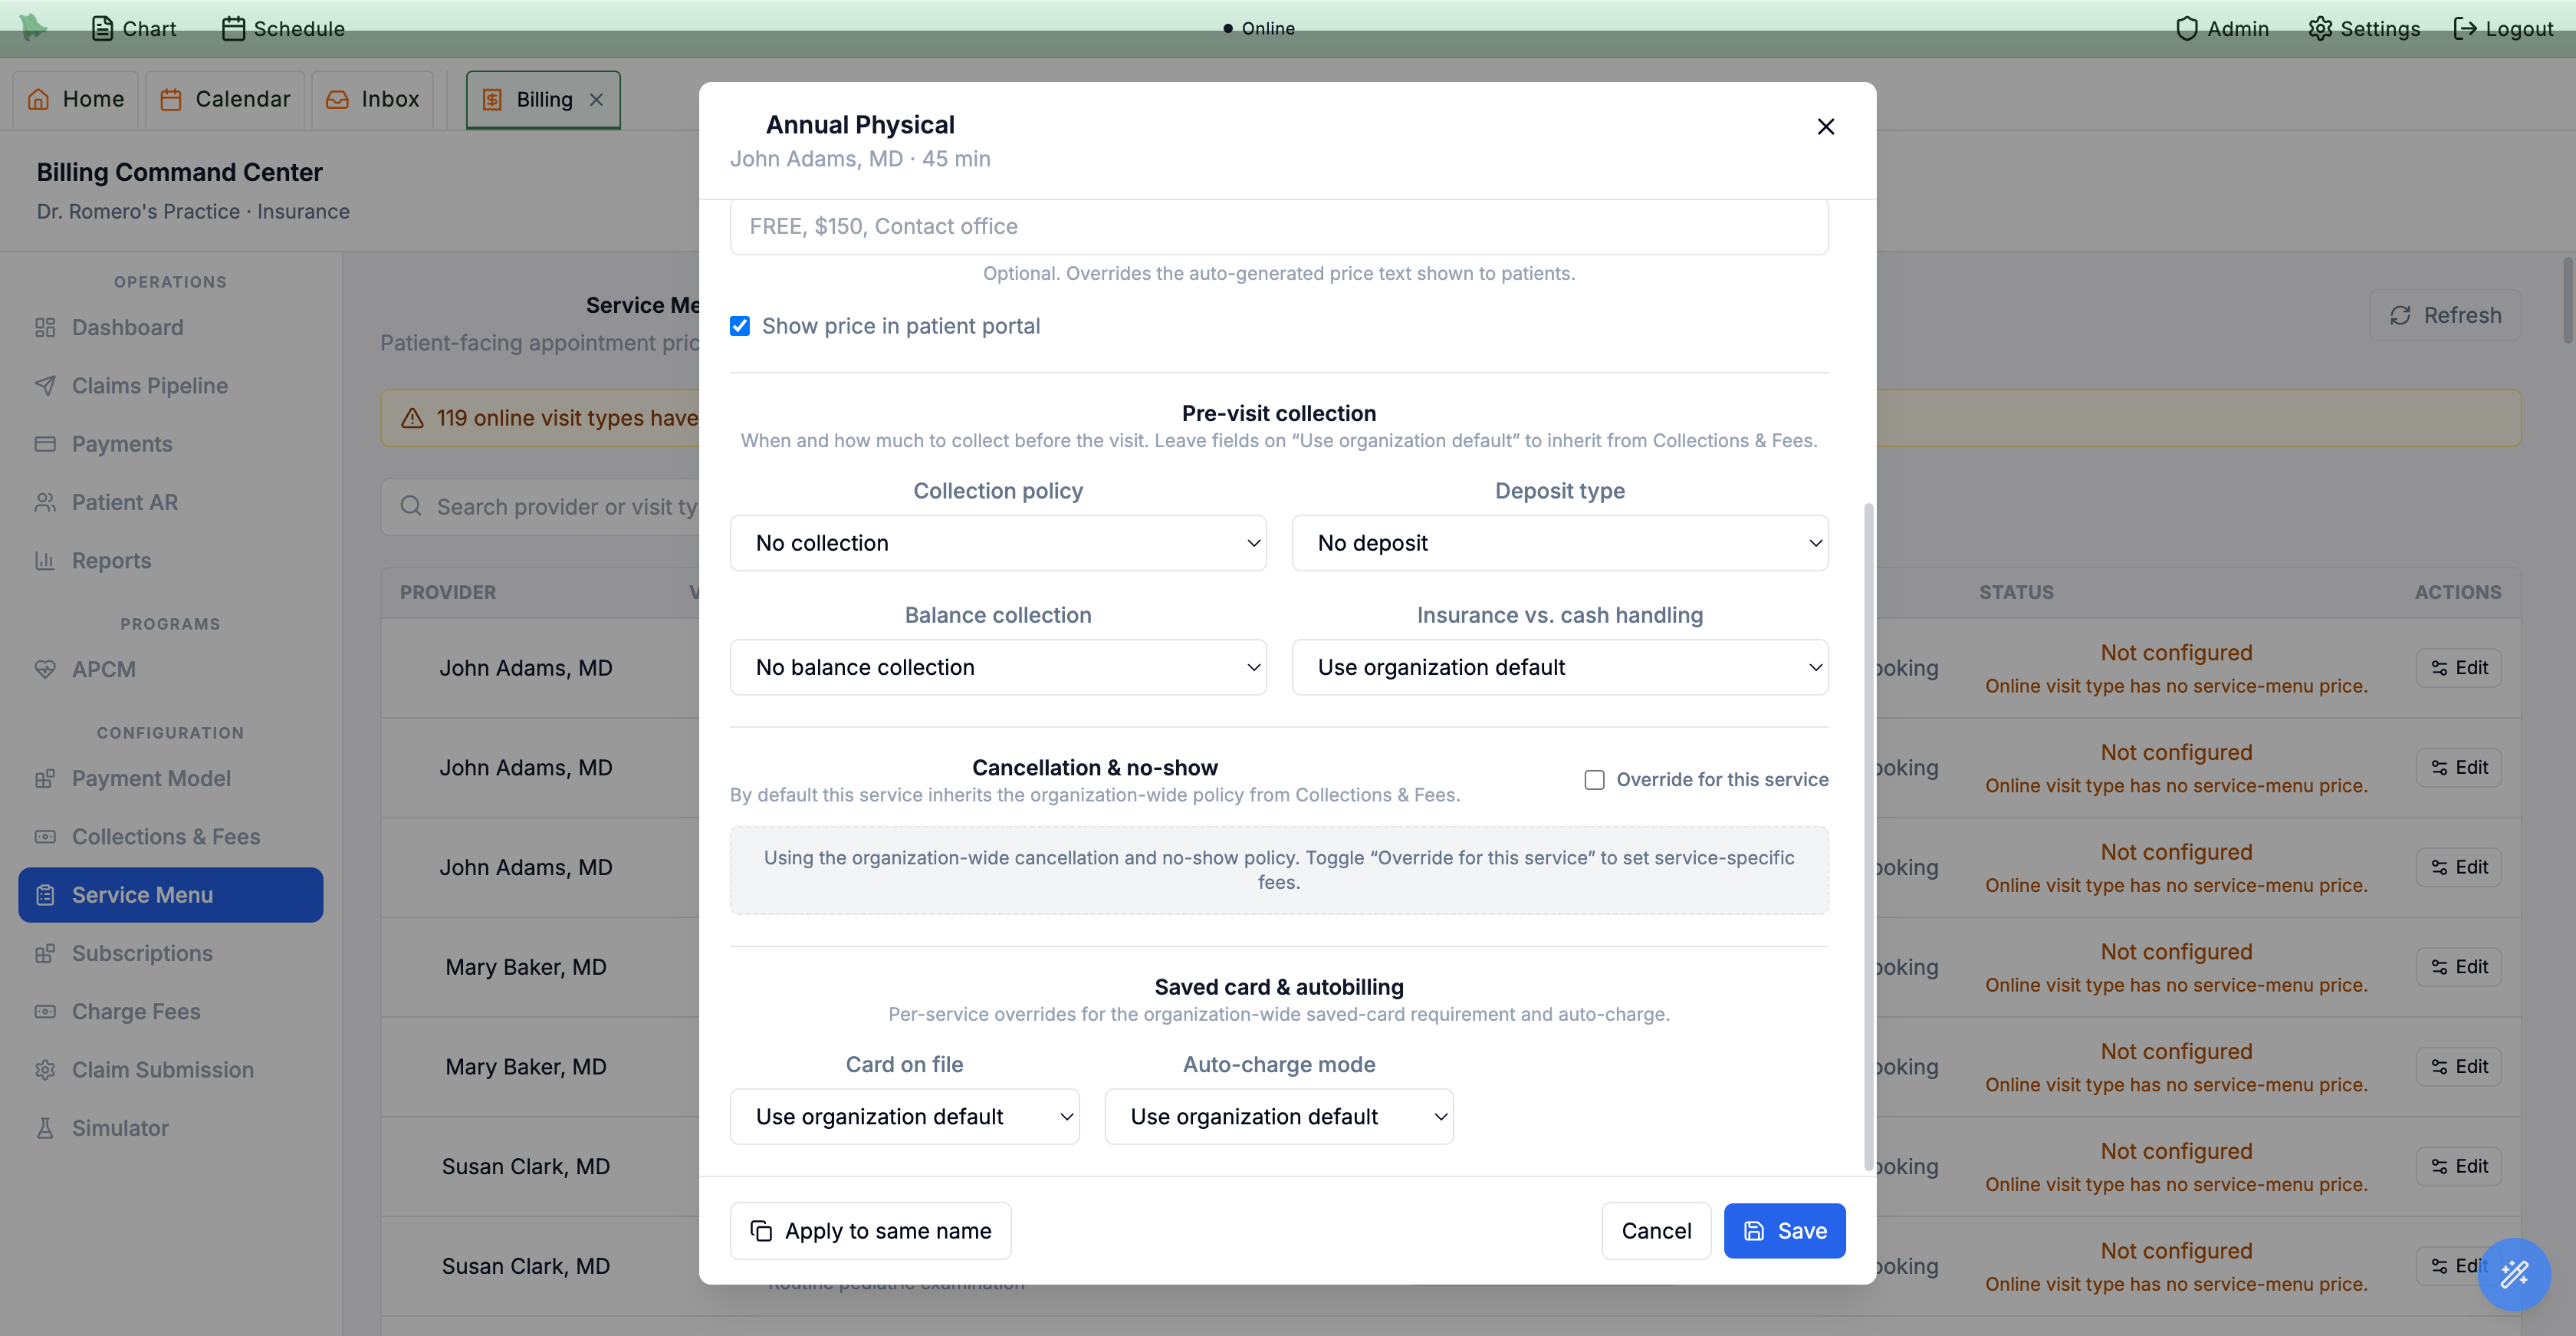
Copy to other providers… (was Apply to same name). In the table view, the banner now ends with Show them and the filter checkbox reads Show only services with no price set (was Show unconfigured only).
Override billing for one patient from Patient Information
The narrowest layer applies to a single patient and beats both the service and organization rules. It lives on the patient’s chart, not in the Billing Command Center: open the patient’s Patient Information screen from the header strip, then the Custom Billing Rules tab under Financial.
- Open the patient and the
Custom Billing Rulestab. In a patient chart, click the patient’s name in the header strip. Physicians and admins land on the Patient Information page in its ownInfo: {patient}workspace tab; staff without chart permissions get the same screen as a dialog. In the sidebar, the Financial group holdsCustom Billing Rules,Insurance, andInvoices & Charges— the two billing tabs appear only for admins and for staff whose permissions allow them. The full screen is documented in §7.8. Billing staff can open the same tab without the chart: click the patient’s name anywhere in the Billing Command Center to open the Patient billing dialog (§5.7). - Set exceptions. Bypass card on file means card requirements won’t block this patient from booking; Bypass booking collection moves any booking-required collection to check-in for this patient. Under Insurance claims, Automatically file secondary claims is on by default; uncheck it to bill this patient directly for what the primary leaves instead of filing it to their secondary policy.
- Set per-patient cash rates. Expand the
Cash charge ratesaccordion (it starts collapsed and loads its table the first time you open it). It lists every visit type and provider with the read-only Service rate (the inherited service-level default) beside an editable Patient cash rate.Search provider or visit typematches every word you type across both, so a provider’s surname plus Standard finds that provider’s Standard visit (rows show the provider’s formal name, so a nickname won’t match). Leave it on Default to inherit, or type an amount to override; the row’s reset button (Use the service rate for {visit type}) puts it back to the service rate. In a DPC practice, membership-covered services read Covered by membership in the Service rate column, with “Not used in DPC: this visit is covered by membership.” - Save once. The checkboxes and the rates are one draft: nothing saves until you press
Save changesin the bar at the bottom, which reads All changes saved or Unsaved changes withDiscardandSave changes(and “Billing rules saved.” afterwards). Leaving the tab, or closing the dialog, with unsaved edits asks first. - Reclassify on the
Insurancetab (related). The neighboringInsurancetab carries Bypass insurance (treat as cash pay) and a manual Billing type — use these to move a patient to self-pay or set their billing classification. See §7.10. - See what this patient actually owes (related). The
Invoices & Chargestab is the money view for one patient: available credit and open-charge counts, every invoice (each insurance invoice expanding into its read-only claim panel), the Financial documents panel where you prepare superbills and Good Faith Estimates and download receipts, and an Issue a charge or credit form with a required reason, above a log of issued charges and credits. It shows the same invoice records as the Billing Command Center’s Invoices view — see §5.11 and §7.16.
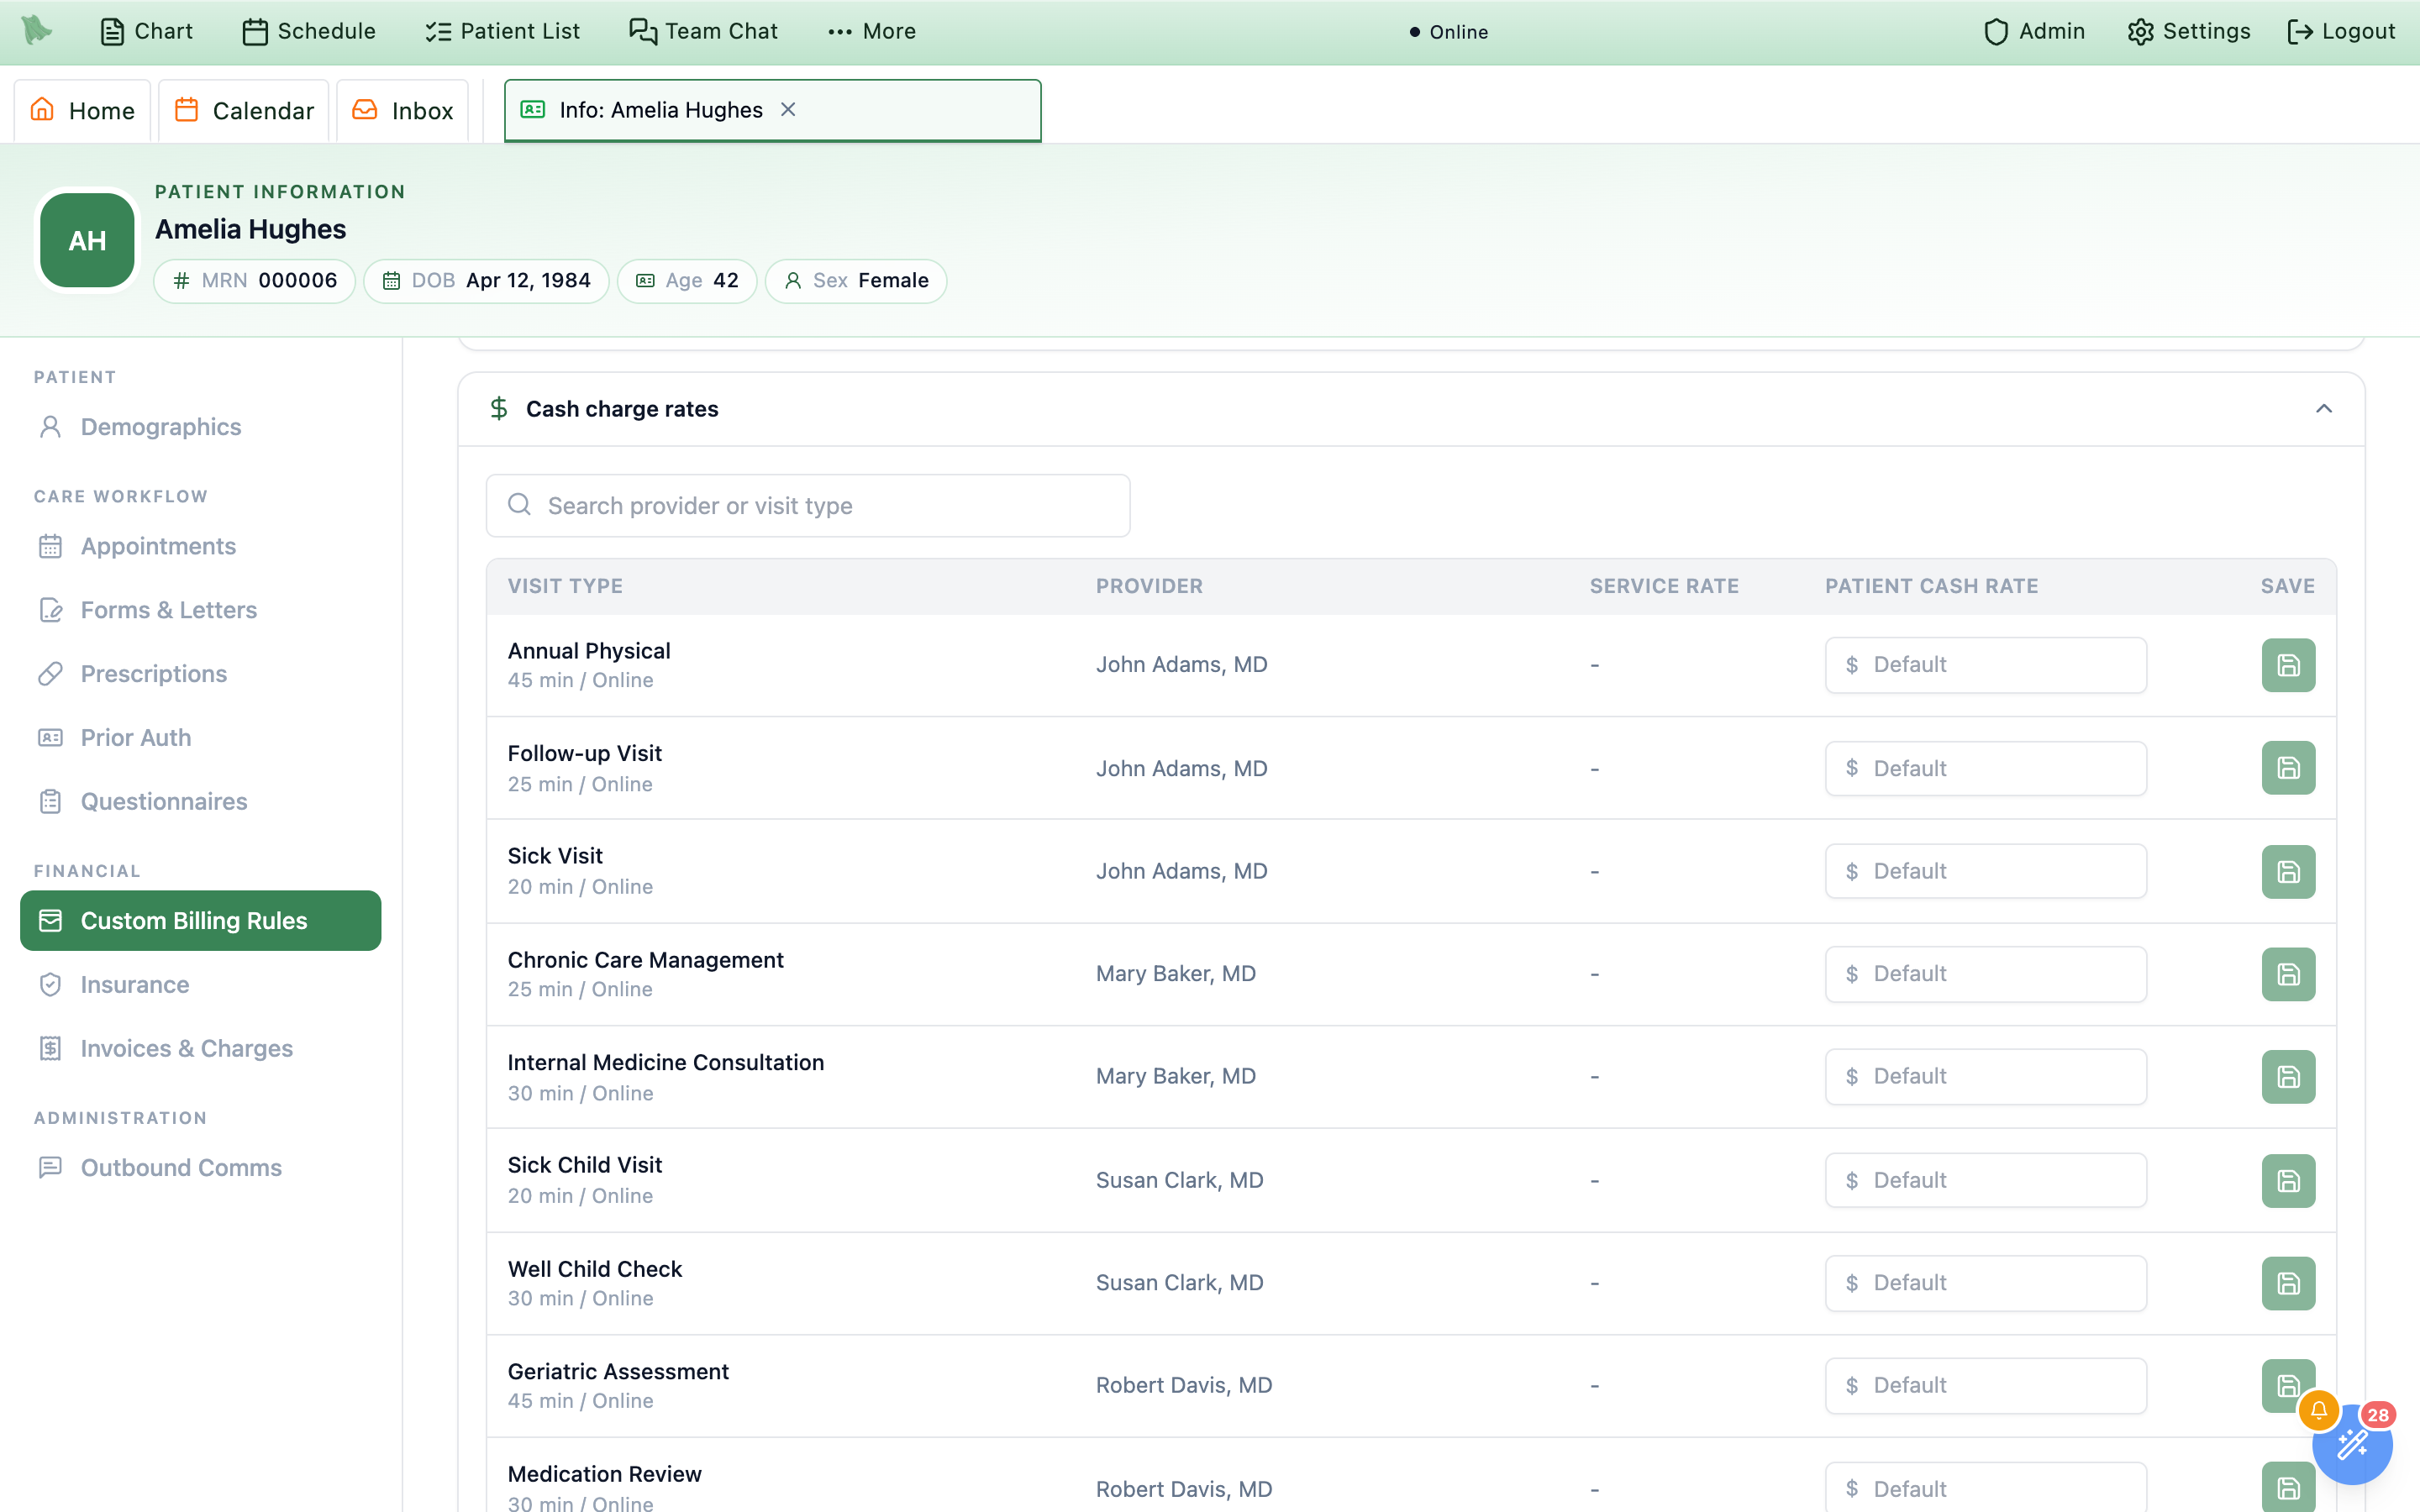
Custom Billing Rules tab with Cash charge rates expanded. Each row’s effective price is the patient cash rate when set, otherwise the service rate, otherwise the organization default.Save changes bar at the bottom.
Price insurance claims: CPT List Prices and payer rates
The three layers above decide what a cash patient pays and what is collected when. An insurance claim is priced code by code from two configuration tabs — Negotiated Rates and CPT List Prices — in a fixed order. The same rates feed the patient’s coverage estimate on the Insurance tab (§7.10).
What each code on a claim bills
- 1 · Contract rate — the payer’s rate for the code in
Negotiated Rates. - 2 · Learned rate — without a contract rate, what this payer has recently allowed for the code, once it has 3 recent payments (below).
- 3 · CPT List Price — otherwise your price in
CPT List Prices: the price you set, or the list’s default for the code, which Hero derives from Medicare’s rate. - No price at all — the visit’s claim is held, never filed with a $0 line, until you set a price.
How to tell on a claim
Learned— “Learned rate: priced from what this payer allowed for this code on recent payments (median). Not a contract rate. See Negotiated Rates.”Est.— no contract rate matched, so the amount came from your list price or the Medicare-baseline default. Review before relying on it.- Badges show on the claim’s line table and the charge-review rows in the Claims Pipeline.
- Choose what insurance claims bill. The top of
CPT List Pricesis one line — What insurance claims bill: Each insurer’s contract rate (or Your list price, or the contract rate if it’s higher) — with aChange…button, and the price list starts right under it.Change…opens the What insurance claims bill dialog: “Applies to new charges. Claims already sent keep their amounts. Cash prices don’t change.”, then Bill each insurer its contract rate (the default: “Claims use the rate in Negotiated Rates when the insurer has one, otherwise your list price.”) or Bill your list price, or the contract rate if it’s higher (“Insurers pay the lower of what you bill and what they allow, so this protects you when a rate on file is out of date. Patient cost estimates still use your contract rates.”). The second option bills your list price whenever it is higher than the contract or learned rate — except on Medicare and Medicare Advantage claims whose billing provider is non-participating or doesn’t accept assignment, which keep the payer’s rate. PressSaveto apply it (the line then shows a Saved chip), orCancel— which asks before discarding if you picked the other option. The choice applies to new charges; claims already sent keep their amounts, and cash prices don’t change. - Set your list prices.
CPT List Prices(“Your practice’s price for each CPT or HCPCS code. Insurance claims use it when no payer contract or learned rate applies (or whenever it’s higher, if you bill your list price above), and cash visits use it when the visit has no cash price.”) lists every claimable code, HCPCS included (G-, J-, and S-codes). Search with Search CPT or HCPCS code or description. Each row shows the Medicare rate beside your List Price, with Default $X under it and aResetthat puts that default back. A code Medicare doesn’t price (for example 99050) reads Not priced, its price box shows Set price, and it has No default price, soResetis disabled. - Price a code a visit is waiting on. When a signed insurance visit used a code nothing prices, Hero holds that visit’s claim instead of filing a $0 line. You see it three ways: a Visits waiting on a price banner on
CPT List Prices(“These codes have no price, so the visits that used them are not billed yet. Set a price and those visits bill automatically.”) with a chip per code, such as 99050 · 1 visit; a Claims Pipeline row reading “No claim yet: 99050 has no price. Set a price for it in CPT List Prices and this visit bills automatically.” with aSet a price for 99050button; and a Billing inbox alert, 99050 has no price, with the same button for staff who manage billing settings. Type a price and save: the confirmation reads Saved 99050 · Billing resumed for 1 visit, and the held visits bill on their own (any that can’t yet are counted as still waiting, with a pointer to the Billing inbox). The alert clears itself. - Cash visits and unpriced codes. A cash visit with its own price (a Service Menu price, a patient cash rate, or an amount set at signing) signs as usual. A cash visit that falls back to the prices of its signed codes stops at signing when one of those codes has no price: “Cash pay needs a price for every signed code, and 99050 has none. Set a cash-pay amount for this visit, or ask billing to set a price for 99050 in CPT List Prices.” Either fix works.
- Keep contract rates in Negotiated Rates.
Negotiated Ratesholds each payer’s contract and maps each visit type to the codes it bills. Deleting a contract asks “Delete {name}? New charges will use a rate learned from this payer’s payments if there is one, otherwise your CPT List Prices. Existing charges don’t change.” - Review the rates Hero learns. The Learned from payments section shows “What each payer allowed per code on paid primary claims. Once a payer has 3 payments for a code in the last 12 months, new claims to that payer bill this rate. Existing charges never change.” Each row names the payer and code (plus modifiers or Facility rate where they apply), the Learned rate (the median of recent payments below your charge), how many payments were seen, and when it was last paid. Its chip says where it stands: Used for new claims, Collecting payments (1 of 3), Re-checking: new claims bill your list price until 3 recent payments come back, Rates vary too much to use (recent payments more than 5% apart), Contract rate applies, or Removed. Payments where the payer allowed your full charge or more are counted but never used, so they can’t lower the rate.
- Turn a learned rate into a contract rate, or stop using it.
Use as contract rate…opens a dialog with the payer and code read-only and the Contract rate prefilled;Add to contractsaves it. If you have no contracts yet it warns “This will be your first payer contract. Once you keep contracts here, payers without one are treated as out-of-network for surprise-billing (IDR) checks.” Only office-rate codes without modifiers can become contract rates.Removesends new claims back to your CPT List Price, and new payments won’t bring the rate back until you chooseUse again, which starts over from payments posted from then on.
Preview the result with the Simulator
The Simulator answers “what will actually happen if I book this?” without touching a real appointment. It runs a real or made-up patient through the entire billing pipeline — booking gate, pre-visit collection, charges, claim, 837P, payer response, and the balance that lands on the patient — against your live rules. Nothing is saved: every write is rolled back, and the result is stamped “SIMULATION — nothing was saved; all writes were rolled back.”
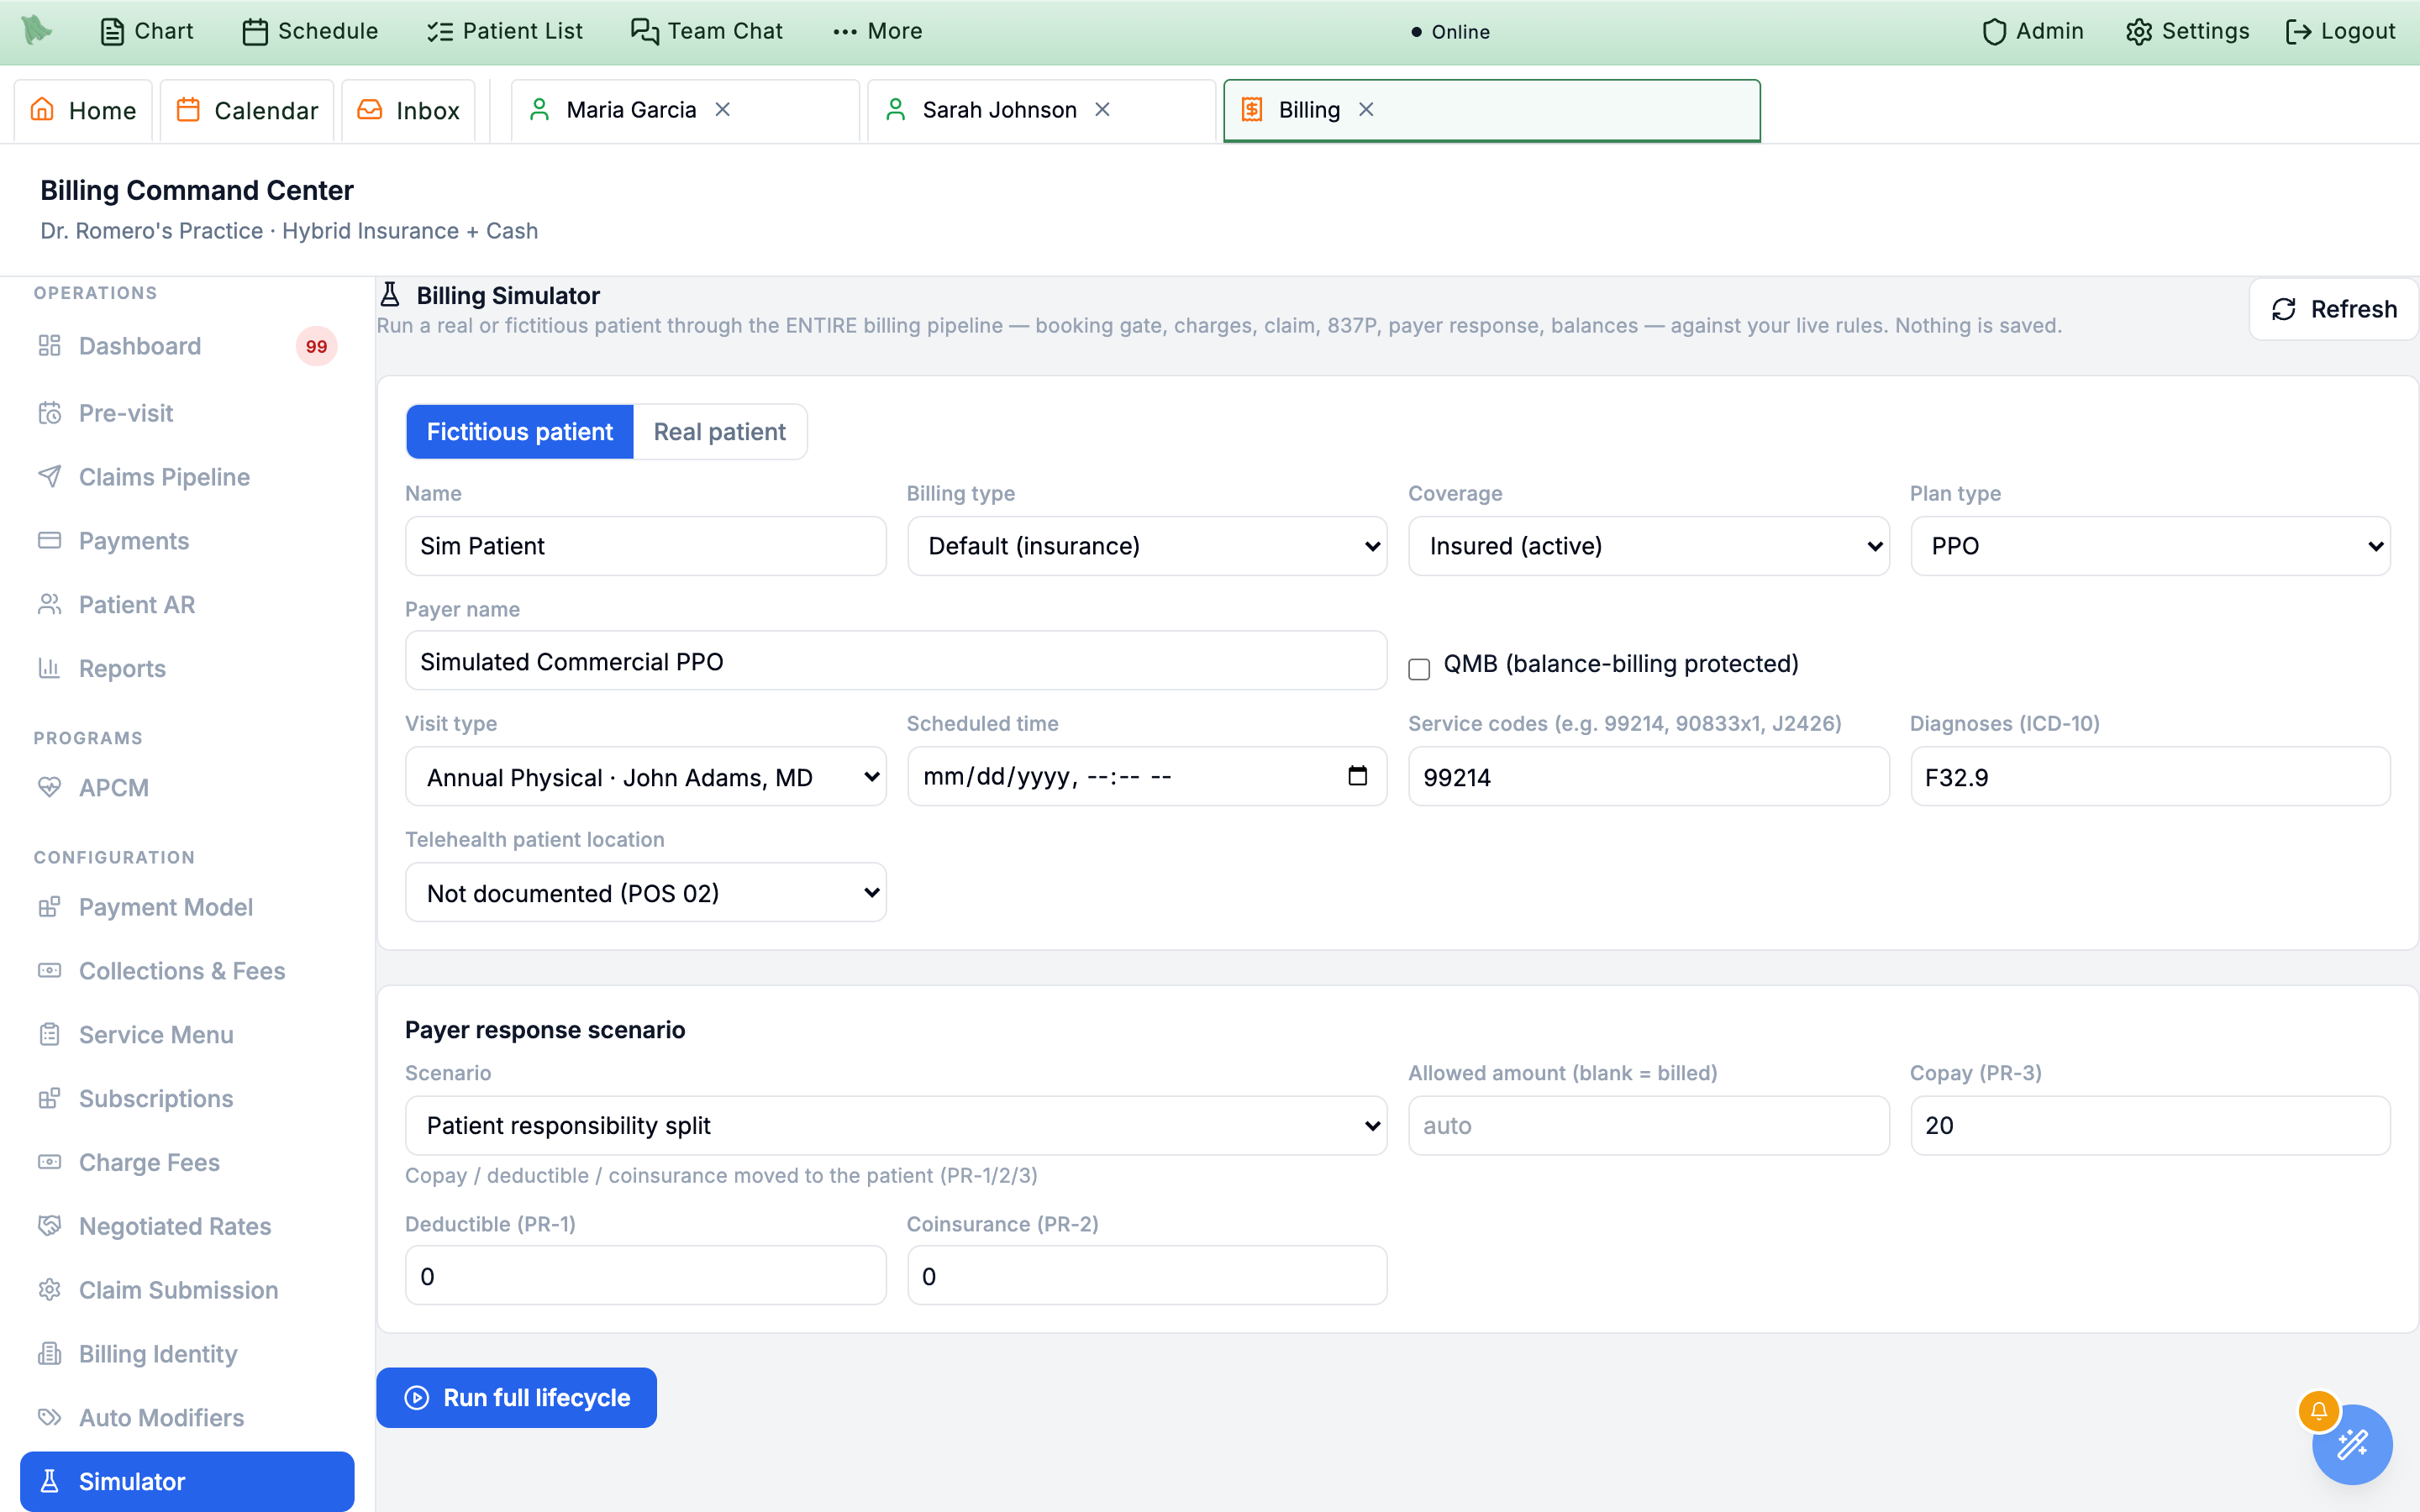
- Choose the patient. A Fictitious patient / Real patient toggle sits at the top; Fictitious patient is the default so you can test a scenario you don't have a chart for. A fictitious patient takes a Name (left empty, it runs as Sim Patient), Billing type (Default (insurance) or Cash pay), Coverage (Insured (active), Insured (coverage lapsed), or Uninsured), Plan type, Payer name (try Medicare Part B or Medicaid KY to exercise government-payer rules), and a QMB (balance-billing protected) checkbox. Switch to Real patient and Select patient to run someone from your chart instead.
- Describe the visit. Set the Visit type (any provider + visit type; it starts on a provider who has a billing identity, and providers without one are marked — no billing identity), the Scheduled time, the Service codes (for example 99214, 90833x1, J2426), the Diagnoses (ICD-10), and the Telehealth patient location — Not documented (POS 02), Home (POS 10 — non-facility rate), or Other location (POS 02).
- Pick a payer response. The Payer response scenario block decides how the imaginary payer answers: Paid in full, Patient responsibility split, Underpaid, Overpaid, Denied, Duplicate (OA-18), or Reversal (CLP-22). Set an Allowed amount (blank means the billed amount), and the scenario adds its own fields — copay, deductible and coinsurance for a responsibility split; a Group code and CARC for a denial; an Overpaid by or Underpaid by amount for the others.
- Click
Run full lifecycle. The results come back as a stack of expandable stage cards, each colored by outcome and carrying any warnings: Patient & coverage, Booking gate, Pre-visit collection, Visit & signing charges, Claim generation, Readiness, routing & 837P, Payer adjudication, and Balance & aftermath. The run goes through the same booking, check-in, and signing code a real visit does, so the stages say what would really happen — for example “Booking allowed after the patient pays $20.00 at booking.”, “Simulation collected $20.00 at booking and $130.00 at check-in. Receipts are rolled back.”, or, for a cash visit, “Cash-pay visit priced at $150.00 (Service menu rule): $150.00 collected before signing, $0.00 charged at signing. No insurance claim.” Free and membership visits read No visit charge: …, an Office review visit says staff set its price at signing, and a visit that could not be priced shows Signing would stop: …. When booking itself is refused, the stage says so and adds “The rest of this run assumes staff booked the visit.” - Expand a stage to see why. Every card opens onto a Rules in effect table — the rule that fired, the value it resolved to, and where to go and change it — plus that stage's figures. The submission stage shows an 837P preview and the adjudication stage a Synthetic 835, so you can read the actual EDI the claim would have produced.
- Check what was suppressed. Below the stages, Side effects that WOULD have fired (suppressed by the simulator) lists the background jobs a real run would have queued — your confirmation that the dry run stayed a dry run.
How a charge is decided, and common gotchas
When Hero quotes a patient at booking or check-in, it resolves the three layers from most specific to least: the patient's exception or cash rate first, then the service-menu override, then the organization default. Insurance claim amounts follow a separate order — contract rate, learned rate, then your CPT List Price (§5.4b). Use the Simulator (§5.5) to preview the resolved outcome for any patient and service.
Resolution order (cash price and collection)
- 1 · Patient — a cash-rate override or exception in the patient’s Custom Billing Rules.
- 2 · Service — the Service Menu price mode and collection policy.
- 3 · Organization — the Collections & Fees default.
- The first layer that sets a value wins; lower layers fill in the rest.
“No service-menu price”
- Online visit types must have a price before the portal can show one.
- Set Price mode on the service, or rely on the org copay default for insured patients.
- A cash visit of a service on Use organization default is charged the CPT List Prices of the codes signed.
- The Service Menu banner counts how many online visit types are still unpriced.
An insured visit has no claim yet
- A signed code has no price: the row reads No claim yet: 99050 has no price…
- Use
Set a price for 99050, or price it inCPT List Prices. - The visit bills automatically once the code is priced (§5.4b).
Patients see “Contact office for pricing”
- The service’s Show the price to patients is off, or its price mode is Office review.
- Hiding a fixed price is display only — the visit still bills that price.
- To have staff set the price per visit, switch the service to Office review.
Patient charged the wrong amount
- Check the patient's Cash charge rate and Exceptions first.
- Then the service's Price mode and Collection policy.
- Then Collections & Fees — the
Simulatorhelps confirm the result.
Cash patient still asked for copay
- Set Bypass insurance (treat as cash pay) on the patient's Insurance tab.
- Or set the service's Insurance vs. cash handling to Cash only (in a DPC practice the field is Membership coverage).
Patient blocked from scheduling
- The org Outstanding balance & scheduling guard is on.
- Collect the balance, enroll a payment plan (if the exception is allowed), or relax the guard.
- This guard also interacts with follow-up outreach in Scheduling > Patient Notifications.
Card-on-file requirement blocks booking
- Confirm the requirement is intended at the org or service layer.
- For an exception, tick Bypass card on file in the patient's Custom Billing Rules.
Need help? Email support@heroemr.com.