Walk-up kiosk & self check-in
Patients check themselves in — on a lobby tablet, from the portal, or by texting CHECK IN — inside one check-in window, while the front desk gets alerts only when something needs a person.
Walk-up kiosk & self check-in
Patients check themselves in — on a lobby tablet, from the portal, or by texting CHECK IN — inside one check-in window, while the front desk gets alerts only when something needs a person.
Let patients check themselves in on a walk-up tablet
A walk-up tablet sits in your lobby and needs nobody at the desk. The patient taps Check in for your appointment, enters their last name and date of birth, types the six-digit code texted to the mobile number on file, and is checked in on the spot. The tablet then walks them through whatever intake is still open and resets itself for the next person. It is the same kiosk as the staff hand-off in 1.12, running in a second mode on tablets you enroll. Walk-up is off until an administrator turns it on.
-
Turn on the kiosk.
Open
Admin>Kiosk. On theGeneraltab, setEnable check-in kiosktoEnabled. Walk-up devices need it. -
Allow walk-up devices.
On the
Walk-uptab, underKiosk mode, chooseAlso allow walk-up self check-in devices(“Enrolled tablets let patients check themselves in — no one at the desk touches the device.”). Staff hand-off keeps working alongside it. -
Choose how patients prove who they are.
Under
Identification, keepLast name + date of birth + text code (recommended)unless your patients cannot receive texts.Last name + date of birth onlyworks without a phone but gives the patient far less to do (see the table below). -
Set the reset timers.
Return to the welcome screen after (seconds idle)— 90 by default (30–600); inside the check-in steps an “Are you still there?” countdown adds 30 seconds first.Show “All set — have a seat” for (seconds)— 15 by default (5–120), then the tablet resets for the next patient. -
Decide who hears about problems.
Alert the front desk(on) sends a toast naming the device — never the patient — when the kiosk cannot find someone. UnderStaff review, pick when a check-in needs a second look —Only when something changed (recommended),Every walk-up check-in, orNever— and choose the people inSend review to-dos to. Nobody is picked by default, which means toasts only. -
Add a welcome line and save.
Welcome message (optional)replaces the default greeting (up to 280 characters). ClickSave Changes; the dialog moves toDevicesso you can enroll the first tablet (1.34).
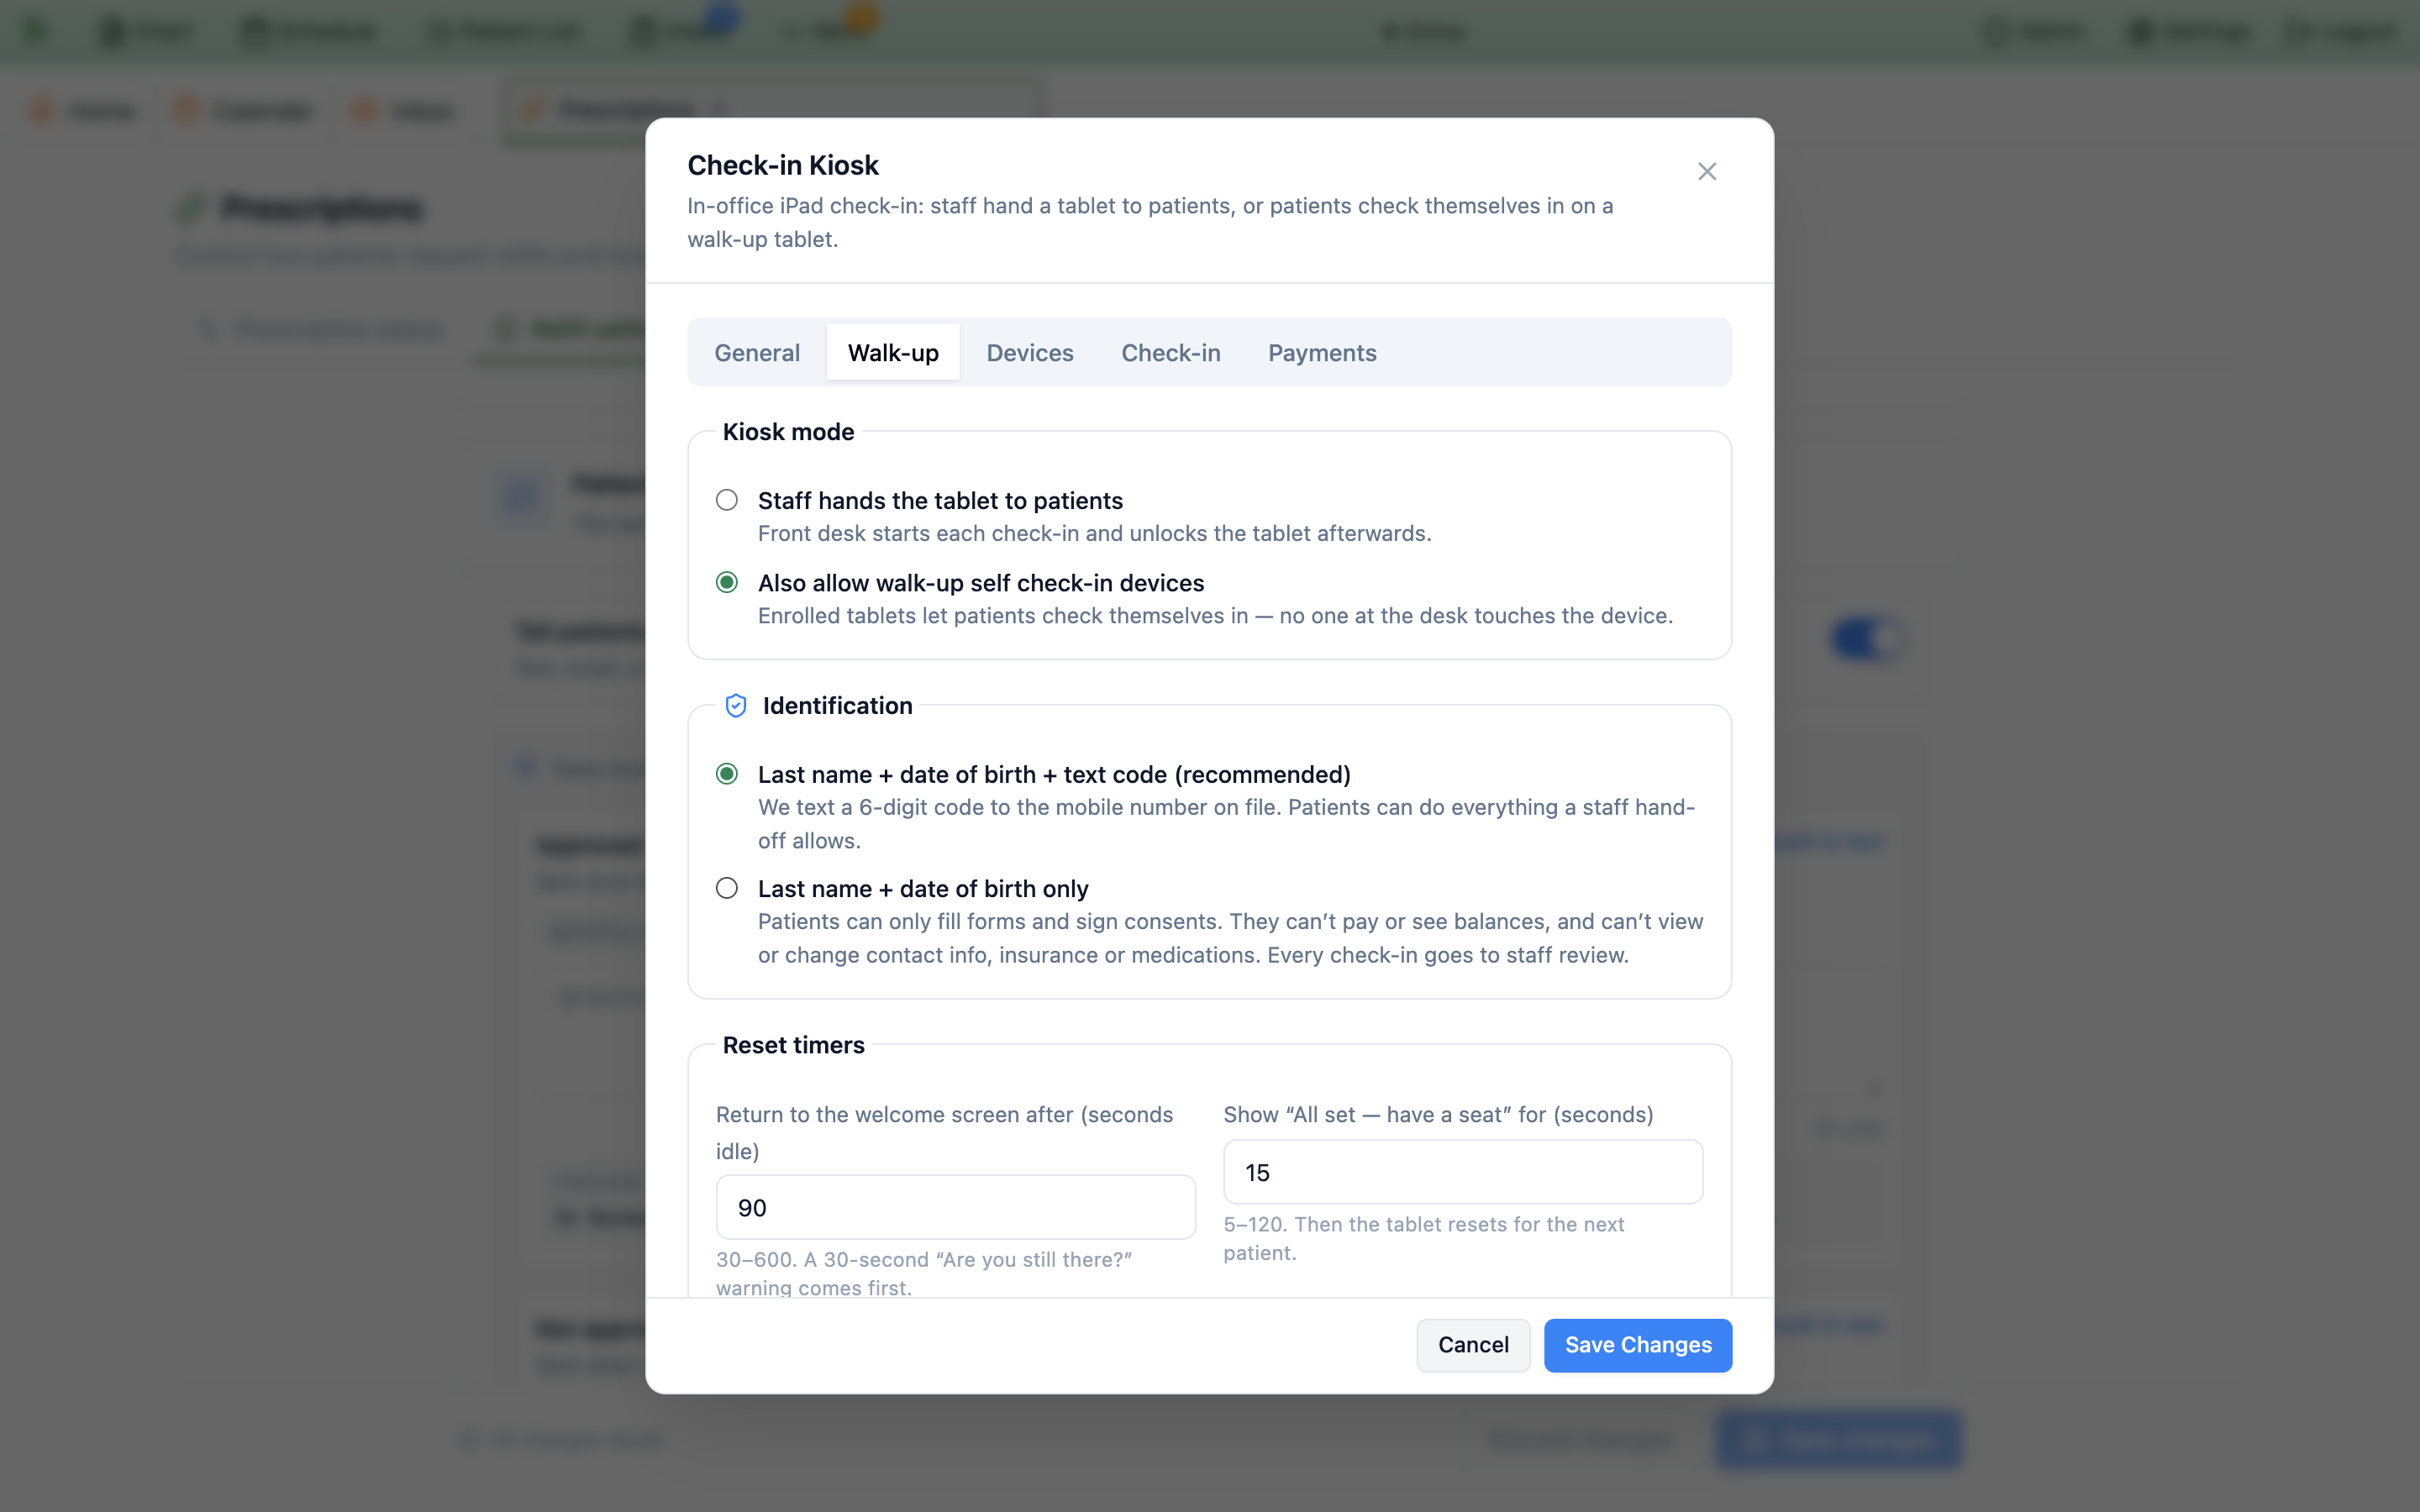
Admin > Kiosk > Walk-up: the mode and how patients identify themselves.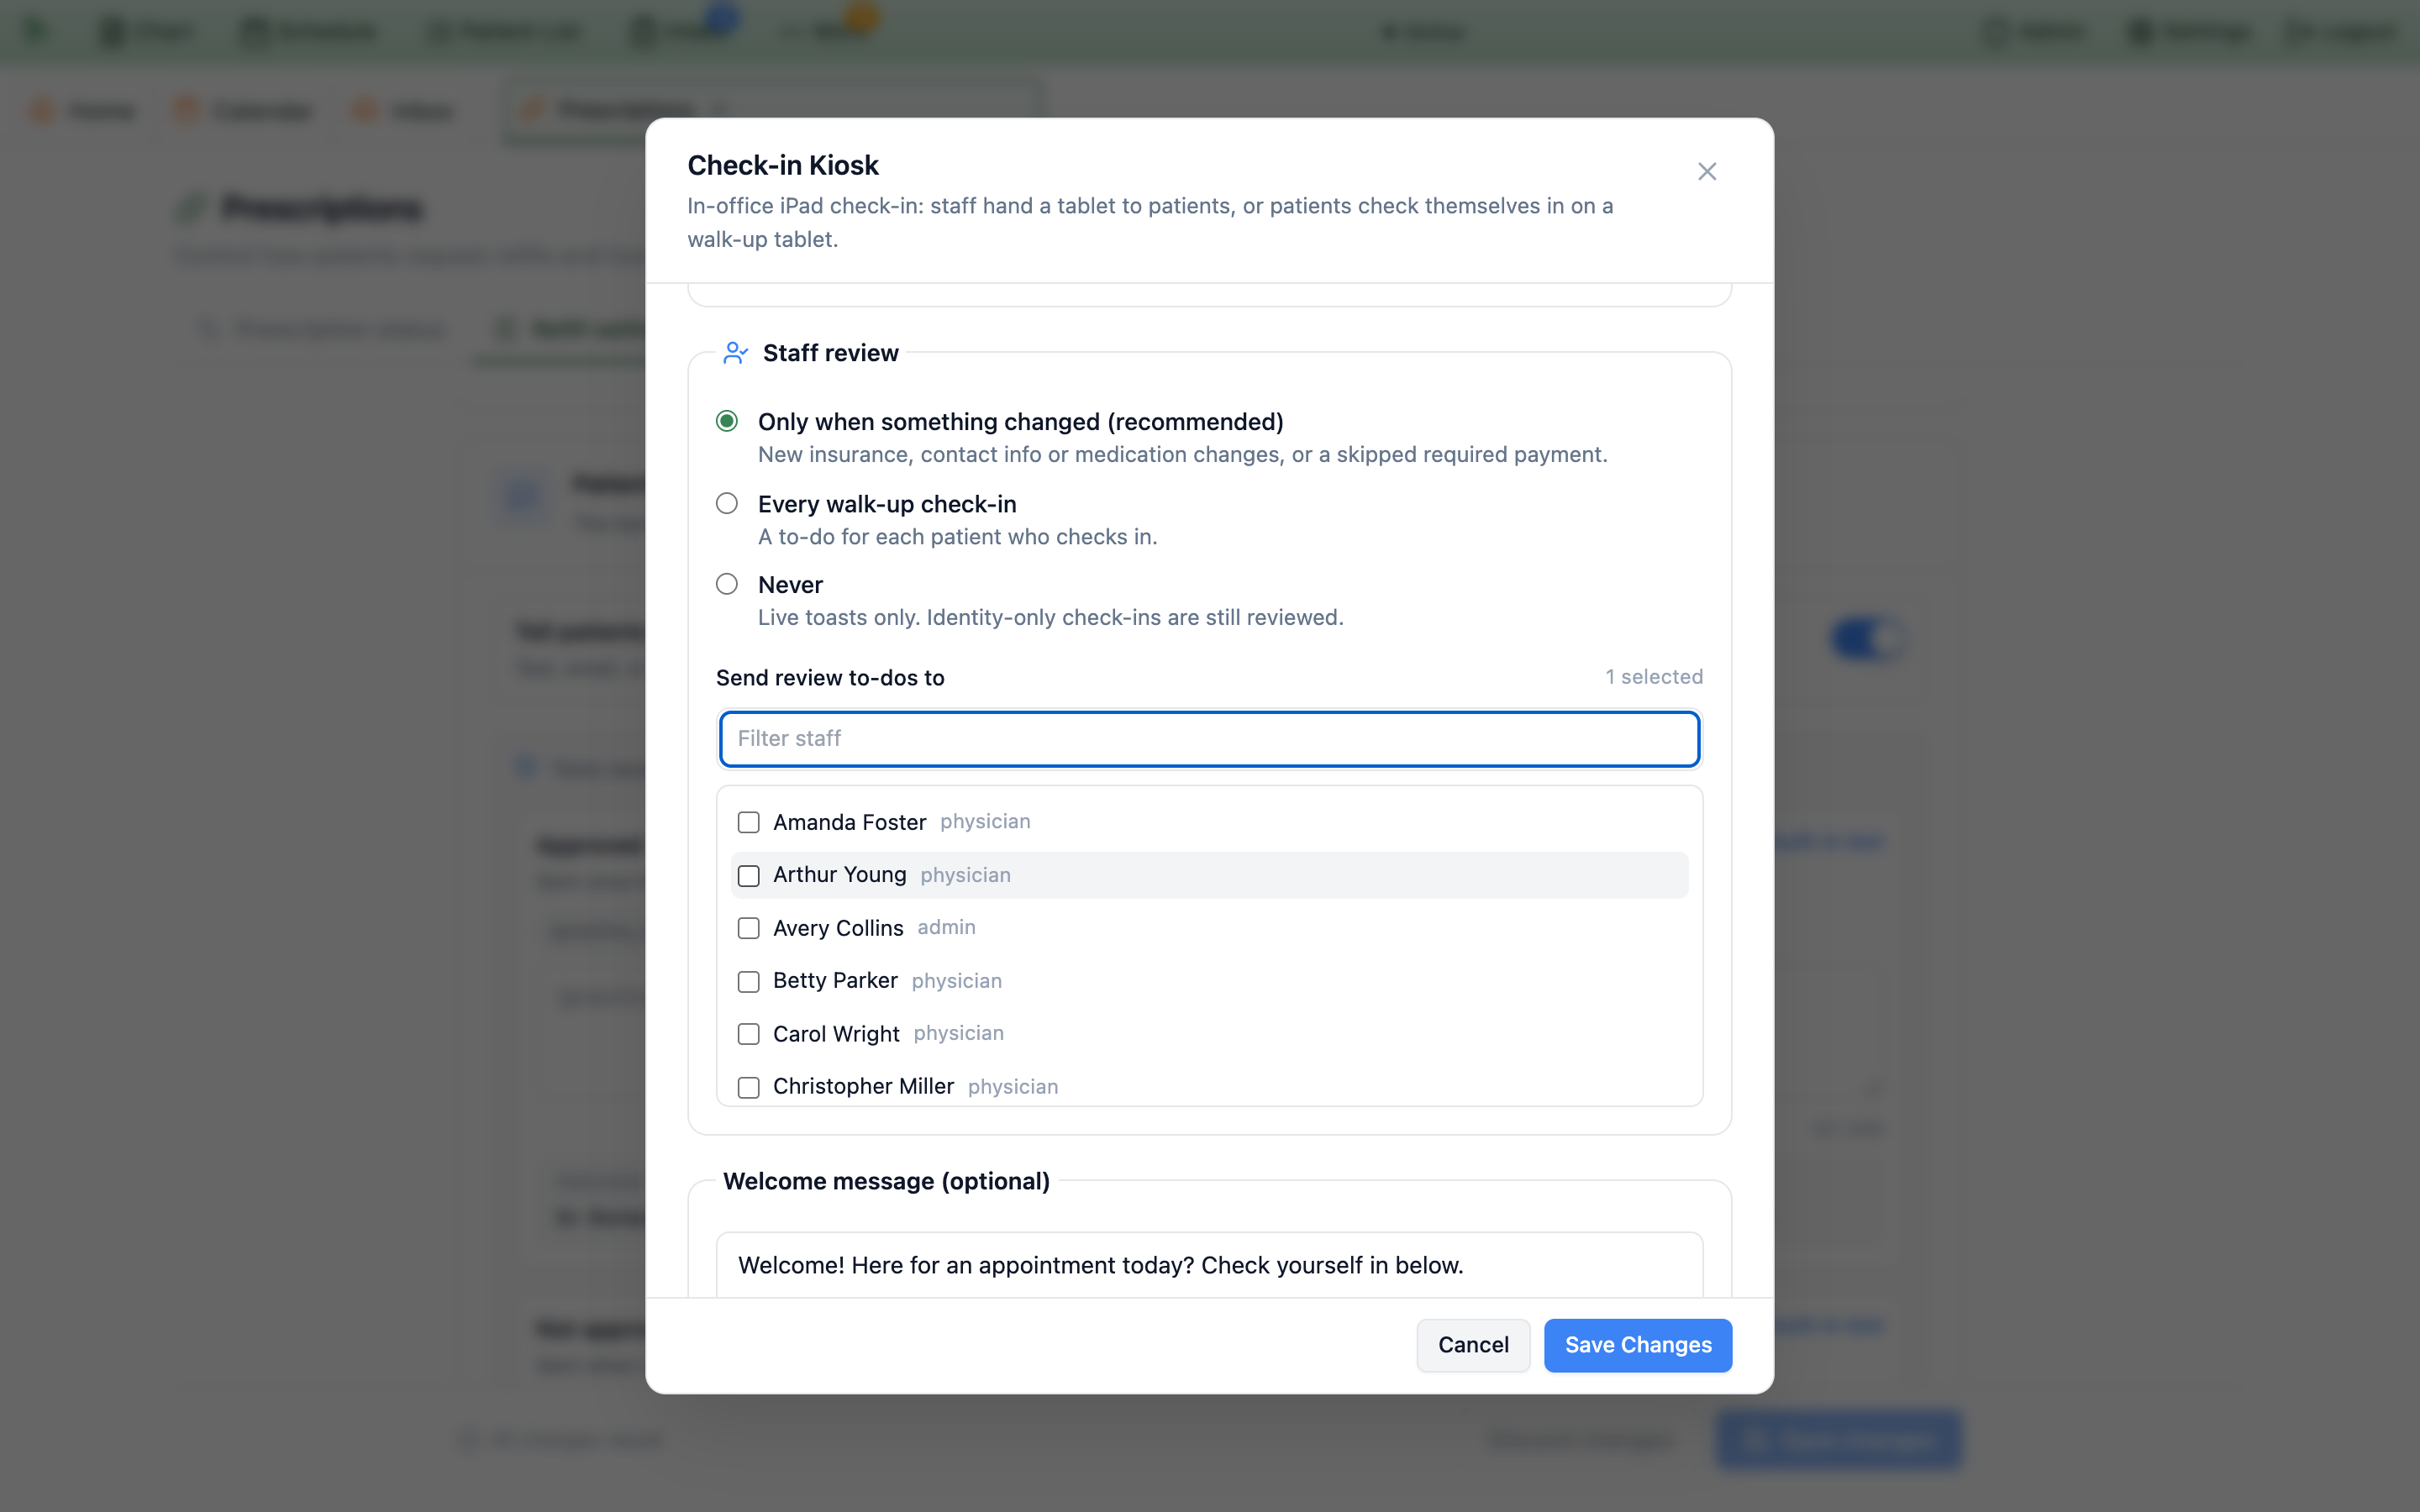
Last name + date of birth + text code
- Proof of identity: a 6-digit code texted to the mobile number on file (for a patient under 18 with no phone, the parent’s phone). It expires in 5 minutes.
- What the patient can do: everything a staff hand-off allows — questionnaires, forms and consents, contact details, insurance, medications and allergies (if enabled), and card payment (if enabled).
- Staff review: follows your
Staff reviewchoice.
Last name + date of birth only
- Proof of identity: knowledge only — no text is sent.
- What the patient can do: questionnaires and forms only. They see “To update your contact info, insurance or medications, please see the front desk.” No payment and no balances.
- Staff review: every check-in gets a high-priority review to-do (“identity not verified by text code”), even with
Never.
Admin > Kiosk. Office managers can still enroll a tablet, or remove it, from the tablet itself (see the next section).
Enroll, name, and revoke walk-up tablets
A tablet becomes a walk-up kiosk only after someone with device rights enrolls it. That is a practice administrator (or office manager or owner), or a staff member with the Enroll, rename, and revoke walk-up self check-in kiosk devices permission, which the Office Manager role profile includes. They also need kiosk access to sign in.
-
Prepare the tablet.
In Safari, open your patient portal address followed by
/kiosk, thenShare>Add to Home Screen, and launch the kiosk from that icon. -
Sign in and enroll.
Sign in with your work email and password (or a passkey). On
Today’s check-ins, tapSet up as walk-up kiosk— it appears only while the kiosk and walk-up are both on and this tablet is not enrolled yet. -
Name it and pick its location.
In the Set up as walk-up kiosk dialog, enter a
Tablet namestaff will recognize in alerts (for example “Front lobby iPad”) and, if your practice has several locations, aLocation— “Patients can only check in here for visits at this location.” — orAny location. TapSet up. You are signed out and the tablet shows the patientWelcomescreen. -
Manage tablets from the Devices tab.
Admin>Kiosk>Deviceslists every tablet withDevice,Location,Last seen,Enrolled by, andCheck-ins today.Renamechanges the name or location;Revokestops the tablet immediately and ends any check-in in progress on it.Show revokedlists retired tablets. -
Take a tablet out of walk-up mode.
Tap
Staffat the bottom of theWelcomescreen and sign in.Return to walk-up modehands it back to patients;Remove walk-up setupforgets the enrollment on that tablet (and revokes it when you have device rights).
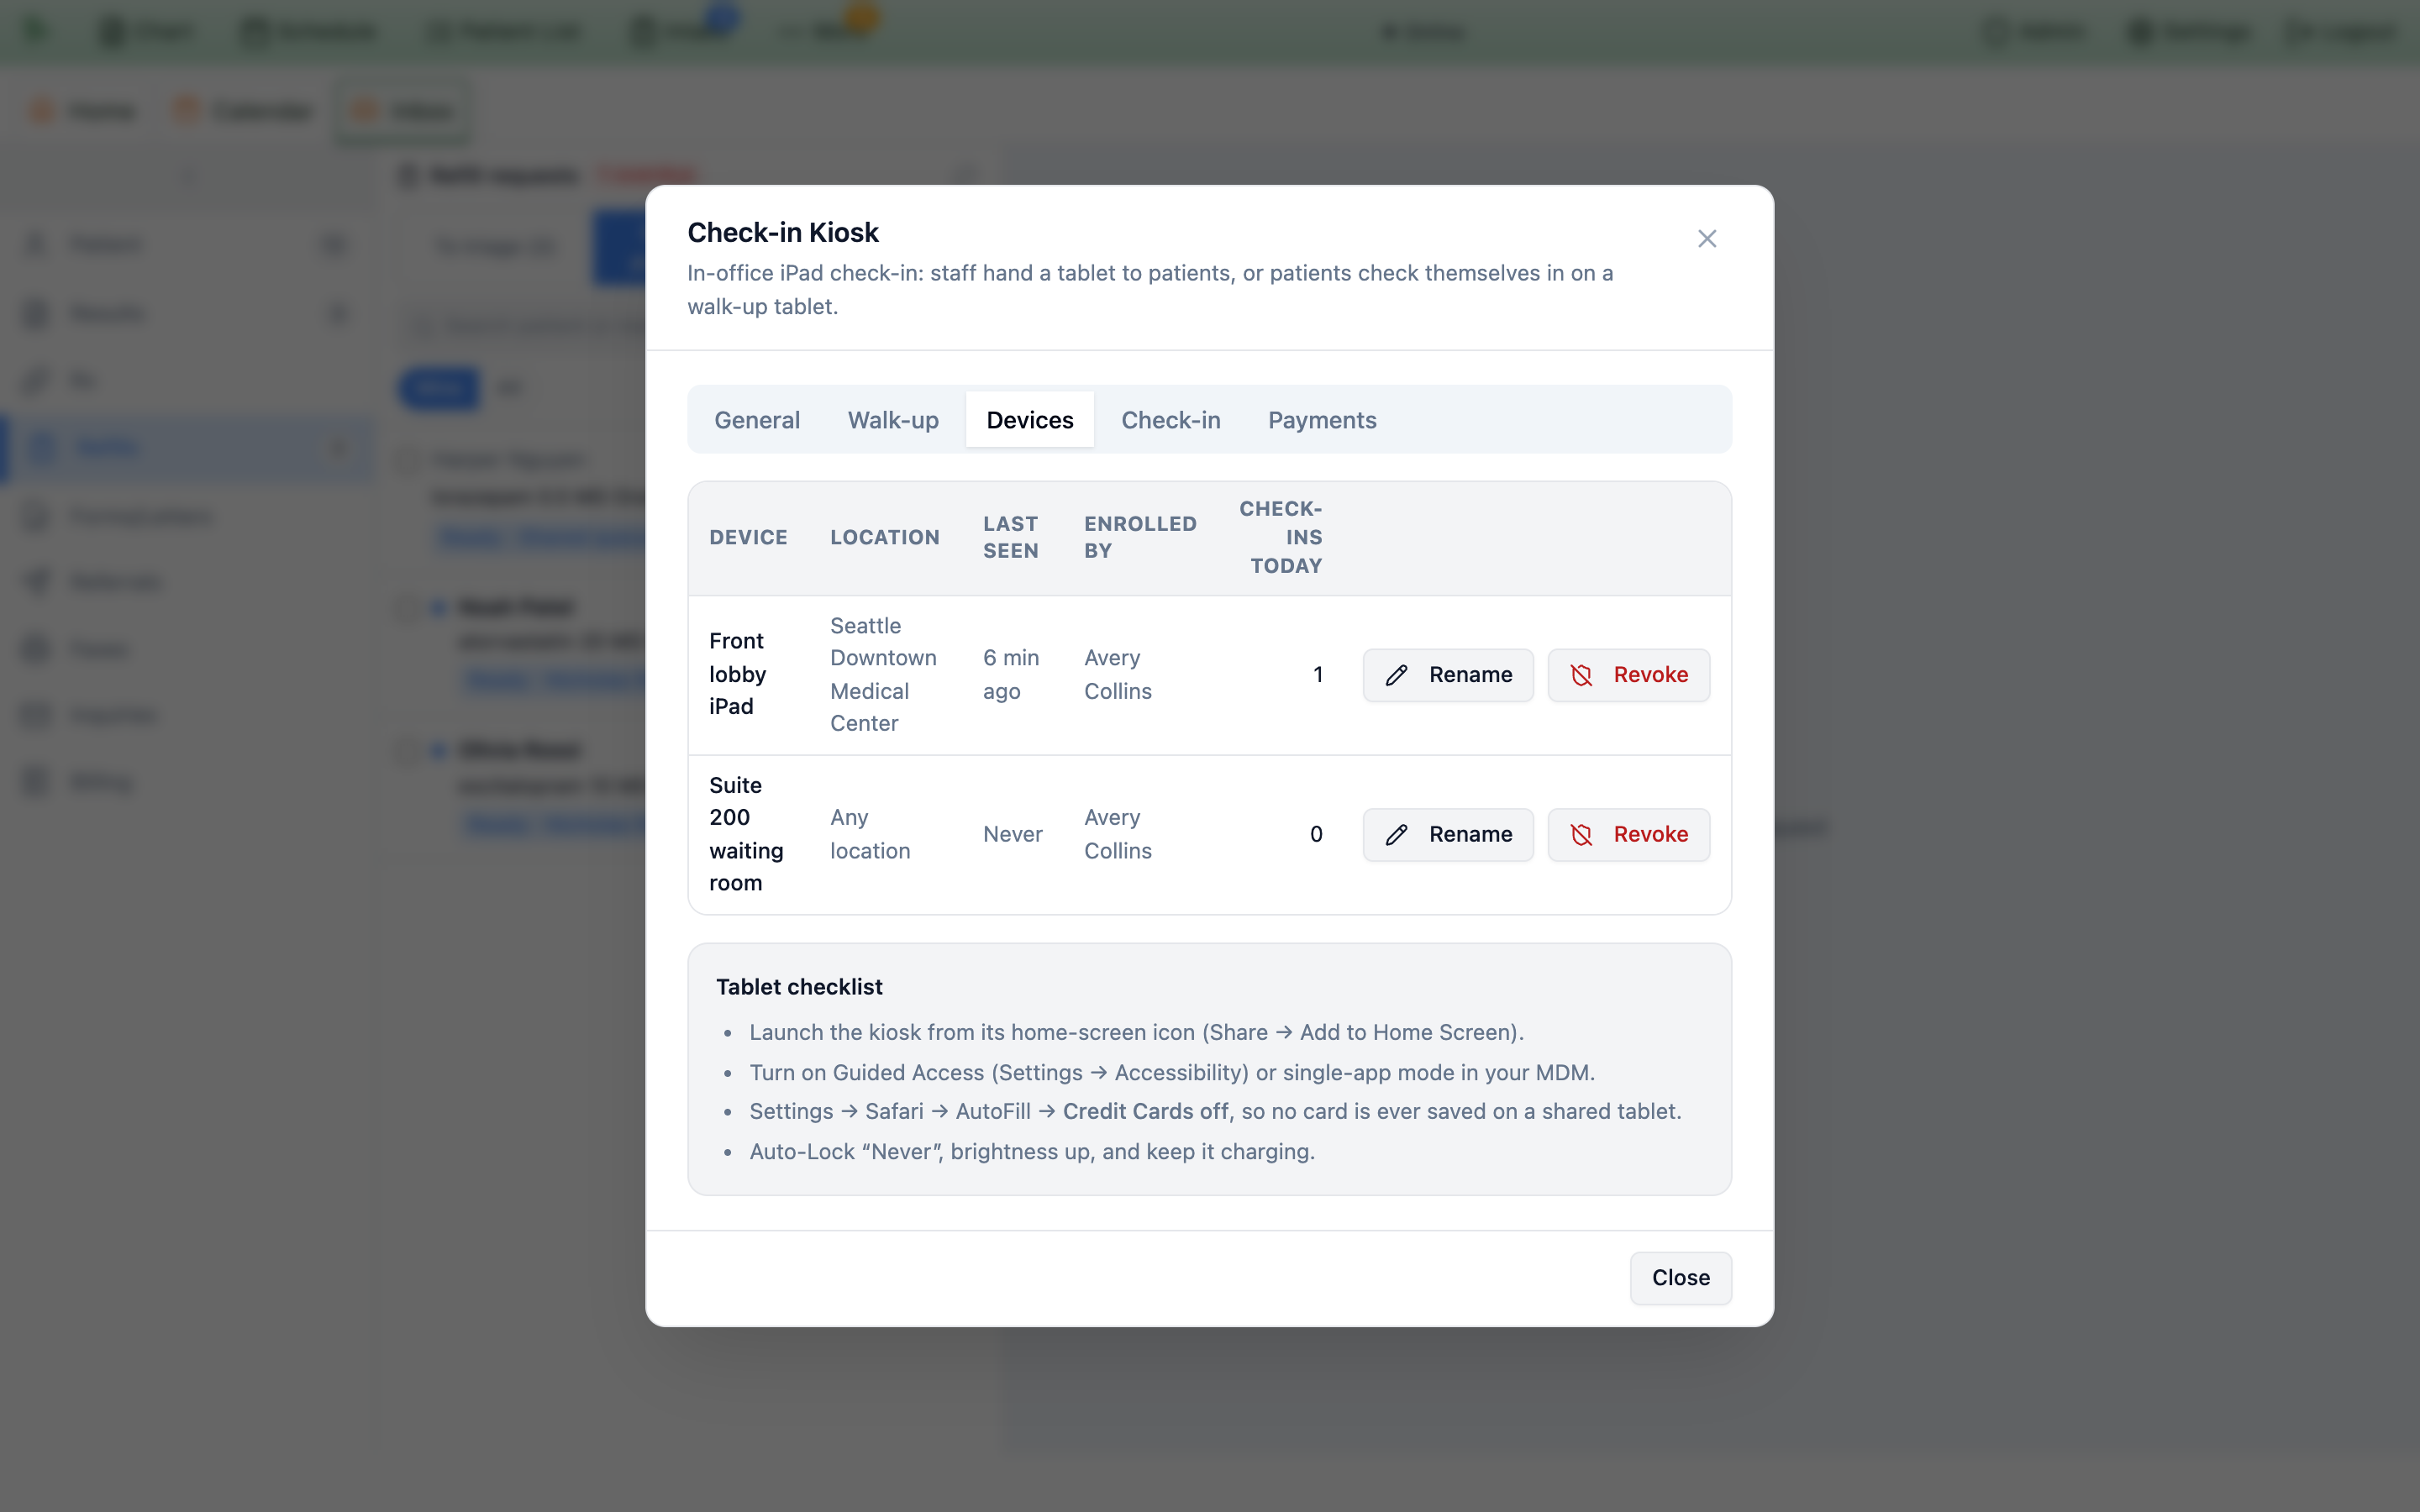
Devices tab: one row per enrolled tablet, with the tablet checklist below.What the patient does at a walk-up tablet
-
Welcome.
Your welcome message (or “Here for an appointment today? Check yourself in on this screen.”) and one big button,
Check in for your appointment.I need helpalerts the front desk;Staffis for your team. -
Let’s find your appointment.
Last nameandDate of birthasMM/DD/YYYY, thenContinue. If two patients share both, aFirst namefield appears. -
Enter the code we texted you.
The screen shows the masked number (“We texted a 6-digit code to +1 *** *** 1234.”). The code submits itself on the sixth digit;
Send a new codeunlocks after 45 seconds. “No phone with you? Please see the front desk.” - Checked in. “You’re checked in, Jordan” with the appointment time and provider. The visit is checked in at this moment — the calendar and the provider see the arrival even if the patient walks away later.
-
Finish open intake.
The same steps as a staff hand-off:
Questionnaires,Forms & consents,Your information,Insurance, and, if enabled, medications, allergies, andPayment. The last screen, That’s everything, ends withFinish check-in, then “All set — have a seat.” counts down and the tablet resets.
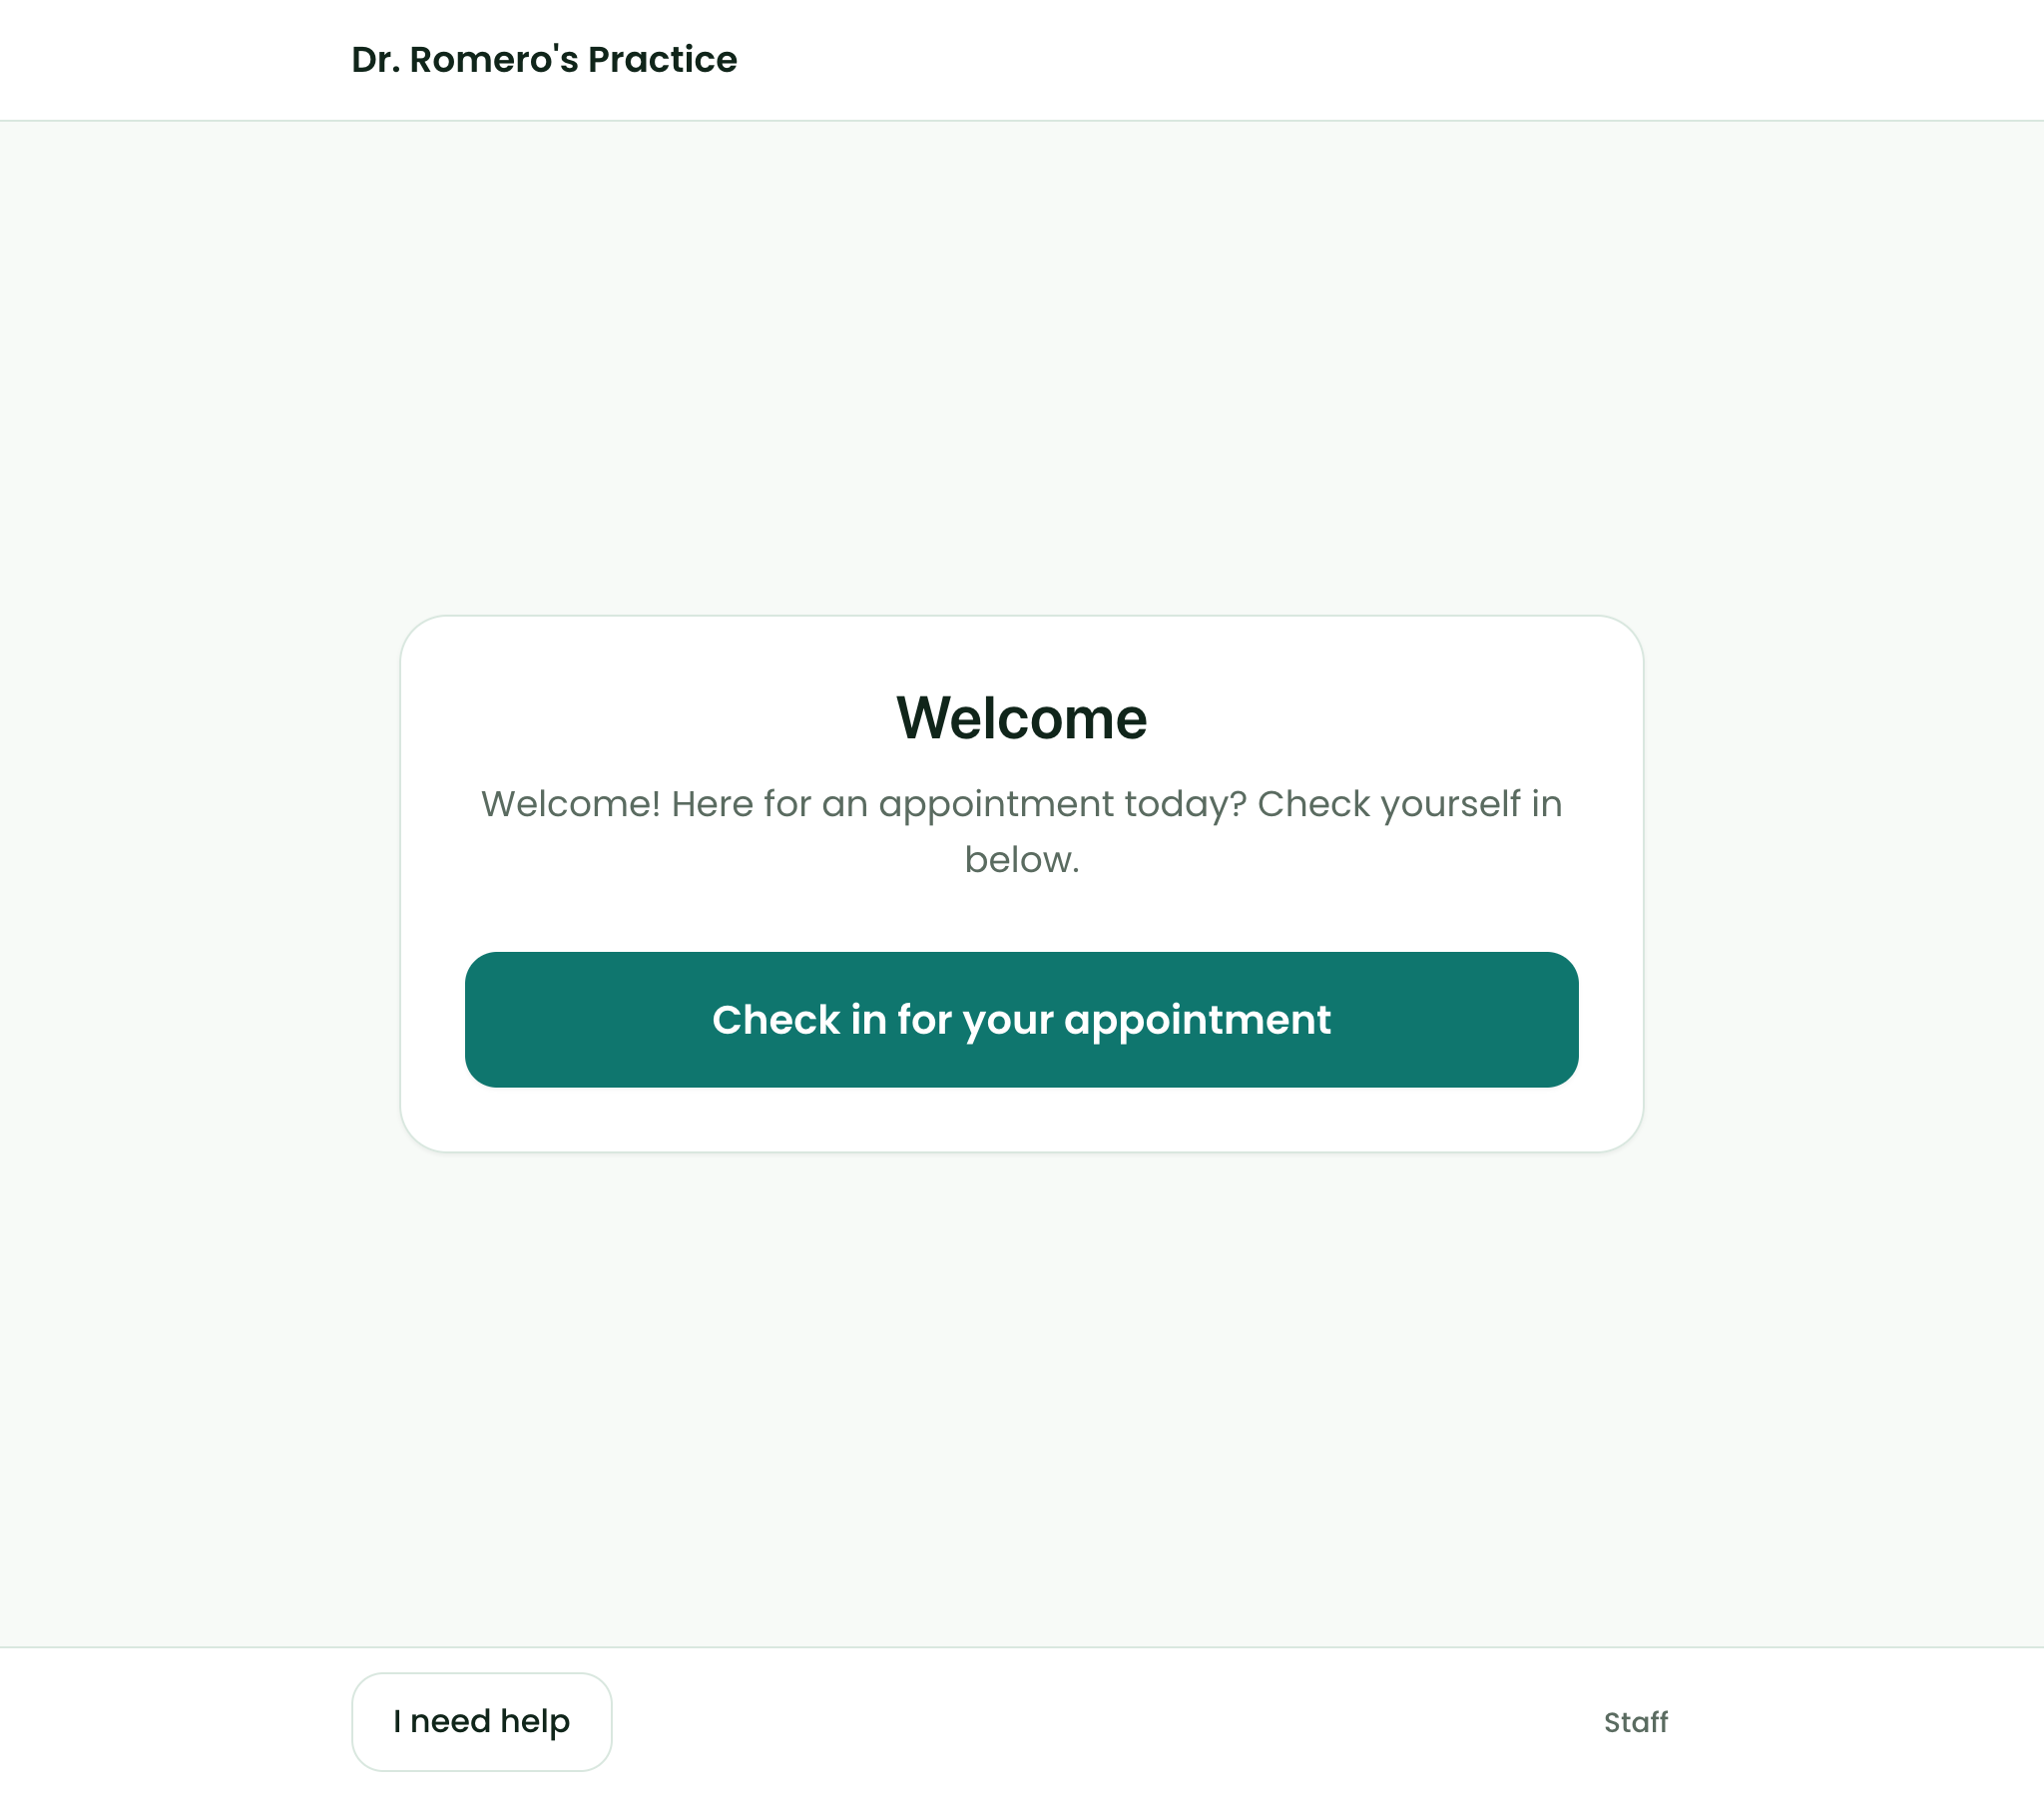
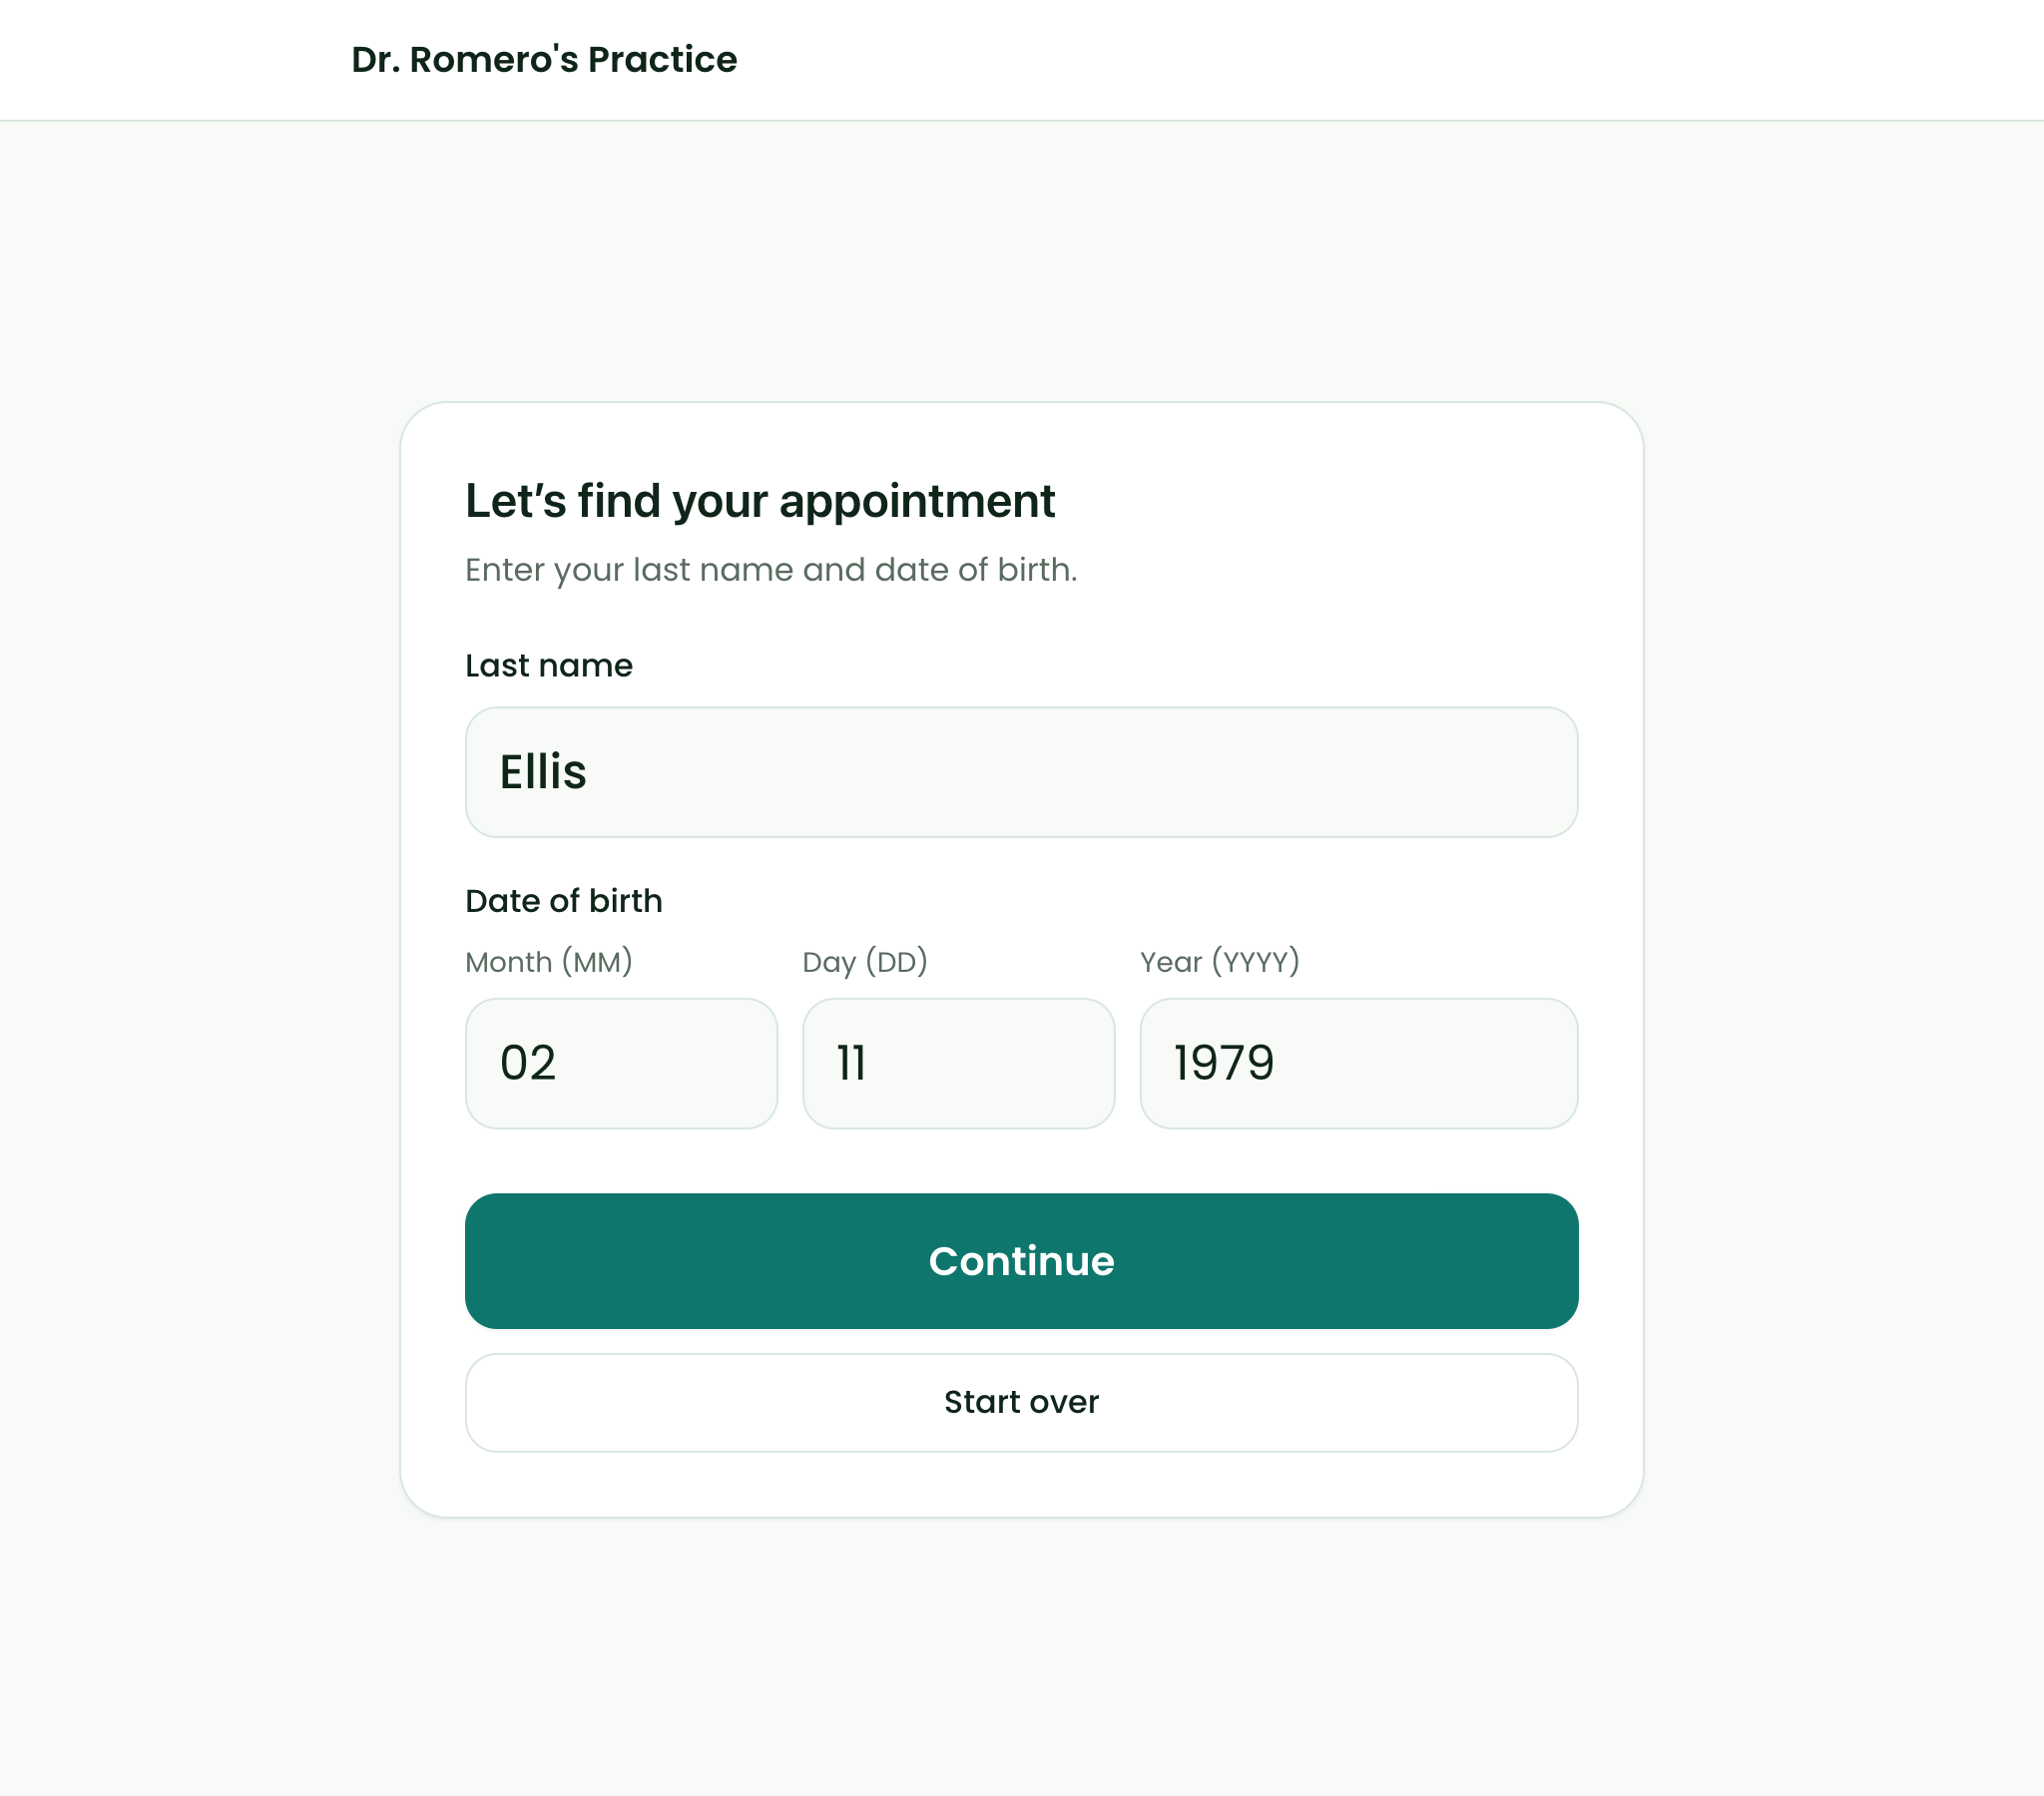
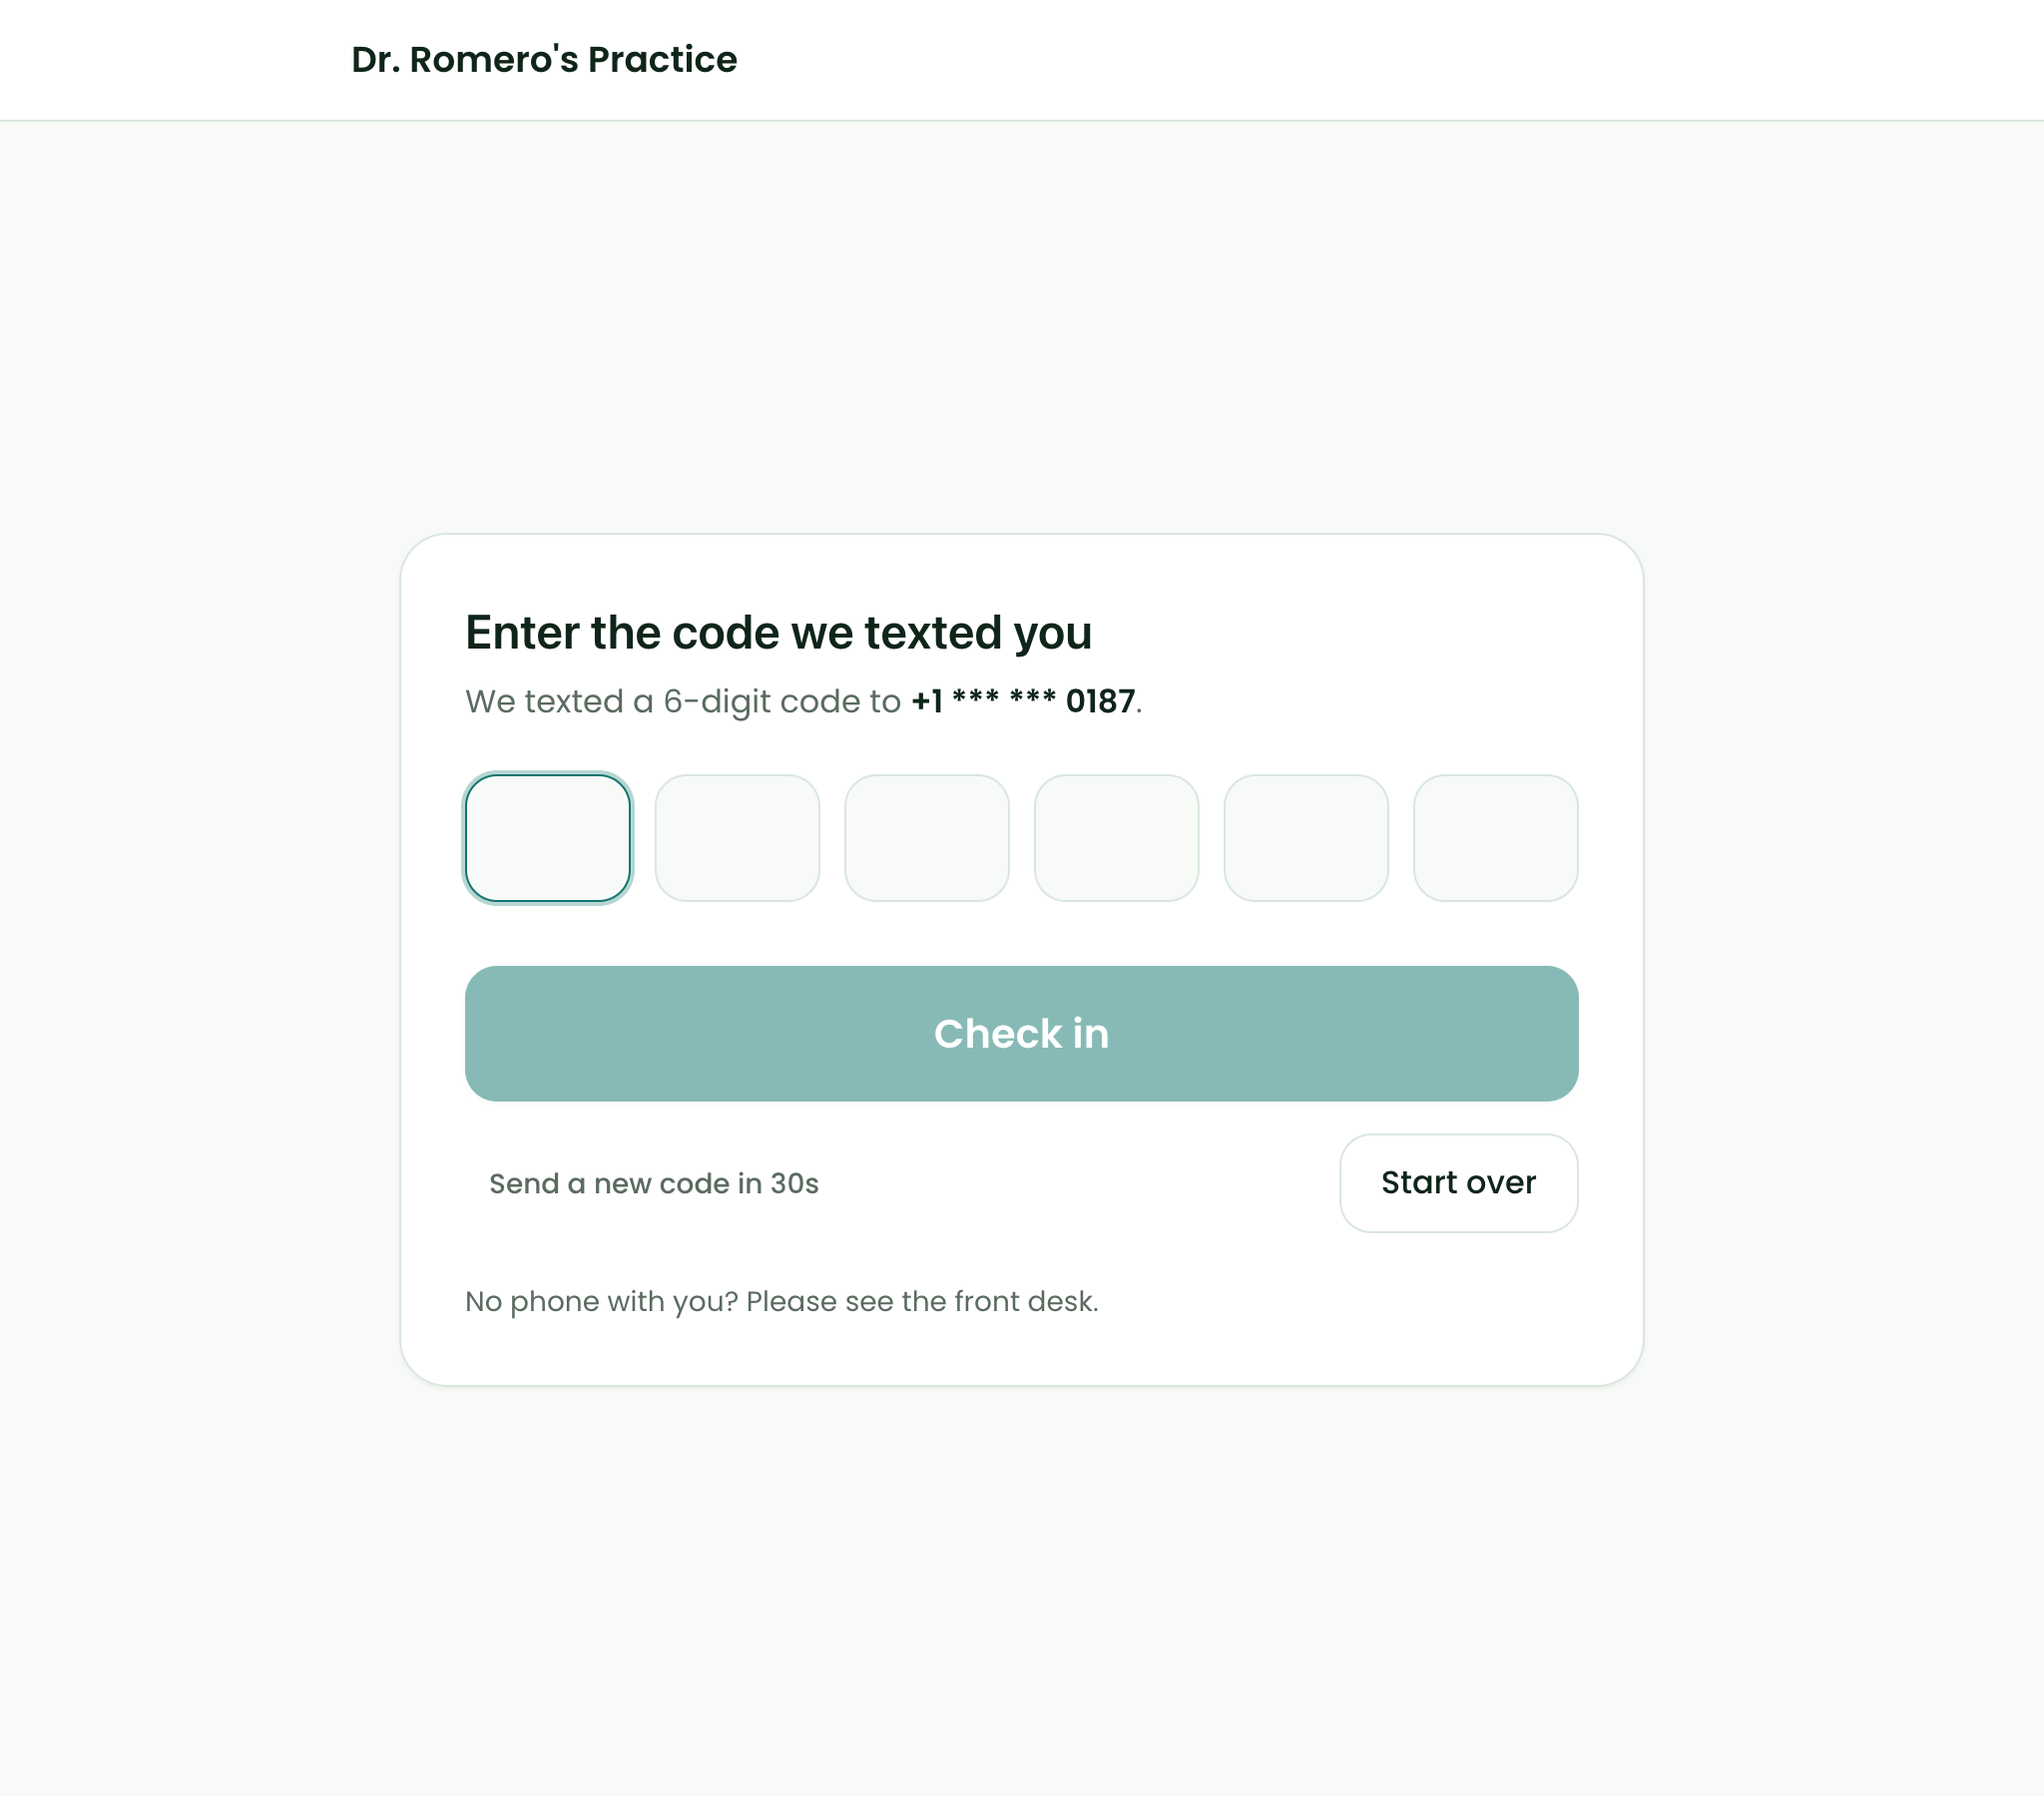
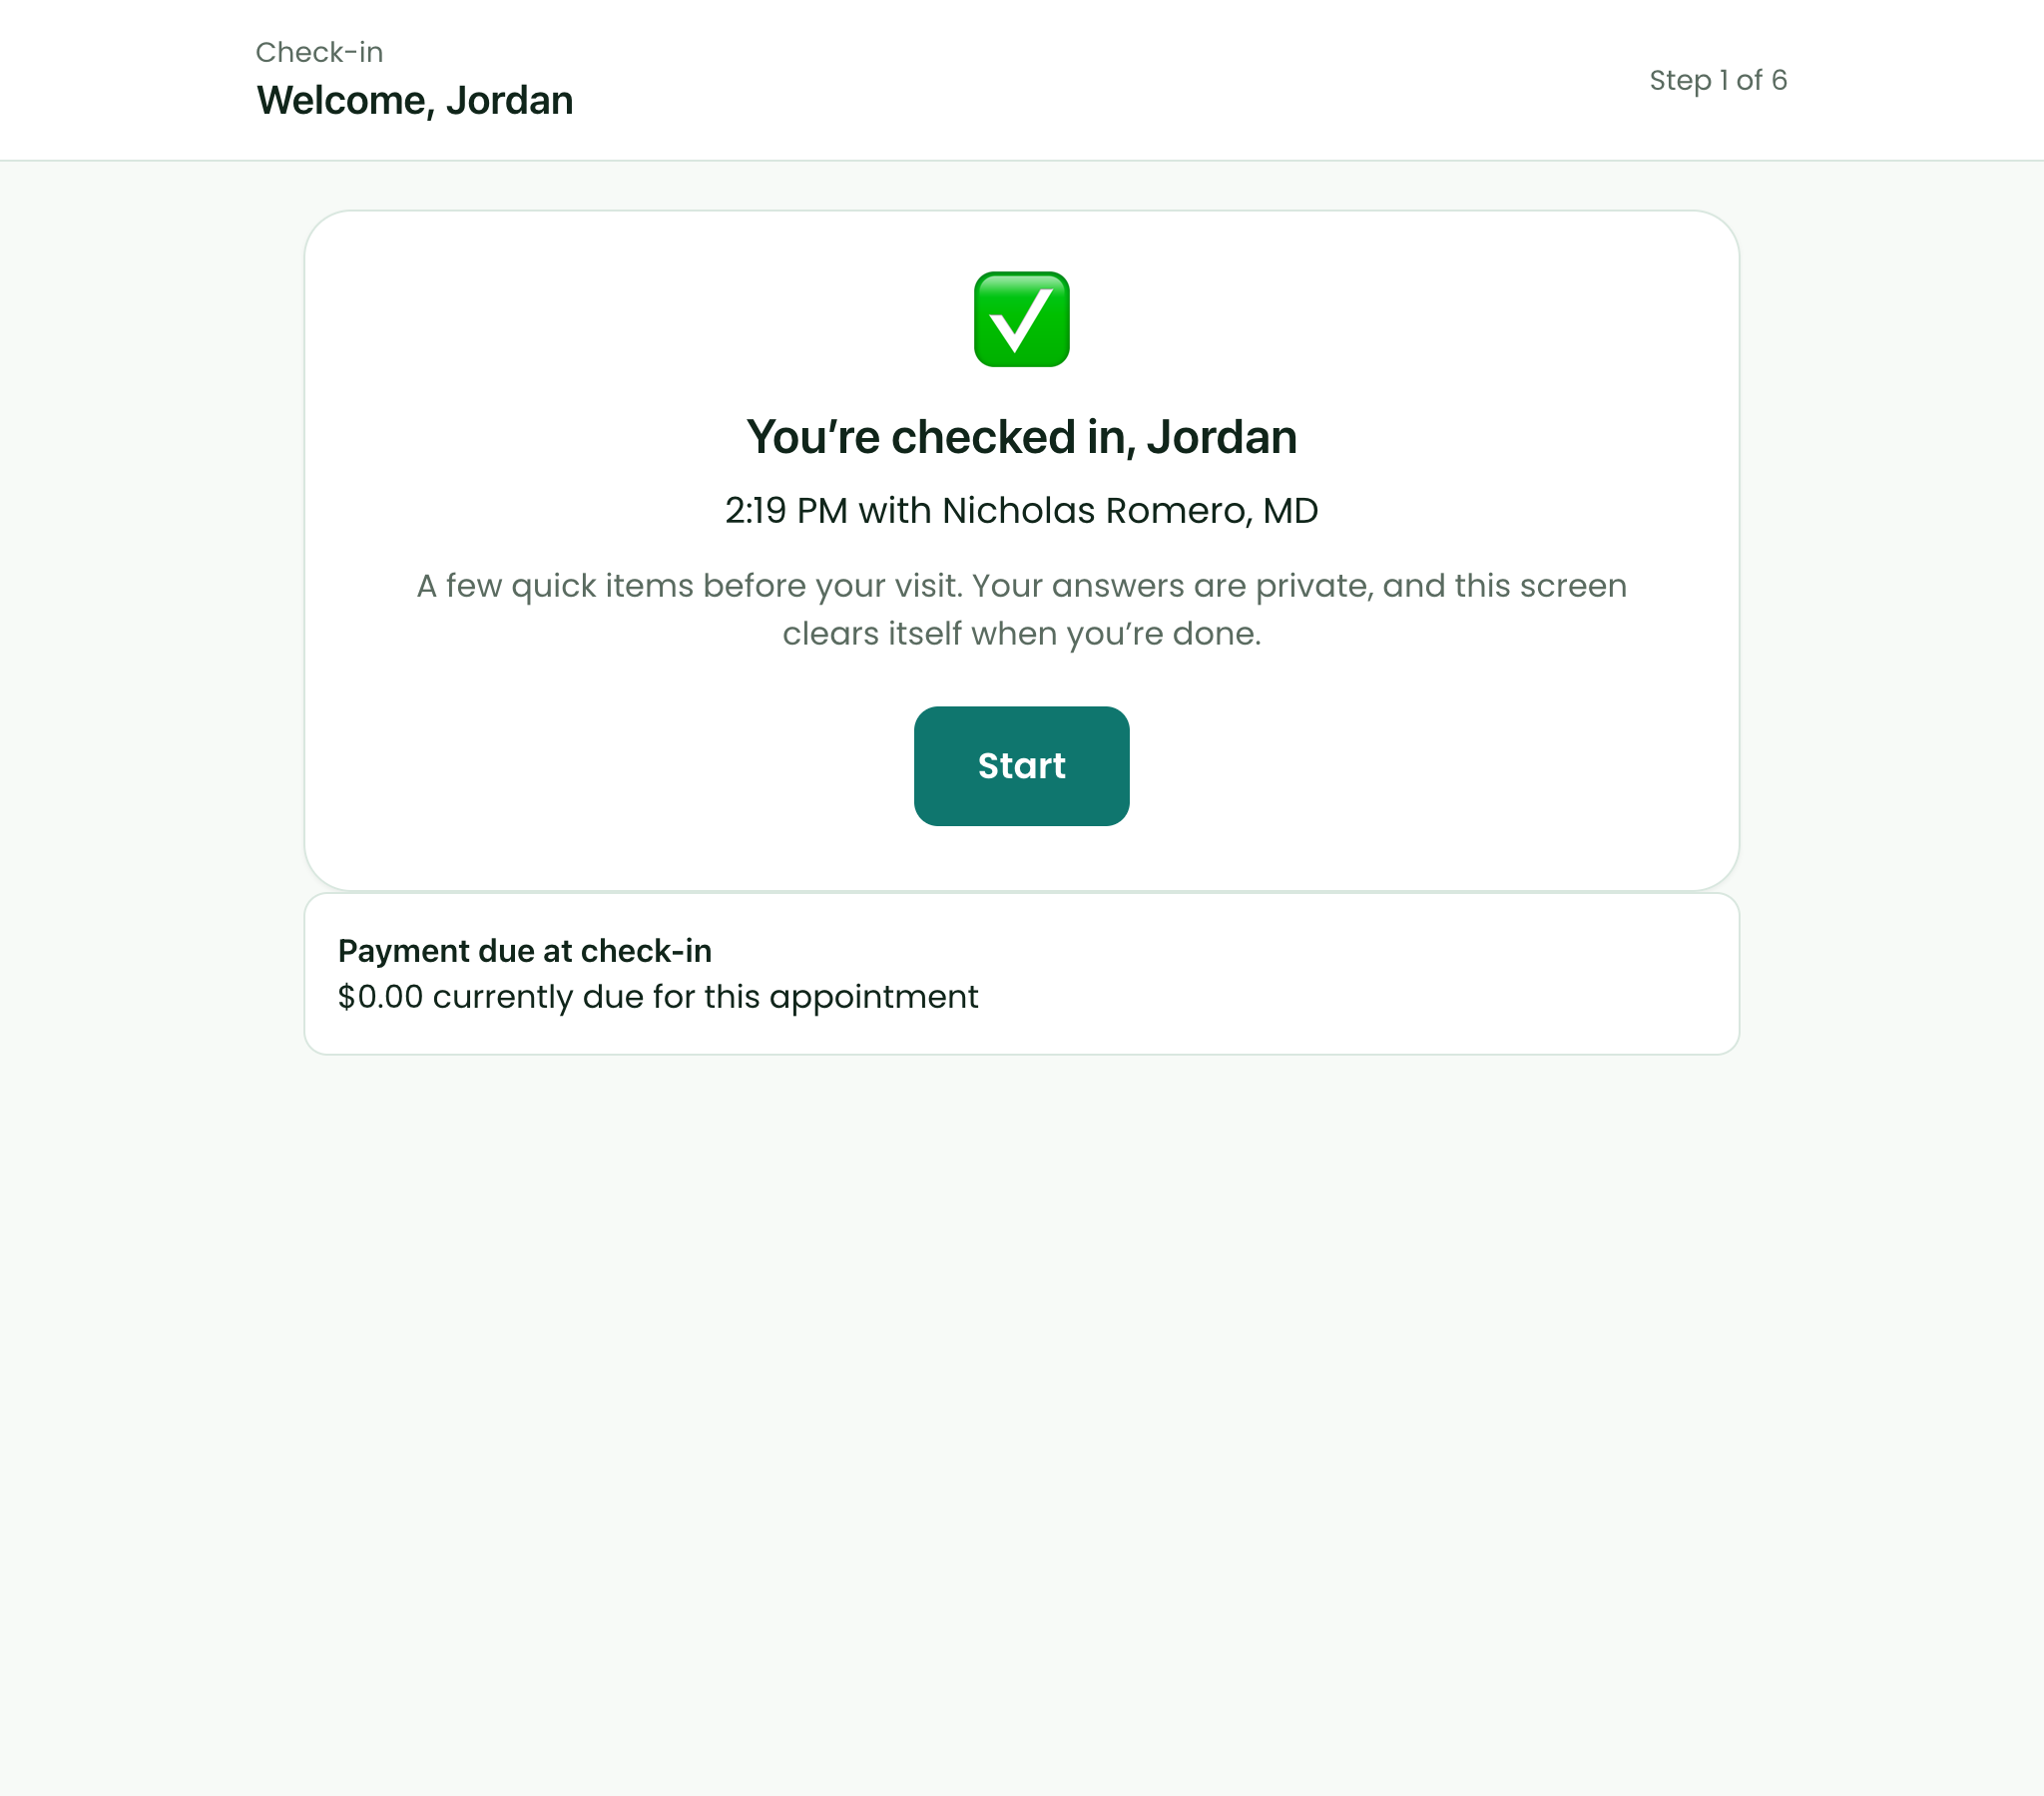
Welcome after 15 seconds. The walk-up tablet never shows who is scheduled or whether a visit exists. Five misses in a row pause the tablet for 2 minutes, and five wrong codes lock that code for 15 minutes.
Welcome. Every ending — finish, idle, help — signs the patient out and reloads, so nothing stays on the tablet.
Front-desk alerts and walk-up review to-dos
Walk-up check-ins reach your team two ways: live toasts in Hero EMR, and to-dos for the people in Send review to-dos to.
| Toast | Example | Who sees it |
|---|---|---|
Patient checked in | “Elena P. checked in at the kiosk for 1:52 PM with Nicholas Romero, MD” with Open schedule | The visit’s provider and staff who manage scheduling |
Kiosk check-in needs review | “Elena P. finished check-in at the kiosk — review: contact info” with Open chart | Staff who manage scheduling, plus your review recipients |
Kiosk needs help | “Someone at Front lobby iPad needs help checking in” — never names the patient | Staff who manage scheduling |
-
Know what triggers a review.
With
Only when something changed (recommended), a check-in is reviewed when the patient changed contact info, insurance, medications, or allergies; asked for help; left before finishing after changing something; skipped a required payment; or identified with name and date of birth only.Every walk-up check-inreviews all of them;Neverreviews only name-and-date-of-birth check-ins. - Work the to-do. Each recipient gets one to-do per check-in, attached to the patient: title “Review kiosk check-in — Elena P.”, with notes such as “Elena P. finished check-in at the walk-up kiosk on Front lobby iPad (Sep 25, 2026 01:45 PM EDT). Review: contact info. Identified by: last name + date of birth + texted code.” Open the chart, confirm the change, and complete the to-do.
-
Answer a help request.
I need helpon theWelcomescreen always alerts the front desk. A patient who taps it mid-check-in stays checked in; the tablet shows “Someone will be right with you.” and resets.
Today’s check-ins as At Front lobby iPad. Staff can cancel it but cannot open or take it over.
Set when patients can check in, and turn on text check-in
One check-in window applies everywhere a patient checks themselves in: the kiosk, the portal and app Check in button, and text check-in. You can edit it in two places that show the same settings: Admin > Kiosk > Check-in, or Admin > Scheduling > Reminders > Patient Notifications > Text Replies.
-
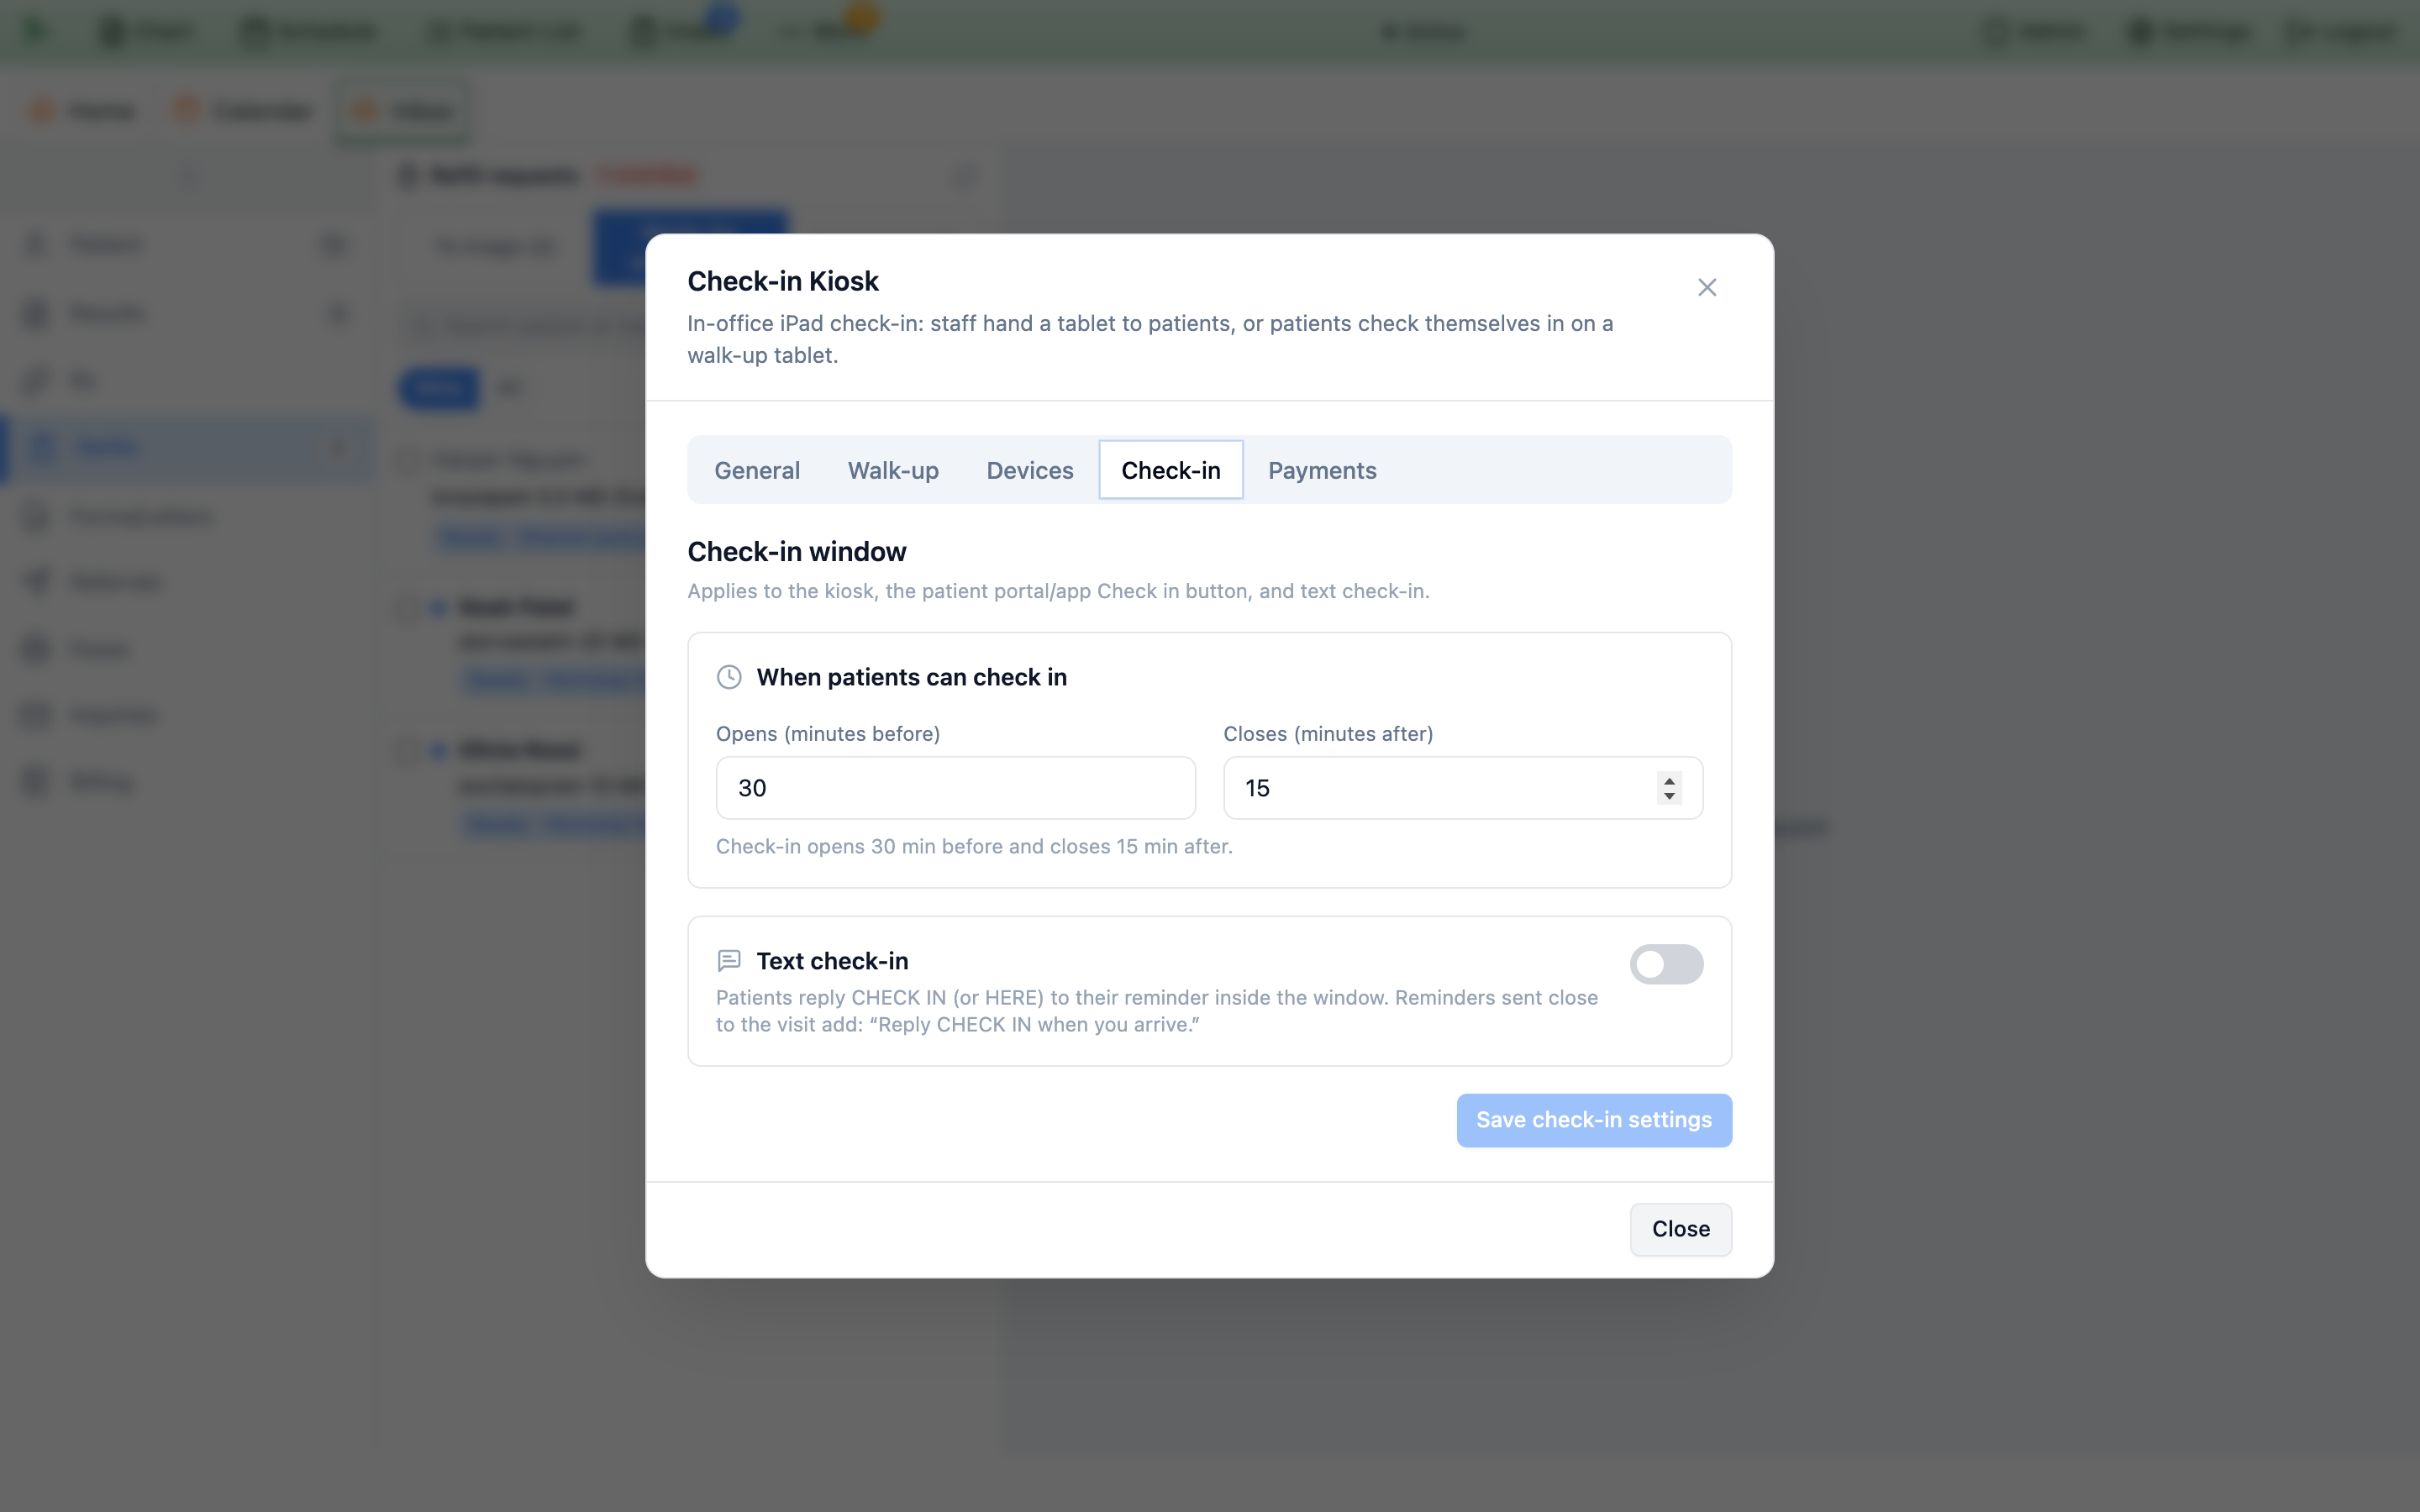
Set the window.
Under
When patients can check in:Opens (minutes before)— 30 by default (5–120) — andCloses (minutes after)— 15 by default (0–60). A summary reads “Check-in opens 30 min before and closes 15 min after.”; setClosesto 0 for “closes at the appointment time”. -
Turn on text check-in if you want it.
Text check-instarts off. When on, patients replyCHECK IN(orHERE) to their reminder inside the window, and reminders sent close to the visit add “Reply CHECK IN when you arrive.” (within 30 minutes: “Reply CHECK IN or open the app to check in now.”). -
Save.
Click
Save check-in settings; it confirms “Check-in settings saved.”
| When the patient texts CHECK IN… | They get back |
|---|---|
| Inside the window | “You’re checked in for your 9:30 AM EDT appointment. Please proceed to the waiting area.” |
| Too early | “It’s too early to check in. You can check in starting 30 minutes before your appointment.” |
| Already checked in | “You’re already checked in for your appointment. We’ll see you soon!” |
| Two visits that day | “You have multiple upcoming appointments. Please check in through the patient app or contact our office.” |
| No upcoming visit | “We don’t see any upcoming appointments for you. Please call our office for assistance.” |
| Text check-in turned off | “SMS check-in is not currently available. Please check in at the front desk or through the patient app.” |
CHECKIN, CHECK-IN, CI, and ARRIVED also check the patient in; a bare C counts as a check-in only while a visit is inside the window.
The Check in button in the patient portal
Patients with an in-office visit can check in from the portal when they arrive. The button lives on the Your next visit card at the top of the portal’s Appointments page; telehealth visits do not show it.
-
Before the window.
The card reads
Check-in opens at 9:30 AM(shown when the window opens within the next 12 hours). -
Inside the window.
Check inchecks the visit in; the card then readsChecked in ✓with the time, and staff get aPatient checked intoast ending in “online”. -
If something comes first.
Unfinished pre-visit tasks: “Finish your pre-visit tasks first, then tap Check in again.” (the first open task opens). A payment your practice requires before check-in: “Pay $25.00 to check in.” with
Go to billing(only when portal bill pay is on). - After the window. For up to 3 hours afterwards the card says “Online check-in has closed — please let the front desk know you’re here.”
Take card payments on the kiosk
The Payments tab of Admin > Kiosk lets patients pay by card on the web kiosk, in both staff hand-off and walk-up sessions. It needs a connected Stripe account (External Providers > Stripe). Changing it requires billing-settings access, which practice administrators, billing managers, office managers, and owners have; others see “Kiosk payments are a billing setting. Ask a billing manager to change them.”
| Setting | Options |
|---|---|
Card payments on the kiosk | Off (default) — the kiosk shows the amount due and patients pay at the desk. Optional — pay by card before finishing, or skip. Required before finishing — patients are asked to pay, but Pay at the front desk is always offered and flags the check-in for review. |
Collect | This visit’s charges (default) — copays and fees for today’s appointment — or Full account balance, paid one charge at a time. |
Card readers (tap/chip) | Take card payments on paired card readers — patients tap, insert, or swipe their card on a Stripe reader paired with the kiosk app. It needs a connected Stripe account. |
On the tablet the Payment step lists what is due with Pay $25.00; the card goes into a secure Stripe form, cards only — Apple Pay, Google Pay, Link, and saved cards are off on shared devices. A successful payment reads “Paid ✓ Thank you.”; there is no receipt screen. A patient share held for a pending secondary claim isn’t offered and doesn’t count in the amount due while that claim is pending (see Patient balances). Card readers need an office registered for them under External Providers > Stripe (Stripe Terminal card readers), and readers are paired in the kiosk app. One Save payment settings applies both the web-kiosk and card-reader settings; new check-ins use them right away.
Need help? Email support@heroemr.com.