Encounter completion — orders & prescribing
Order and prescribe inside the visit: the unified order search, the structured prescription builder, medication safety checks and PDMP, diagnosis links, EPCS signing for controlled substances, and supervisory signing when a physician must sign for an NP or PA.
Encounter completion — orders & prescribing
Order and prescribe inside the visit: the unified order search, the structured prescription builder, medication safety checks and PDMP, diagnosis links, EPCS signing for controlled substances, and supervisory signing when a physician must sign for an NP or PA.
Order medications, labs, imaging & more
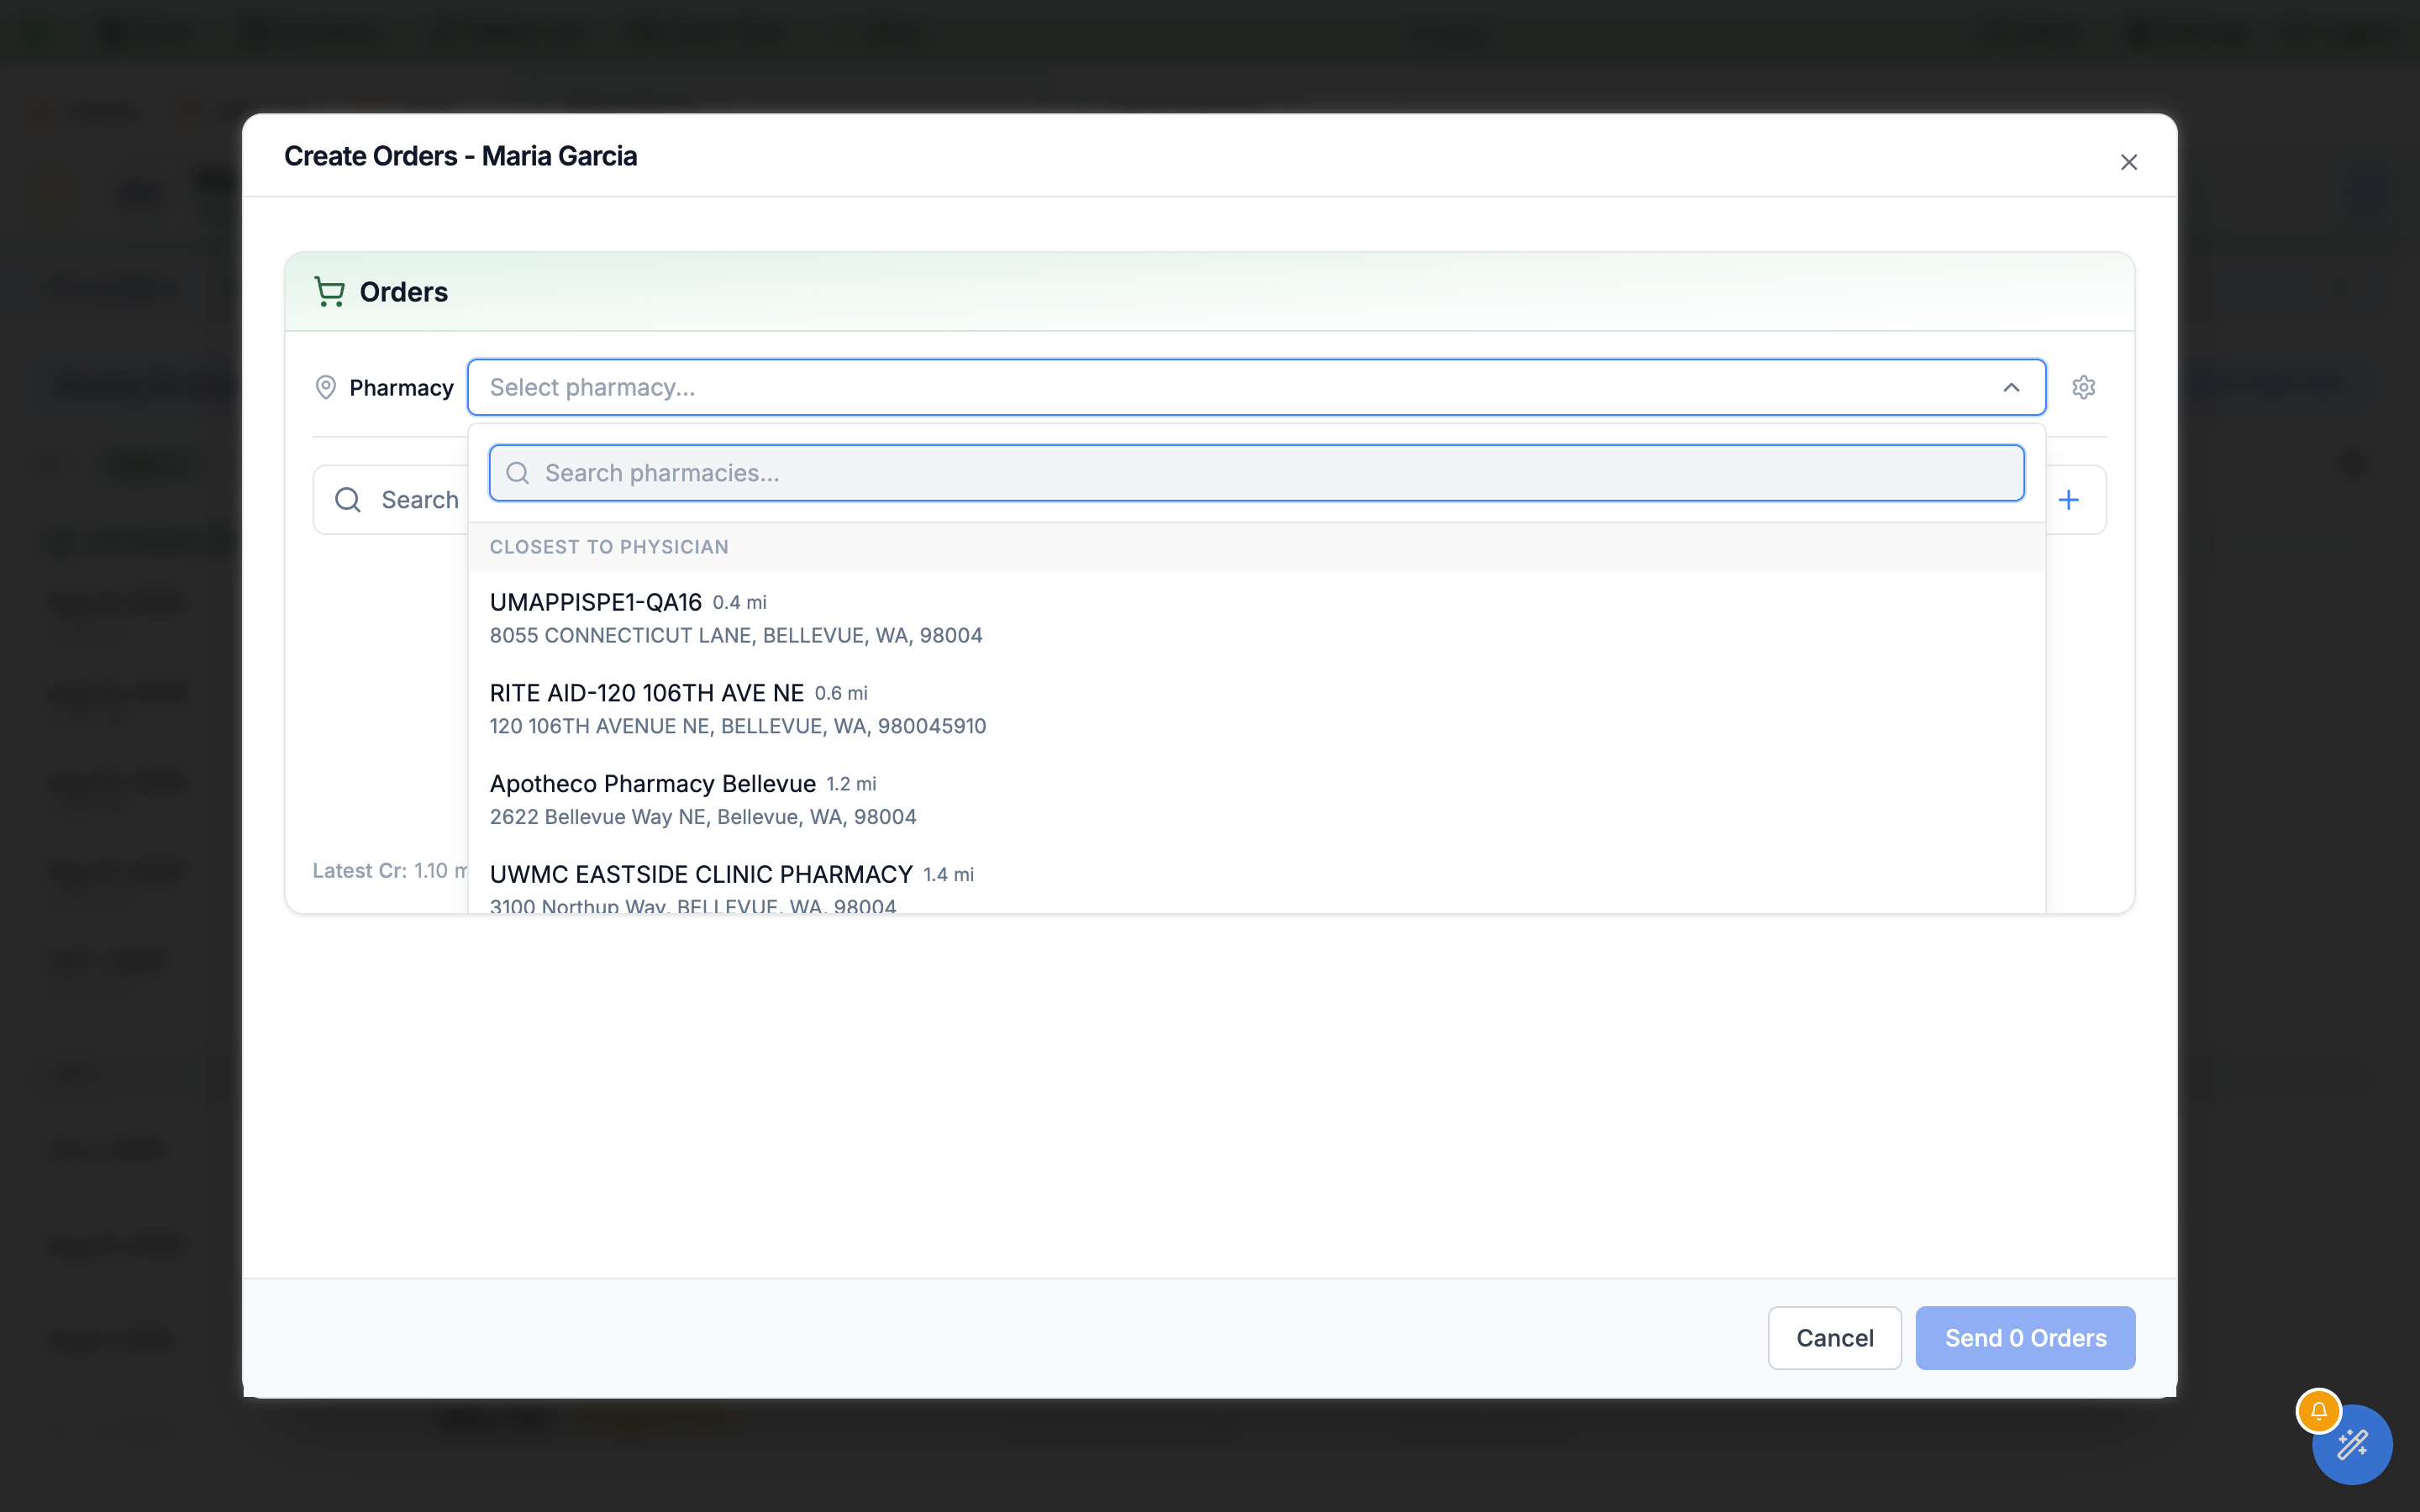
The Orders section is one search box for everything you order at the visit — prescriptions, lab panels, imaging, referrals, screeners, and forms. Pick a destination pharmacy first so prescriptions know where to go.
-
Choose the pharmacy.
Open
Select pharmacy…and the dropdown is grouped, not one flat distance-sorted list:Primary Pharmacyfirst, thenPatient Pharmacies, then up to fiveClosest to Physician, then up to fiveClosest to Patient. A group with nothing in it is left out entirely, so don’t expect all four on every patient — the first two need pharmacies already saved on the chart, andClosest to Patientneeds a usable home address to measure from. On a patient with neither, the dropdown opens onClosest to Physicianalone. Type two or more characters and aSearch Resultsgroup from the wider pharmacy directory appears above those groups. Add or edit pharmacies withManage pharmacies. -
Search and add.
Type into
Search ordersand pressSearch & Addto open the Search Orders window. Filter by tab:all,order sets,medication,lab,imaging,referral,screeners,forms, orfavorites. Theorder setstab only appears when order sets are enabled for your organization — see Order sets. Each result shows its name, brand names, and type; controlled medications are flagged with their schedule (for exampleSchedule: CIV). -
Watch the renal cue.
Latest Crunder the order list surfaces the most recent creatinine so you can dose-adjust without leaving the screen.
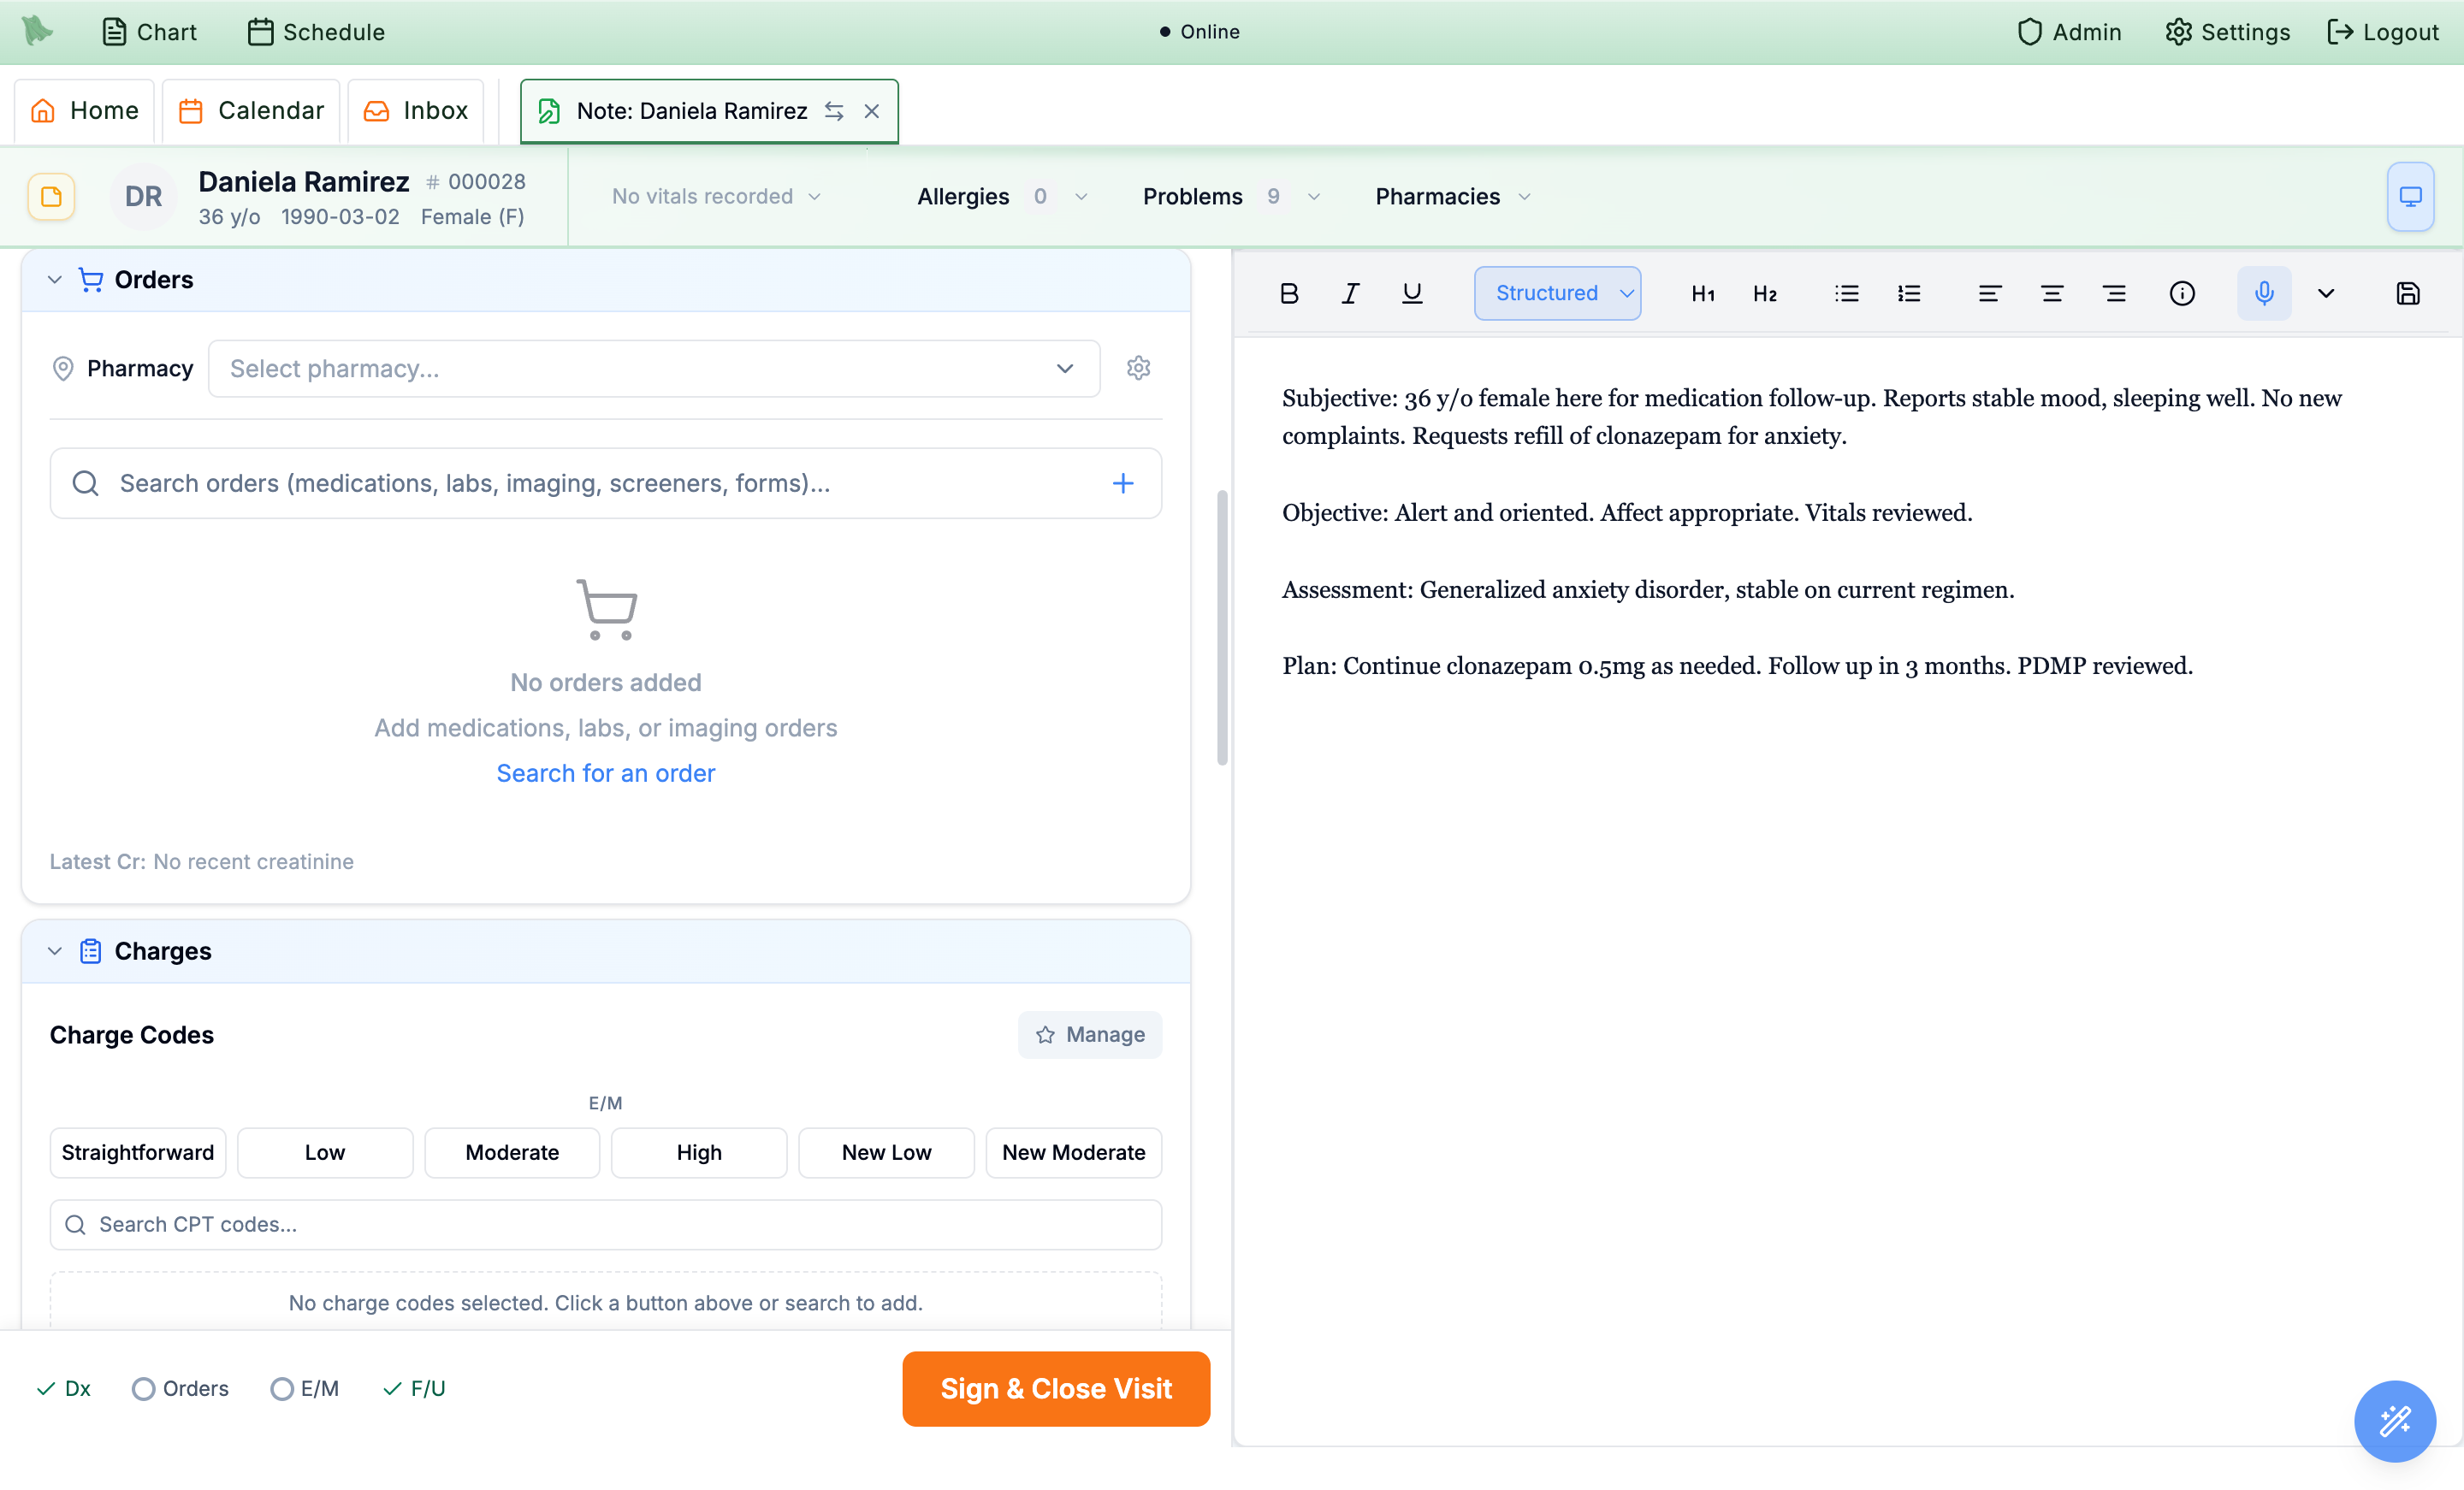
Latest Cr sit right above it.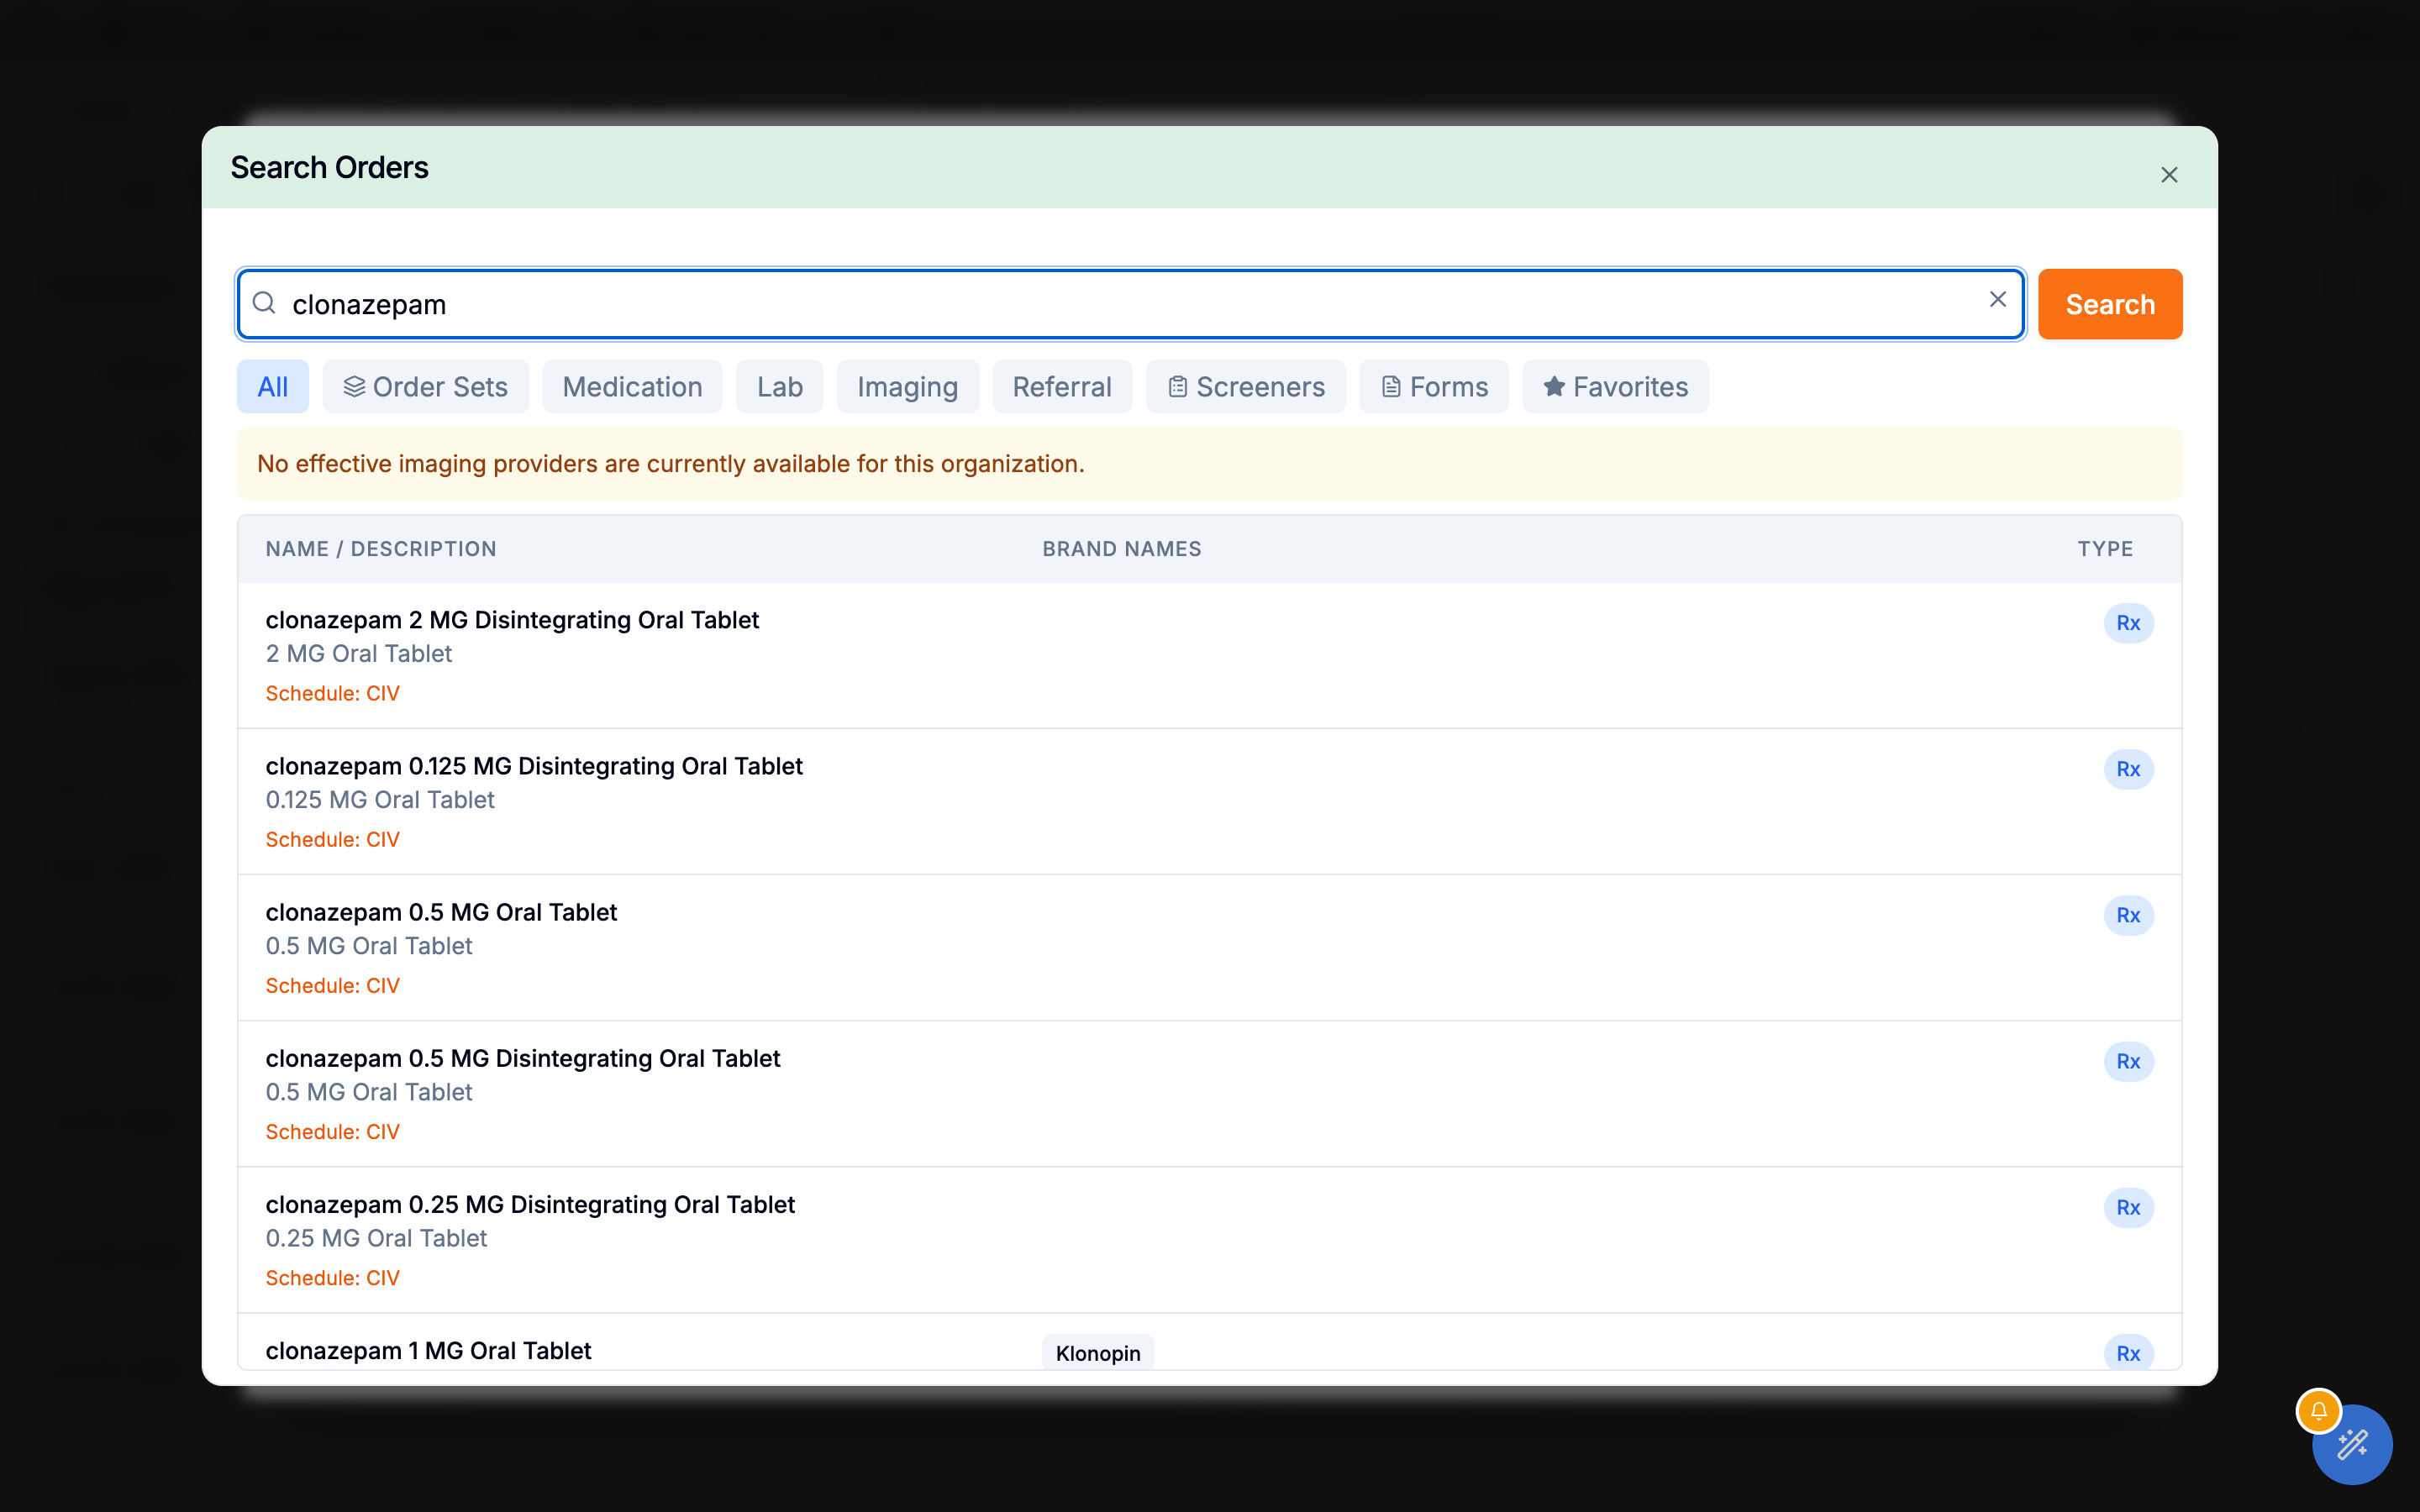
Write a structured prescription
Selecting a medication opens Edit Medication, where you build the sig from structured fields. Hero EMR assembles the directions and a one-click Auto-fill proposes a starting regimen with dosing guidance.
-
Build the sig.
Set
Action,Route,Dose(amount + unit),Frequency,Duration,Dispense(amount + unit), andRefills. A live summary of the directions is assembled from those fields and updates as you go. -
Fill in the as-needed details.
Choosing
As needed (PRN)(or ticking the as-needed box) reveals a free-text reason — “As needed for… (e.g. pain, nausea, anxiety)” — and aMax doses per dayfield. Both fold into the directions the pharmacy receives. -
Check the advisory readouts.
- If the dispense quantity looks implausible for the days’ supply, the dialog shows the implied amount per day so you catch an absurd quantity (1800 tablets, 20 capsules a day) before sending. The same dispense/day summary appears on the order row in the list. It’s advisory and never blocks you.
- For patients under 18 with a recorded weight and a catalog-matched product, a weight-based mg/kg readout appears under the dose fields. It is advisory only — it never edits the order.
-
Let
Auto-fillpropose a regimen.Auto-fillpopulates the structured fields and surfaces a Medication Hero dosing note — e.g. “For anxiety, clonazepam initial adult dose is 0.25–0.5 mg PO daily, may increase to 1 mg daily as needed.” Adjust anything before saving. -
Delay the fill if you need to.
Do not fill until (optional)sends the prescription now but asks the pharmacy to hold the fill until the date you pick. Leave it blank to fill now. -
Say how it relates to what the patient already takes.
When the patient already has the same drug on their list, the dialog shows
Already on the medication listwith one choice per matching entry:Replacesand the entry, for example “Replaces Lisinopril 10 mg tablet”. The old entry moves toPaston the day the new prescription starts. Until then it stays current.Take alongsideand the entry. Both stay current, and Hero stops flagging them as a possible duplicate.Continuesand the entry, offered when you are prescribing the very same product. The prescription simply renews that entry. If the patient really takes two separate prescriptions of it, pickTake alongside … (separate prescription).Not specified. Leave the decision for later.
Replacesonly when the new prescription has the same release (for example IR for IR) and the same route as the one matching entry. A different release, such as ER added to IR, is pre-set toTake alongside. When Hero can’t tell, nothing is pre-selected. The choice is optional and never blocks saving or signing. It takes effect once the prescription is sent. -
Set substitution and pharmacy notes.
Toggle
Substitution Allowedand add aNote to Pharmacyif needed, thenSave Changesto drop the order onto the list. -
Check the chip on the order card.
Back in Orders, the prescription’s card repeats the choice as a chip:
Replaces… in amber,Take alongside… in blue, orContinues… in grey. If you haven’t chosen, it readsAlready on the list:and the entry. Click the chip to change the choice any time before the prescription is sent.
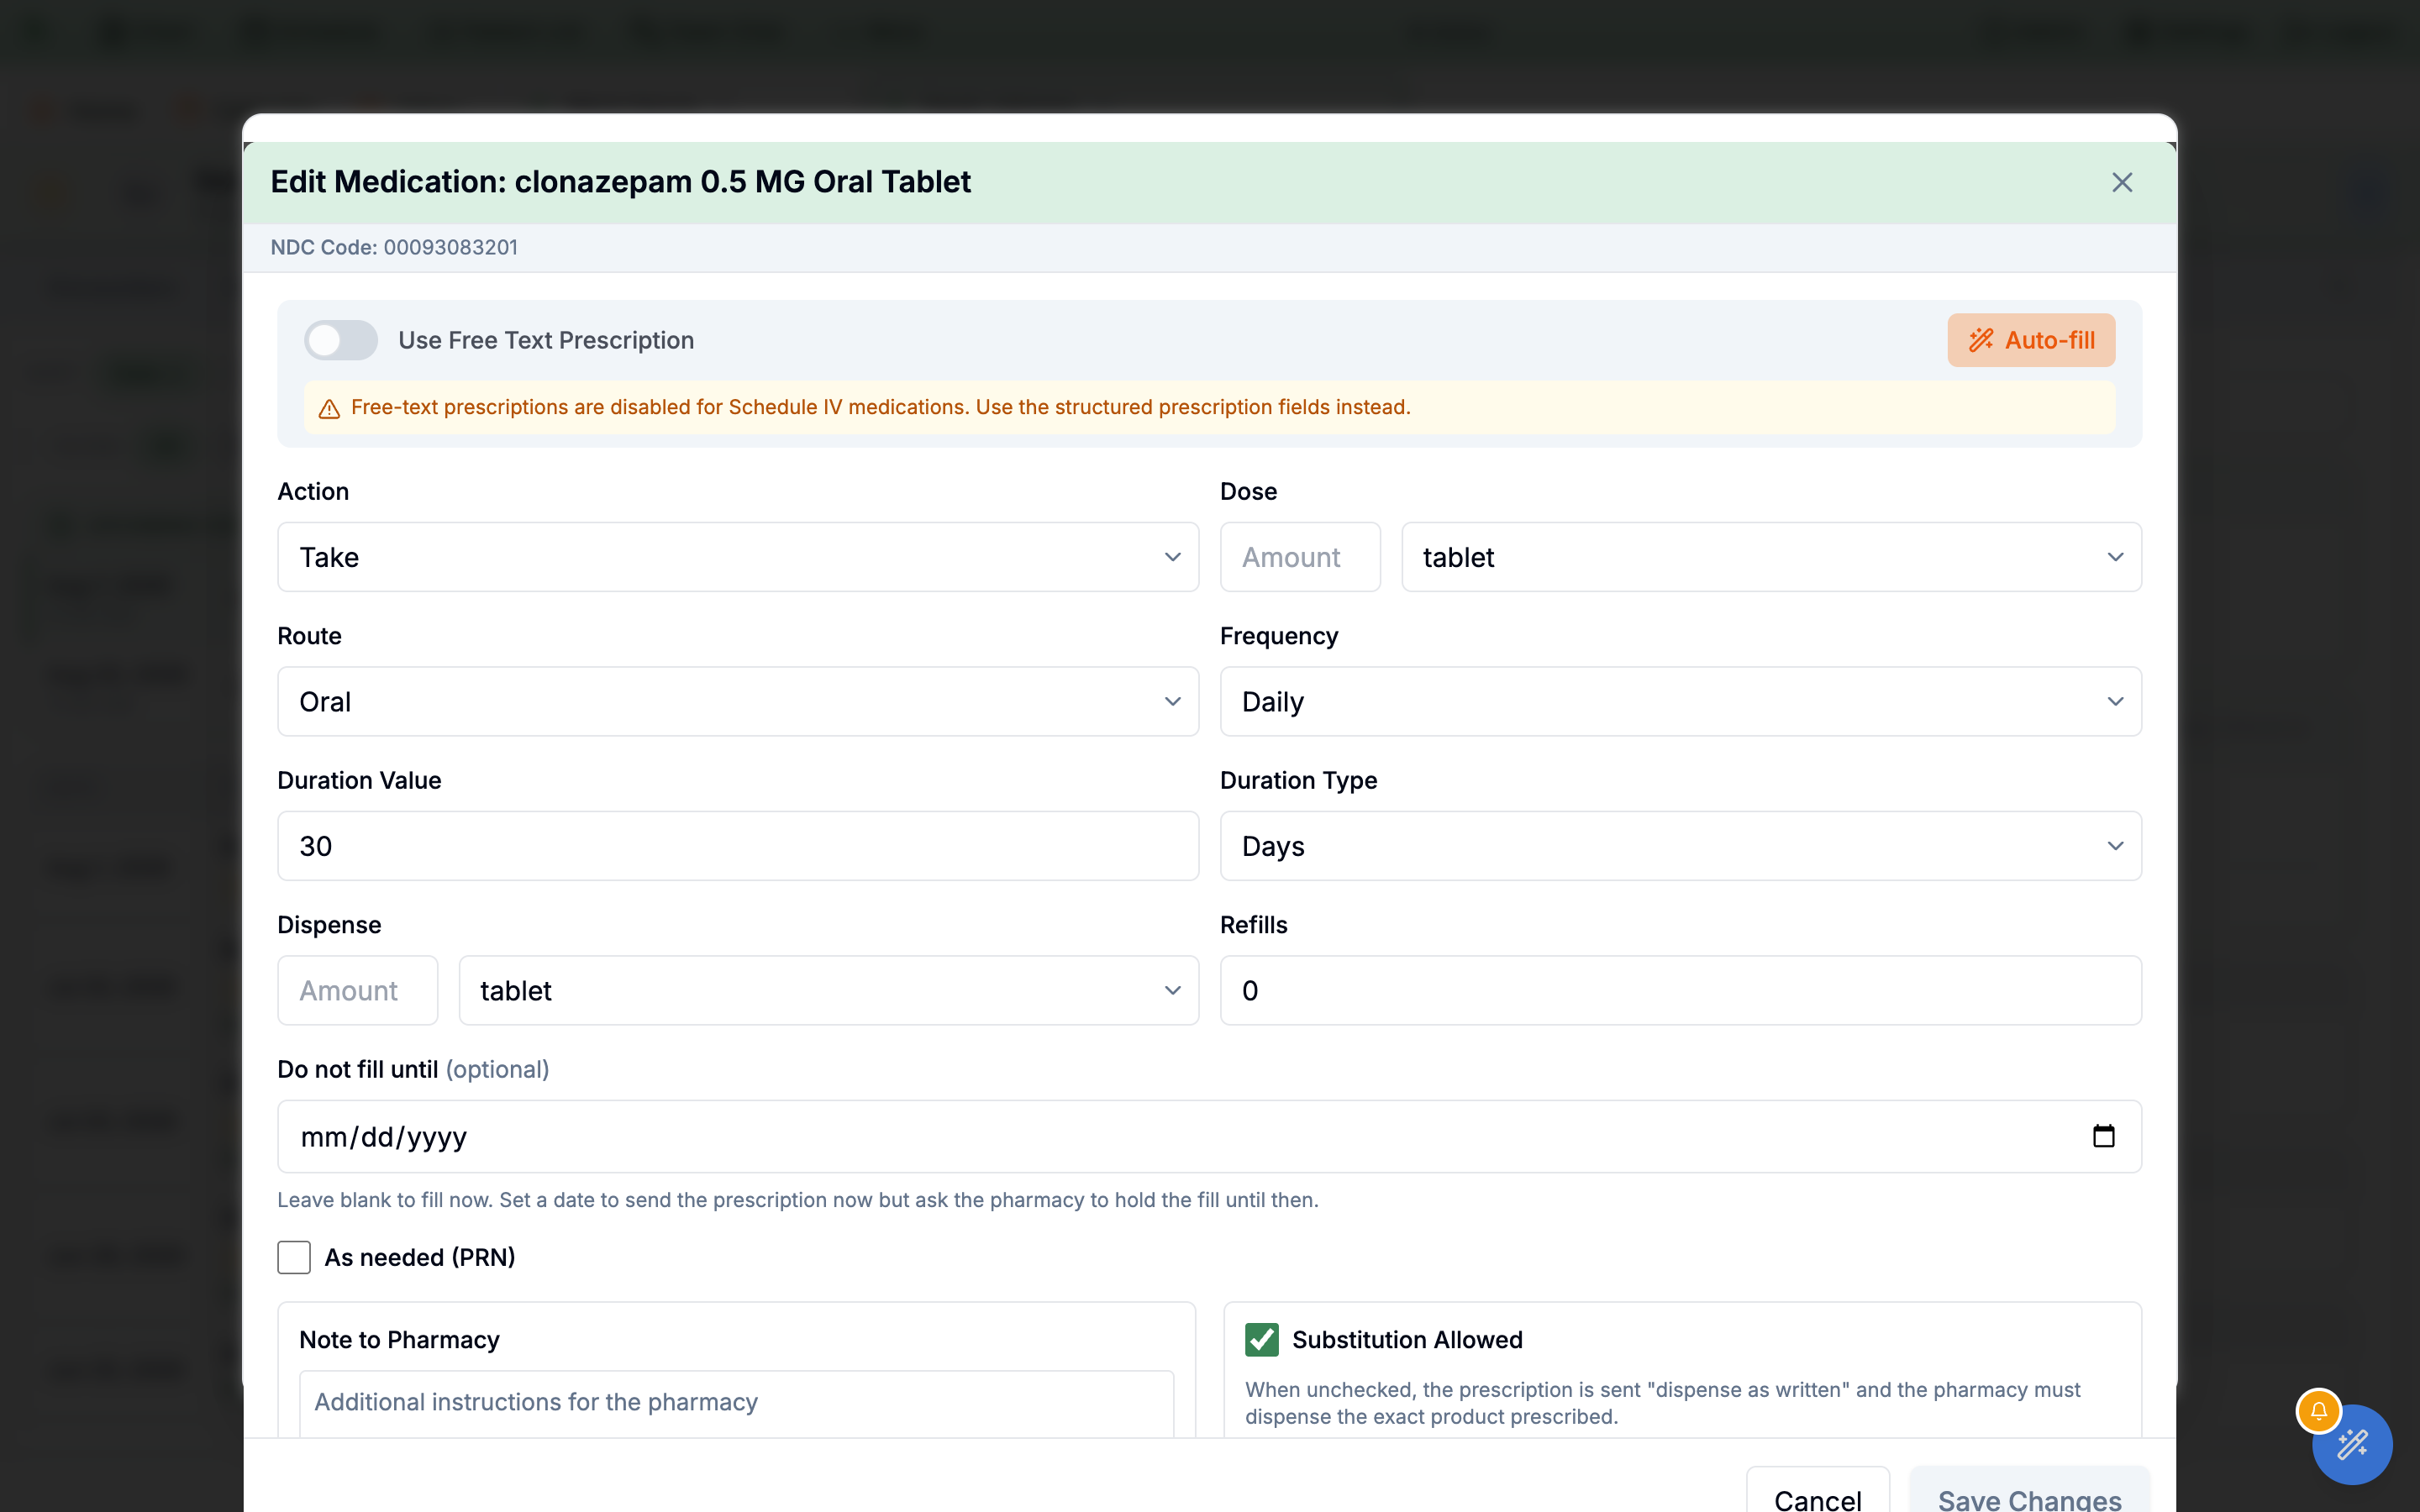
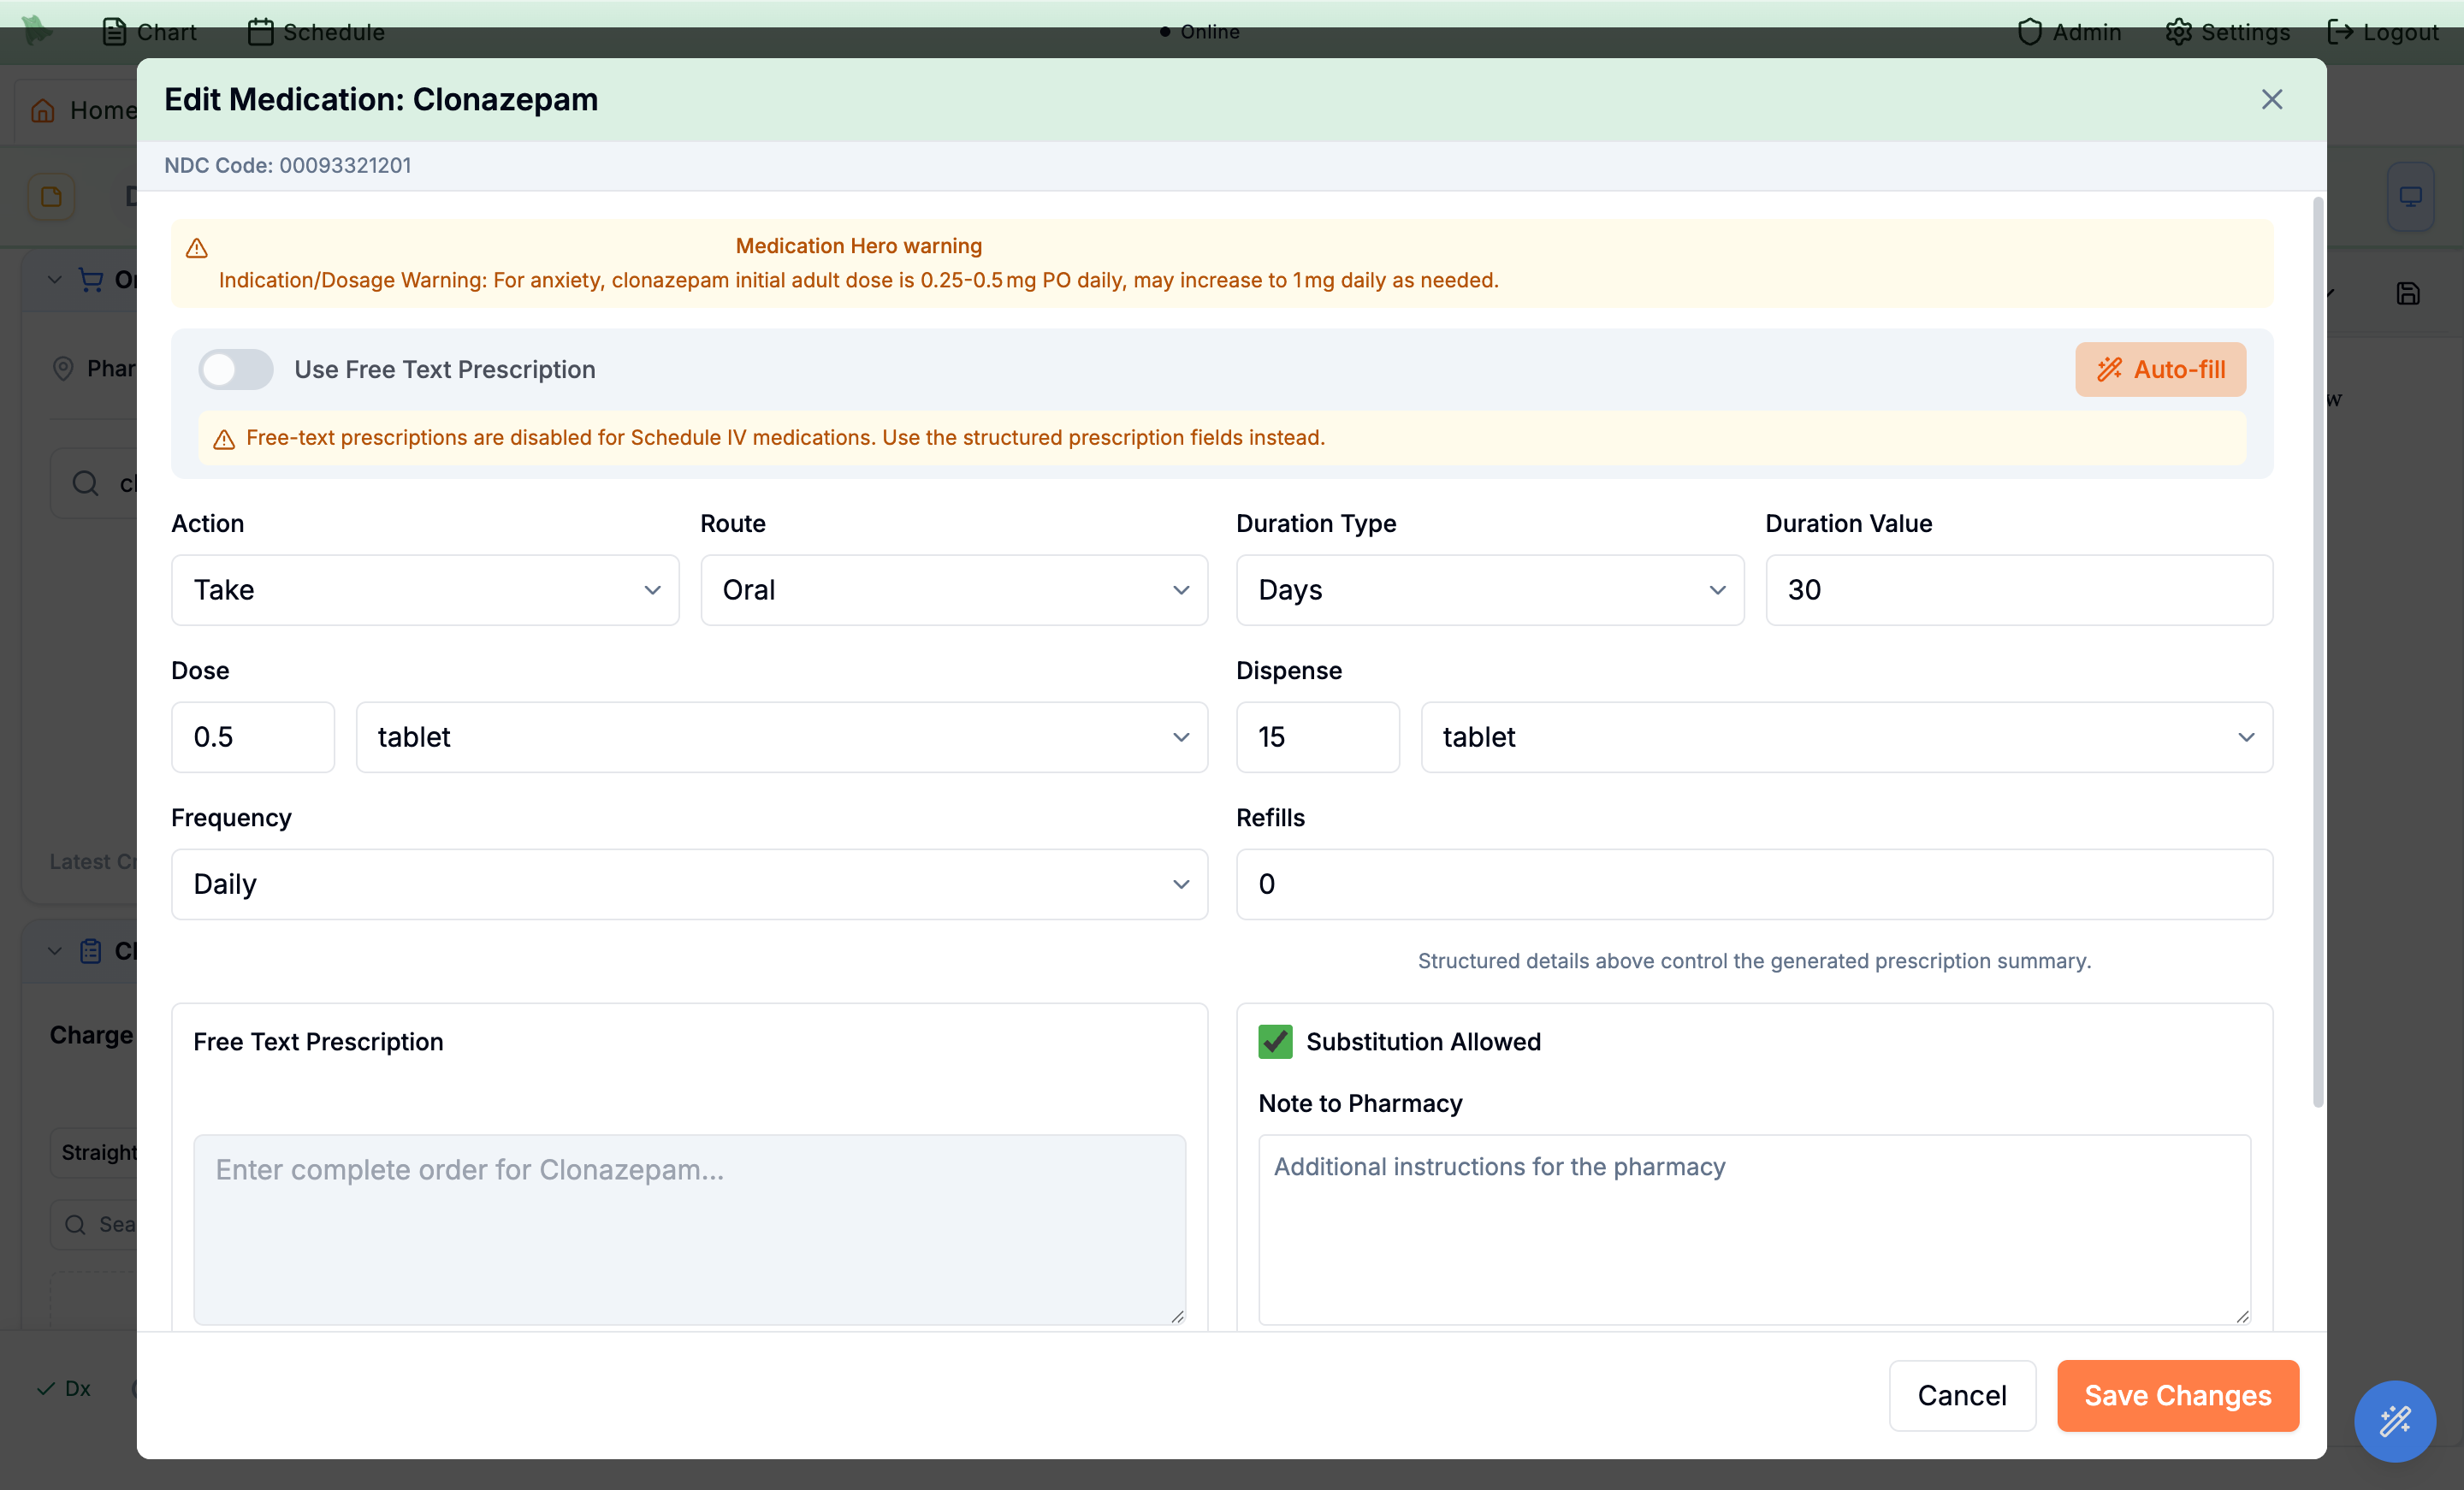
Auto-fill fills the sig and shows indication-specific dosing as a Medication Hero note.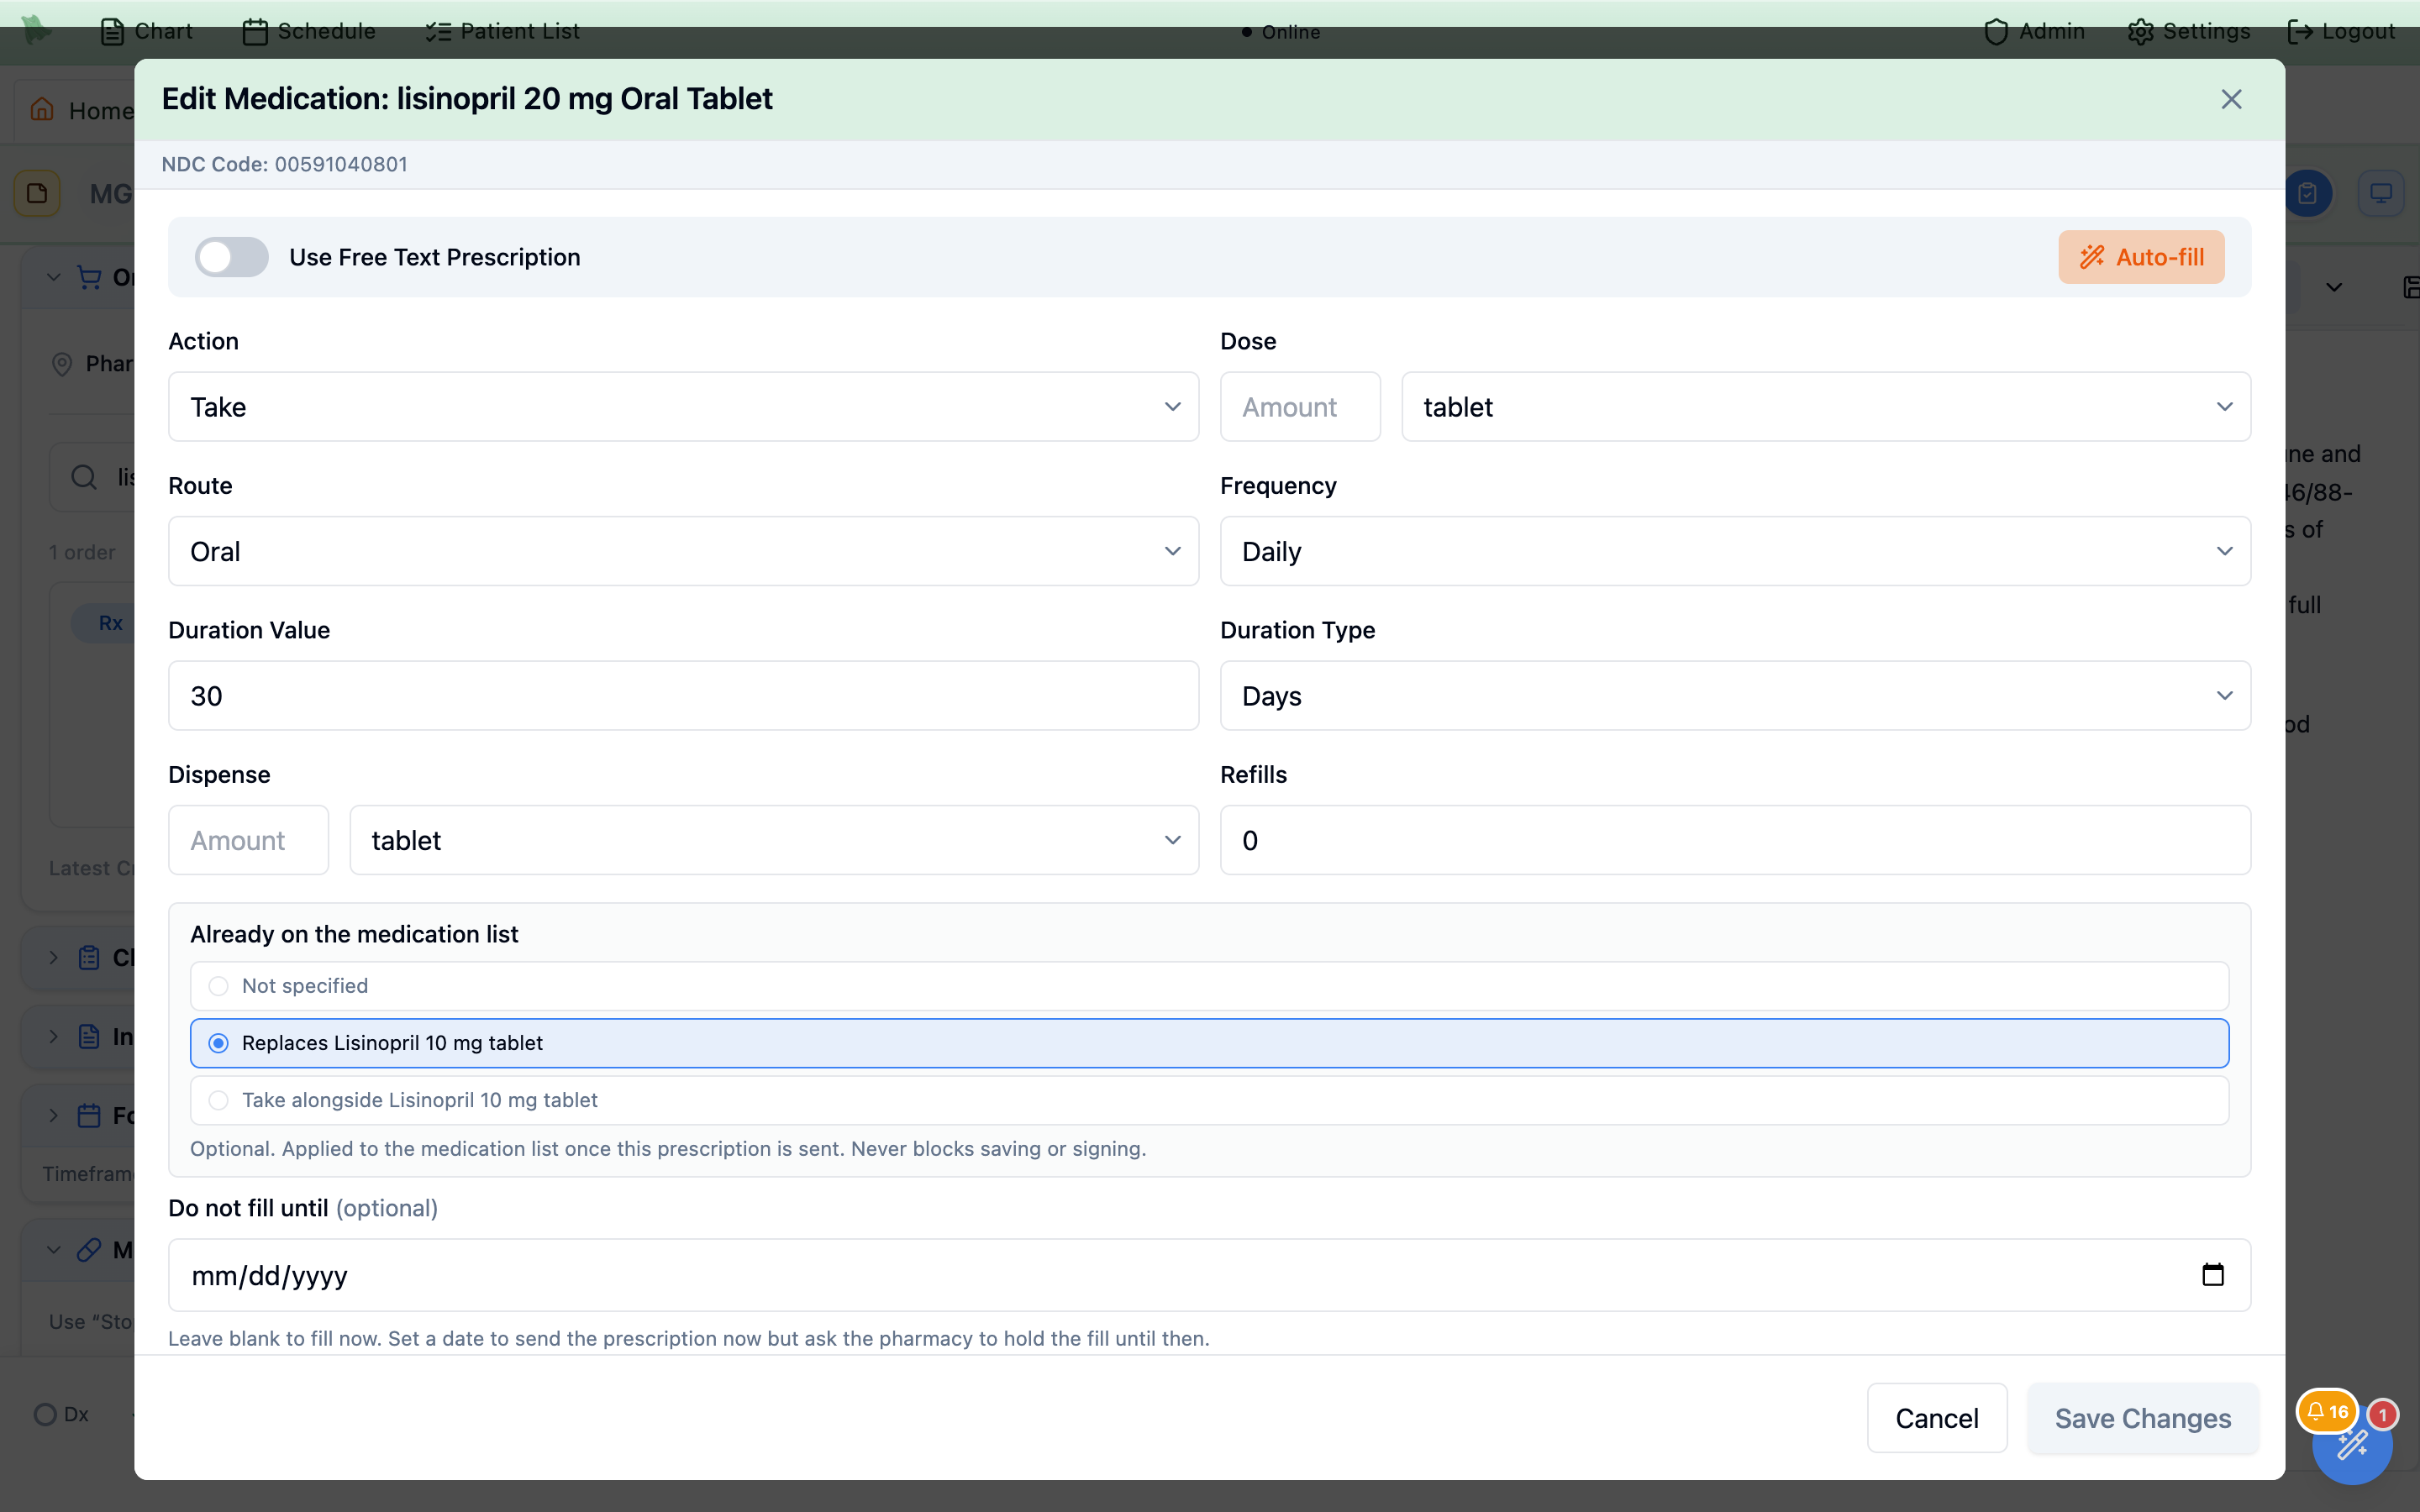
Replaces is pre-selected because the release and route match. Pick Take alongside if the patient will take both.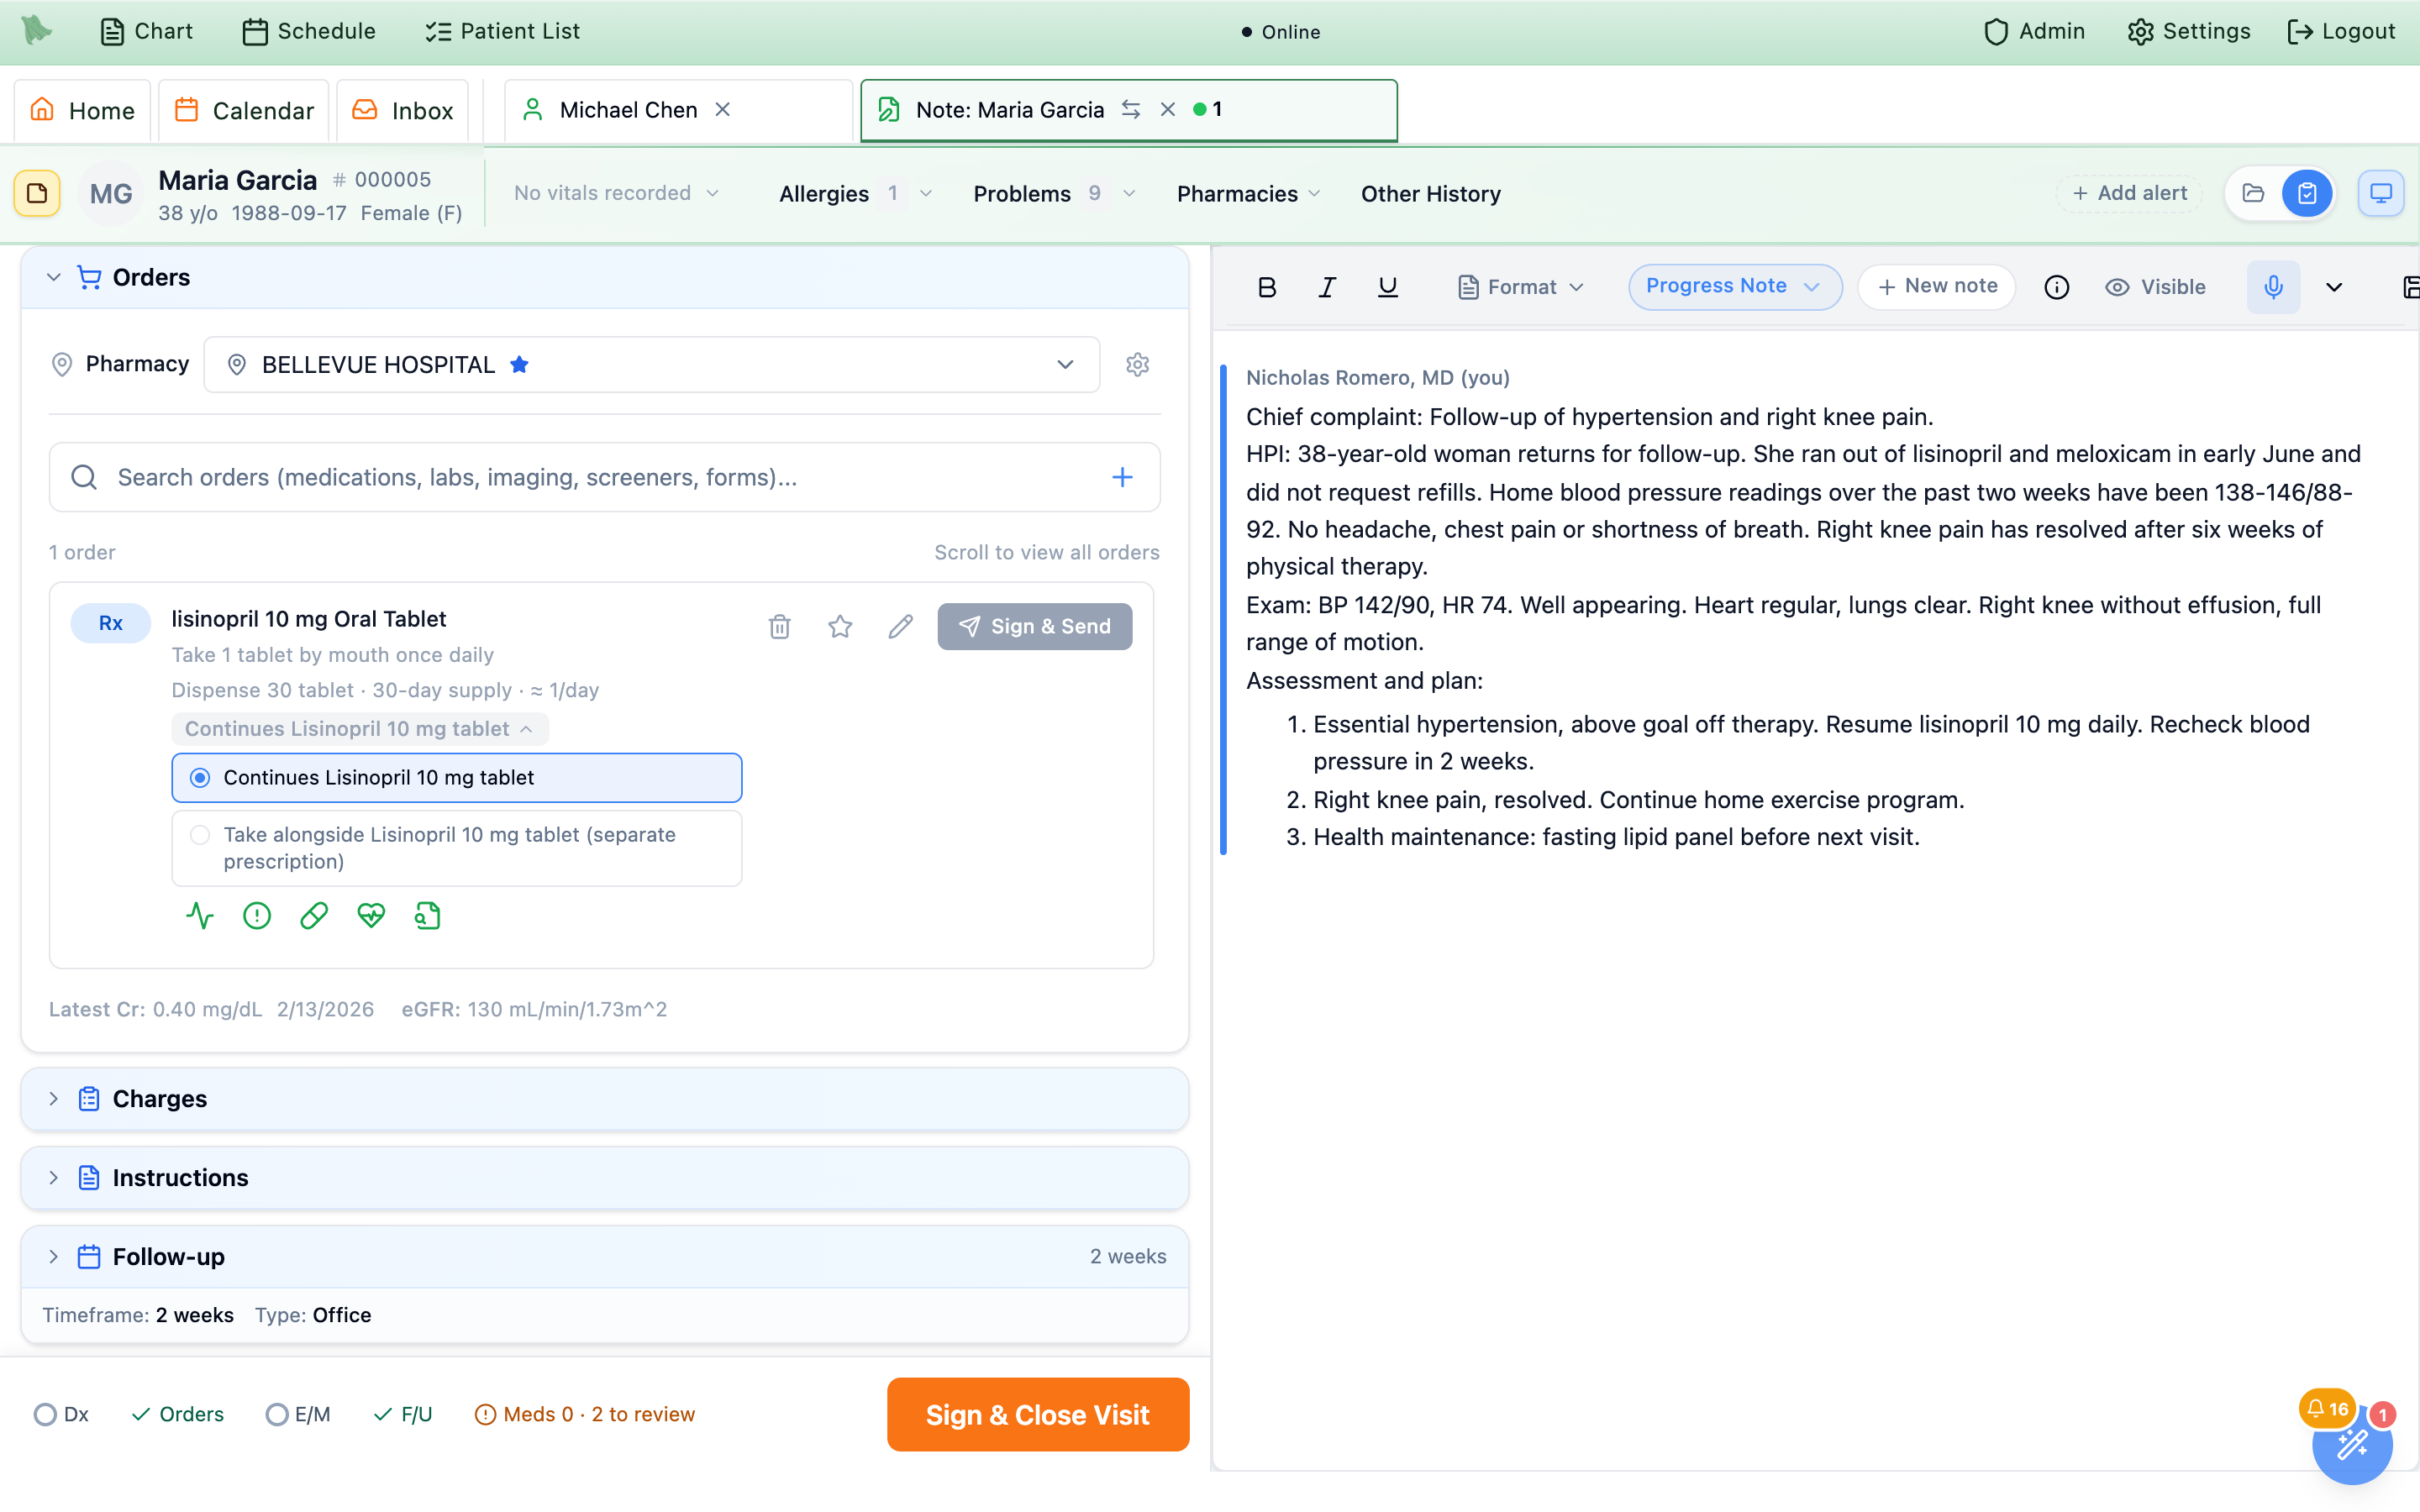
Use Free Text Prescription toggle is disabled (“Free-text prescriptions are disabled for Schedule IV medications”), so the sig is always built from discrete fields. Signing them uses the EPCS flow in Signing controlled prescriptions.
Read the medication safety checks
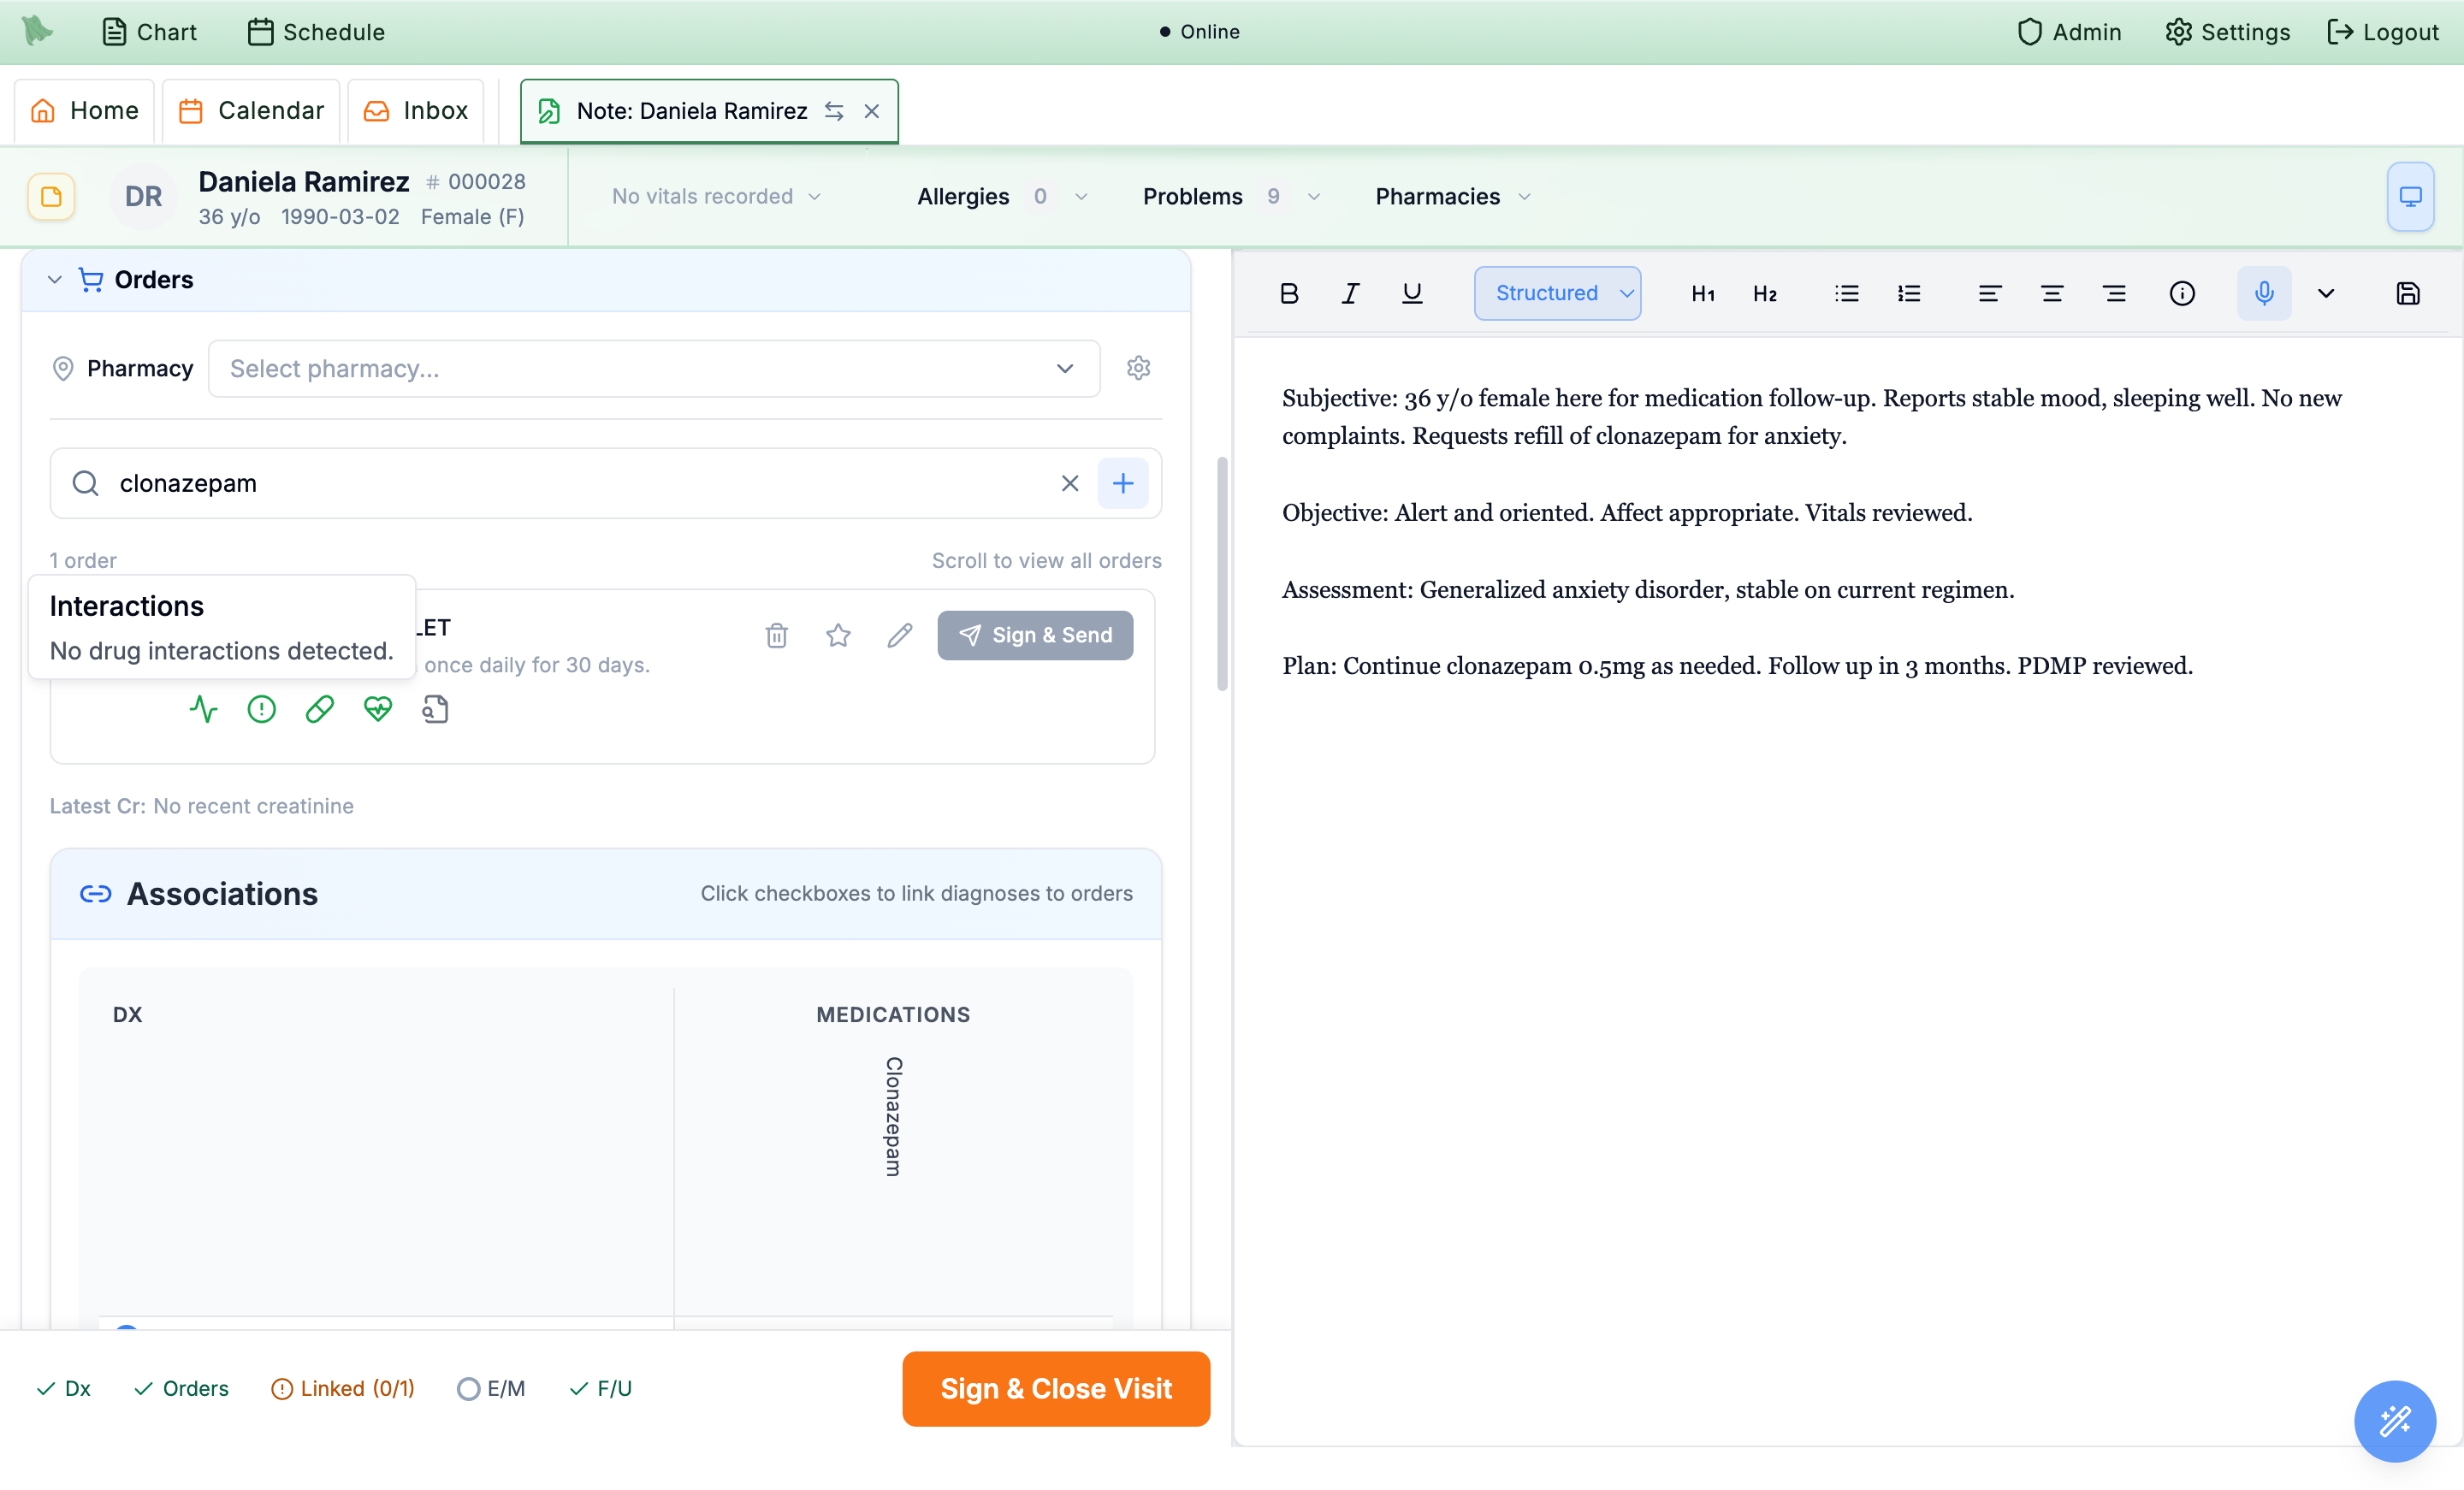
Every medication order carries a row of five Medication Hero checks. Four of them — interactions, allergies, indication/dosage, and black box — run automatically and show green when clear; click any icon for the detail. A red or amber result means review before you sign. The fifth, PDMP, is a status readout only: it stays grey until a check has actually been run, and clicking it just opens its tooltip.
Interactions
Drug–drug interactions against the patient’s medication list, covering Current plus anything in Needs review, Scheduled or On hold, so a prescription that ran out is still checked (“No drug interactions detected” when clear).
Allergies
Drug–allergy conflicts against recorded allergies (“No allergy conflicts detected for this patient”).
Indication / Dosage
Standard dosing for the indication, so you can sanity-check the sig at a glance.
Black Box Warning
FDA boxed warnings relevant to this patient and drug.
PDMP
Status of the state Prescription Drug Monitoring Program report. It only carries data for Schedule II–IV medications, and only after you run a check — until then it is grey and reads “PDMP check has not been completed for this patient.” Run the query from Run PDMP in the signing dialog (Signing controlled prescriptions).
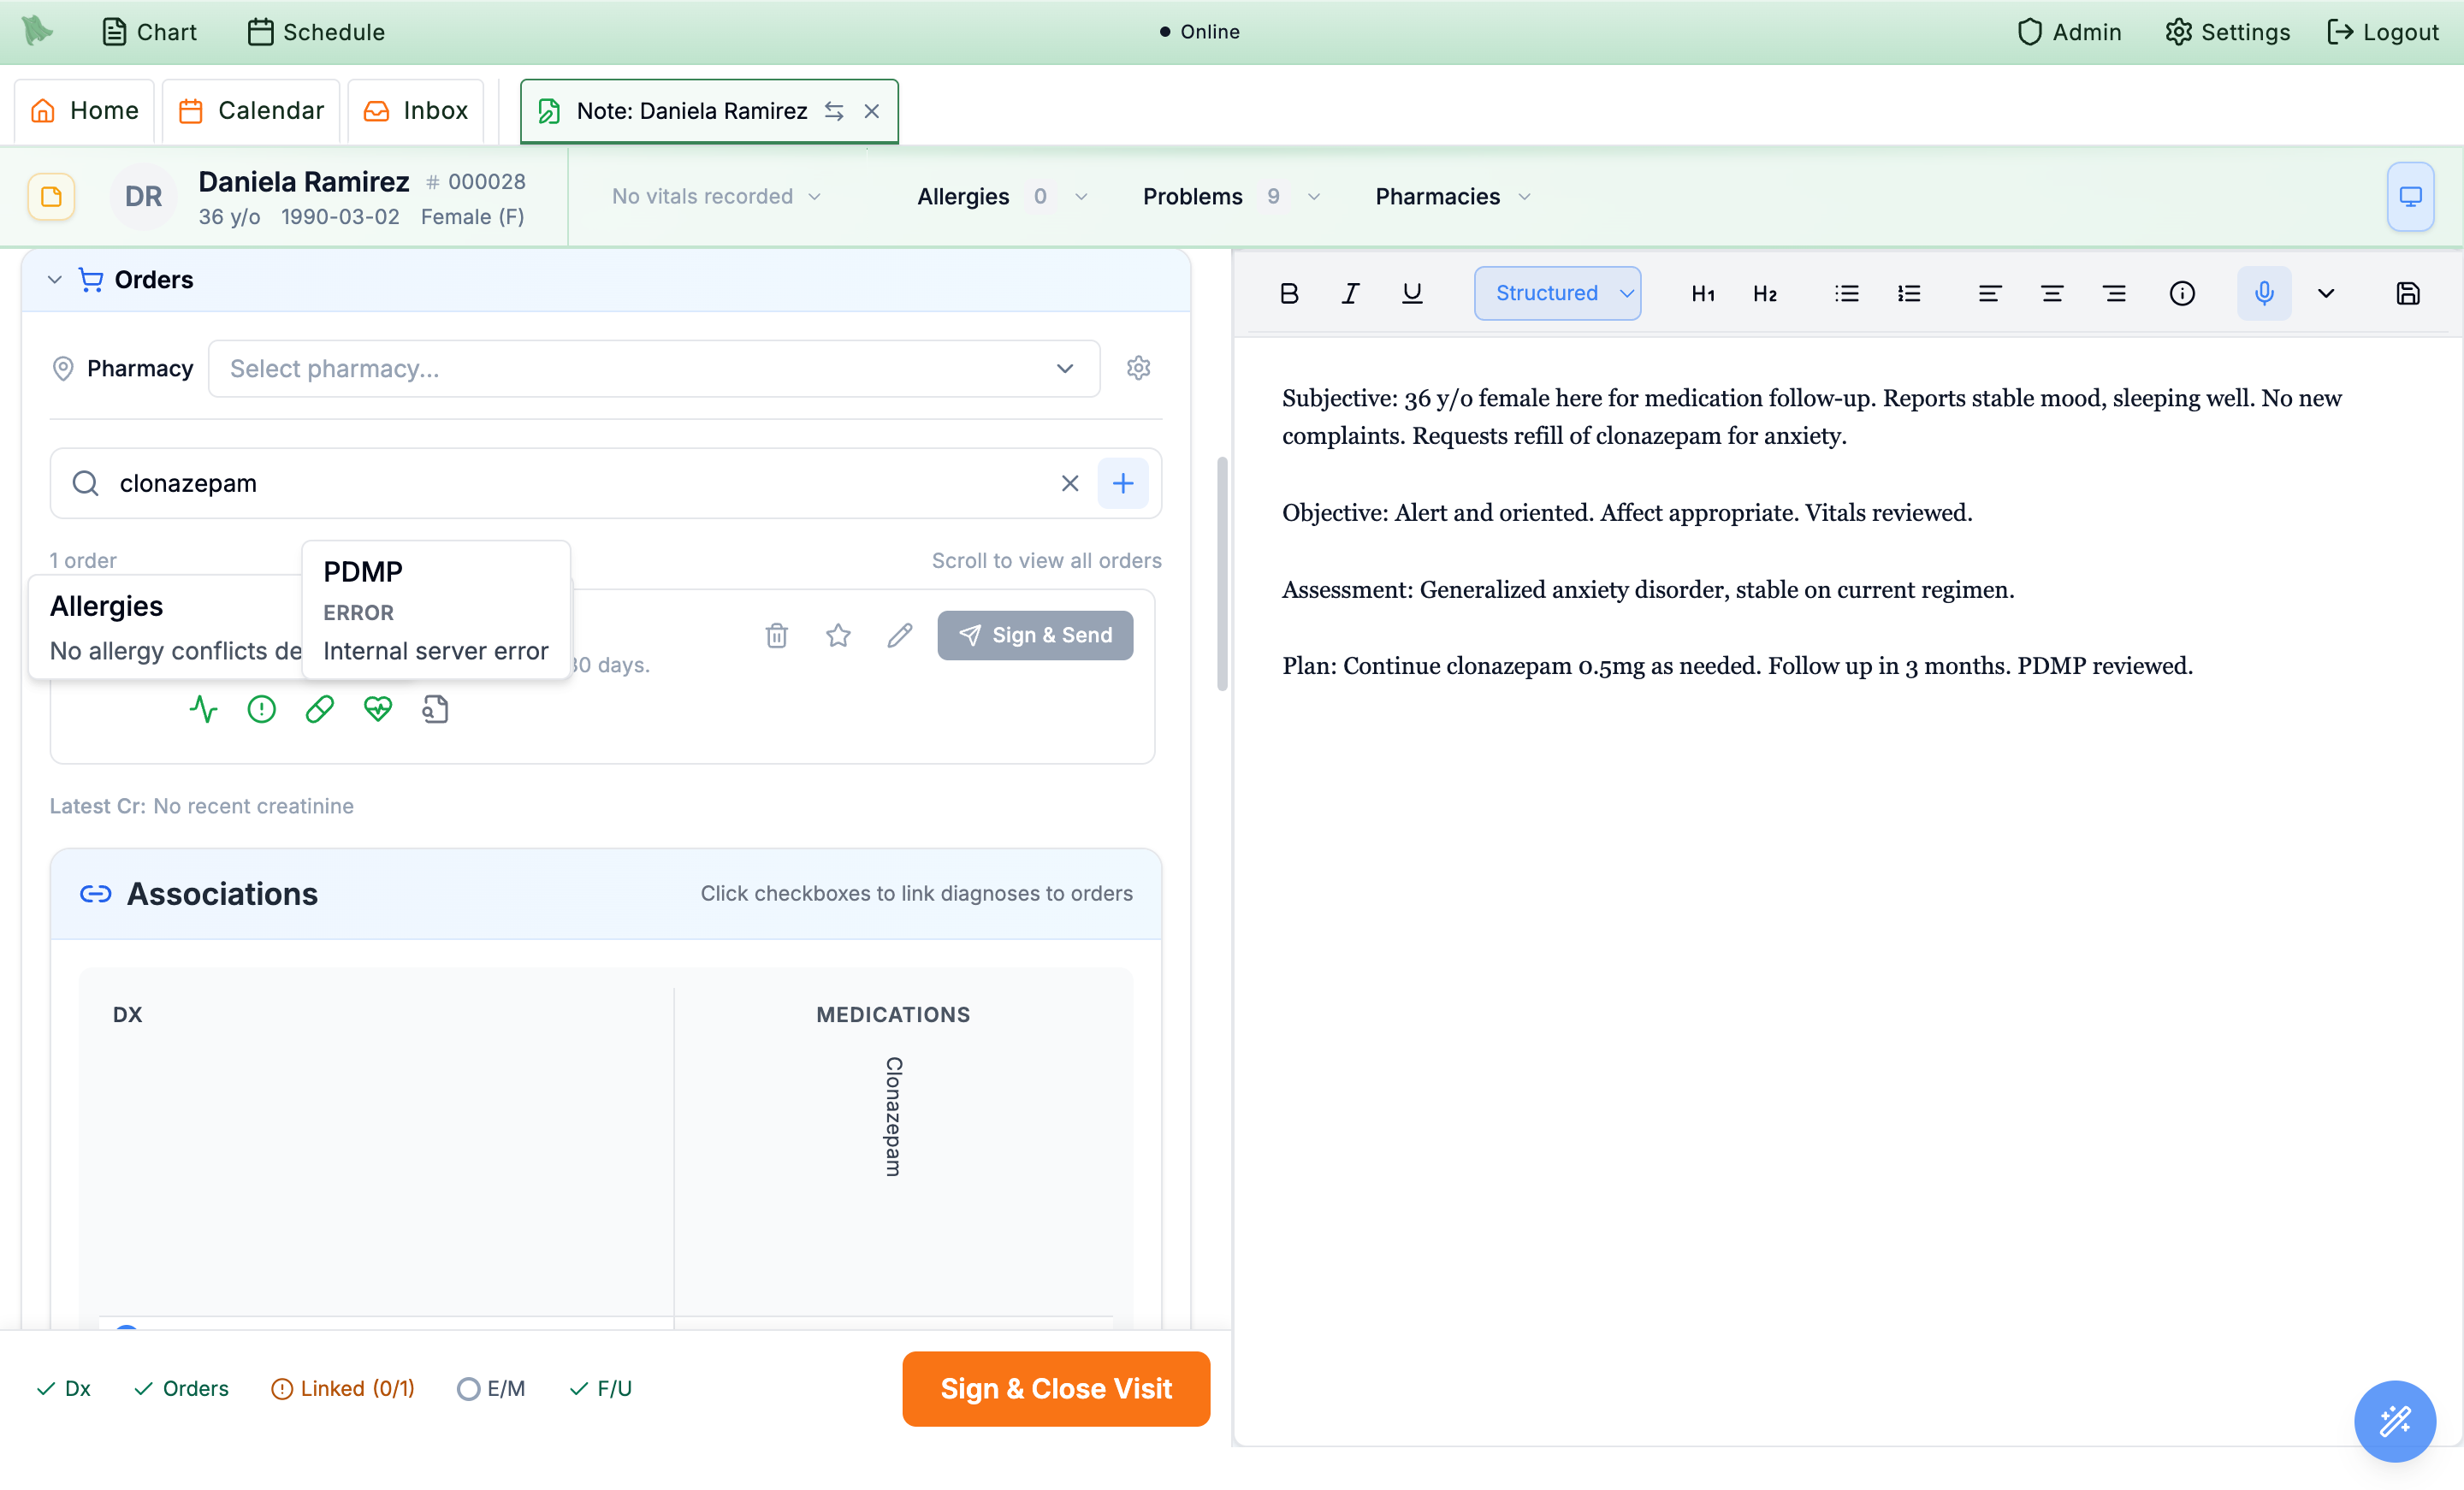
Run PDMP in the Controlled Rx Mobile Approval dialog, and it calls your state’s PMP gateway. Find signup instructions and configure PDMP rules under EPCS enrollment → PDMP. Hero support configures the approved connection credentials after state enrollment; the PDMP tab has no credential-entry field. The icon and the dialog report whatever came back — PDMP not checked, PDMP loading, PDMP available, No PDMP report, PDMP stale, PDMP expired, PDMP error, or PDMP unavailable when no gateway is connected.
Link each order to a diagnosis
Orders should be tied to the diagnosis that justifies them. The Associations grid — diagnoses down the side, orders across the top — lets you check the box where they intersect. Linking supports medical necessity and is required before a prescription can be sent.
- Open the Associations grid. It appears under the order list once you have at least one diagnosis and one order.
-
Check the intersections.
Tick the box where a diagnosis row meets an order column (for example F41.1 × Clonazepam). The footer tracker shows
Linked (0/1)in amber until every order is linked, then flips to a greenLinked.
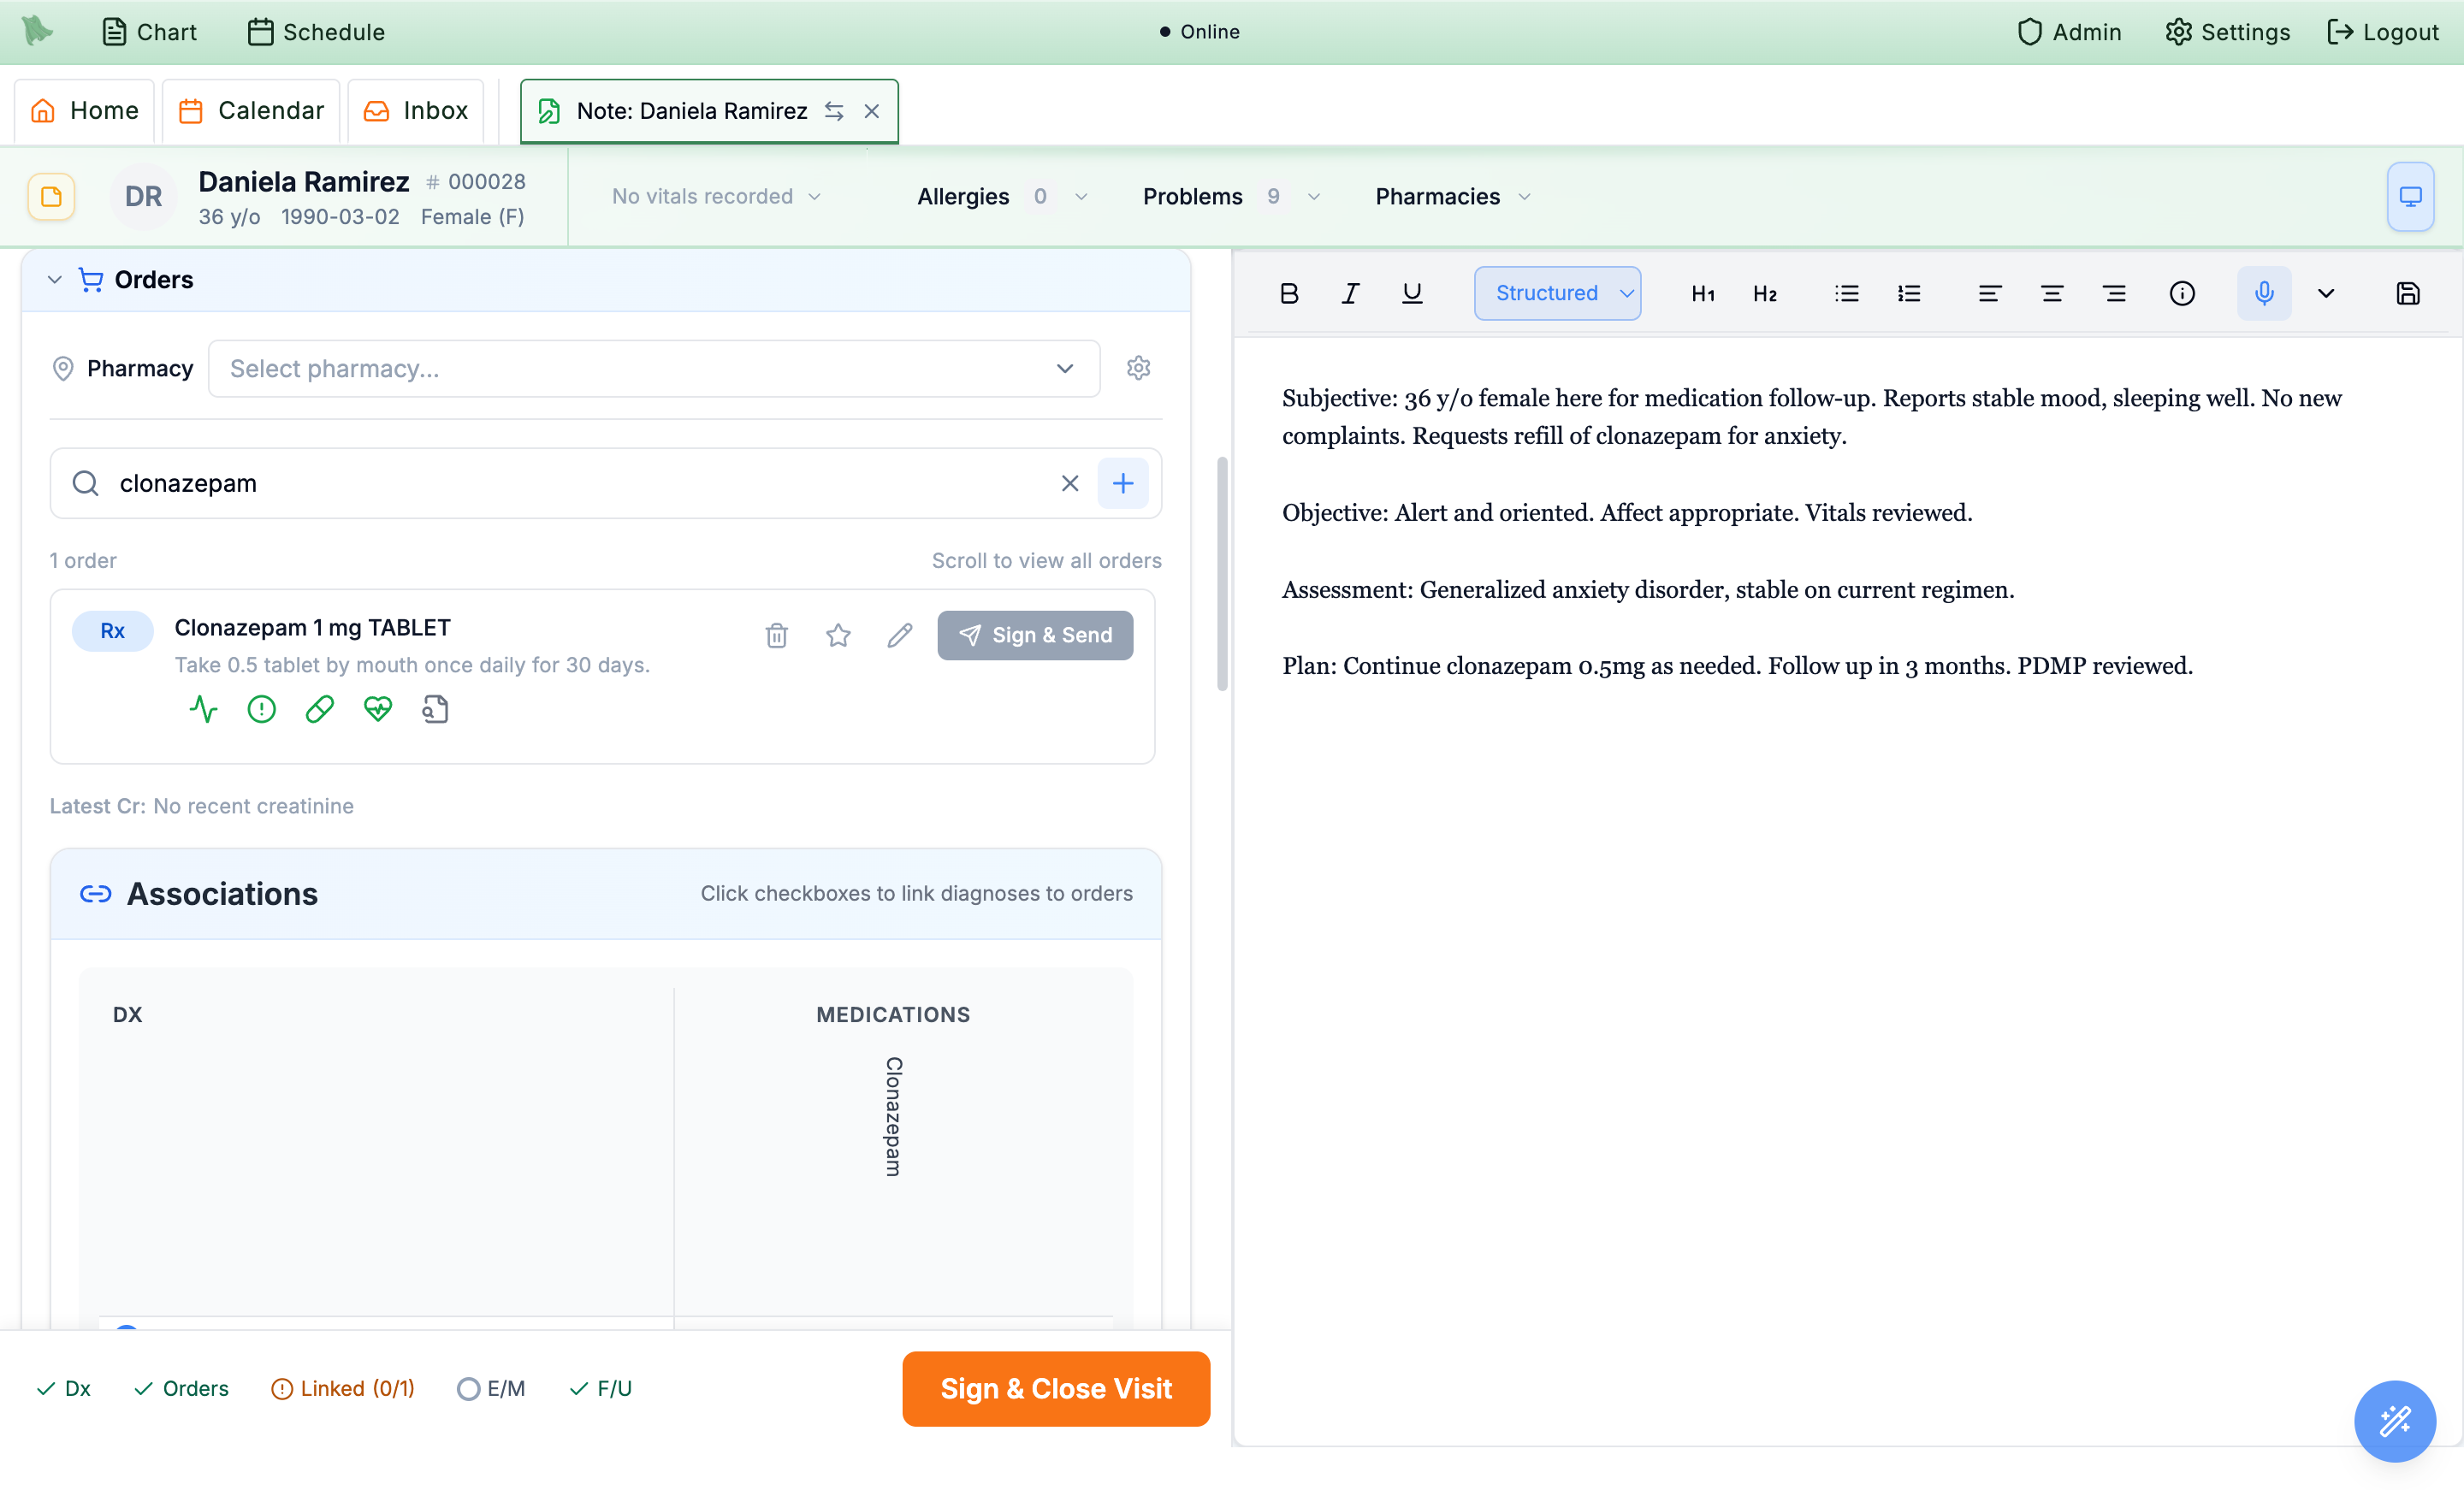
Sign & Send stays disabled until a pharmacy is chosen and the order is linked.Sign controlled prescriptions (EPCS)
Non-controlled prescriptions send when you press their own Sign & Send, or when you finalize the visit if you haven’t. Controlled substances (Schedule II–V) require EPCS — DEA-regulated two-factor signing — before they can be transmitted. The order’s button always reads Sign & Send; for a controlled drug that is otherwise ready to go, its tooltip adds “(2FA required)”. The button stays disabled until a pharmacy is selected and a diagnosis is linked.
- Select a pharmacy and link the diagnosis. Both are prerequisites; the button’s tooltip tells you what’s still missing (“Cannot send: Select a pharmacy, Associate a diagnosis with this medication”).
-
Click
Sign & Send. The Controlled Rx Mobile Approval dialog opens. It restates the full prescription — patient and DOB, medication with its schedule, directions, refills, and the prescriber’s name, service address, and DEA number — alongside the legal signing attestation. - Confirm the DEA prescribing location. Hero defaults the DEA and service address to the registration whose state exactly matches the patient’s recorded address. Use the DEA-location dropdown for a manual change when needed. If the patient has no state or no registration matches, the dialog flags the issue and requires you to select a location before signing can continue. A manual selection for a different state remains visible as a warning so you can confirm it deliberately.
-
Check the PDMP.
The dialog shows a
PDMP not checkedindicator with aRun PDMPbutton. This is the only place the state database is actually queried. Where a PDMP check is required for this drug’s schedule and your state,Start mobile approvalstays disabled untilRun PDMPcomes back with a usable report — a stale or expired result blocks it too, and the reason is shown beneath the indicator. -
Complete two-factor approval.
Choose
Start mobile approvalto push the request to your registered phone, orEnroll passkeyif you haven’t set up a second factor. Completing 2FA signs the prescription and authorizes transmission to the pharmacy.
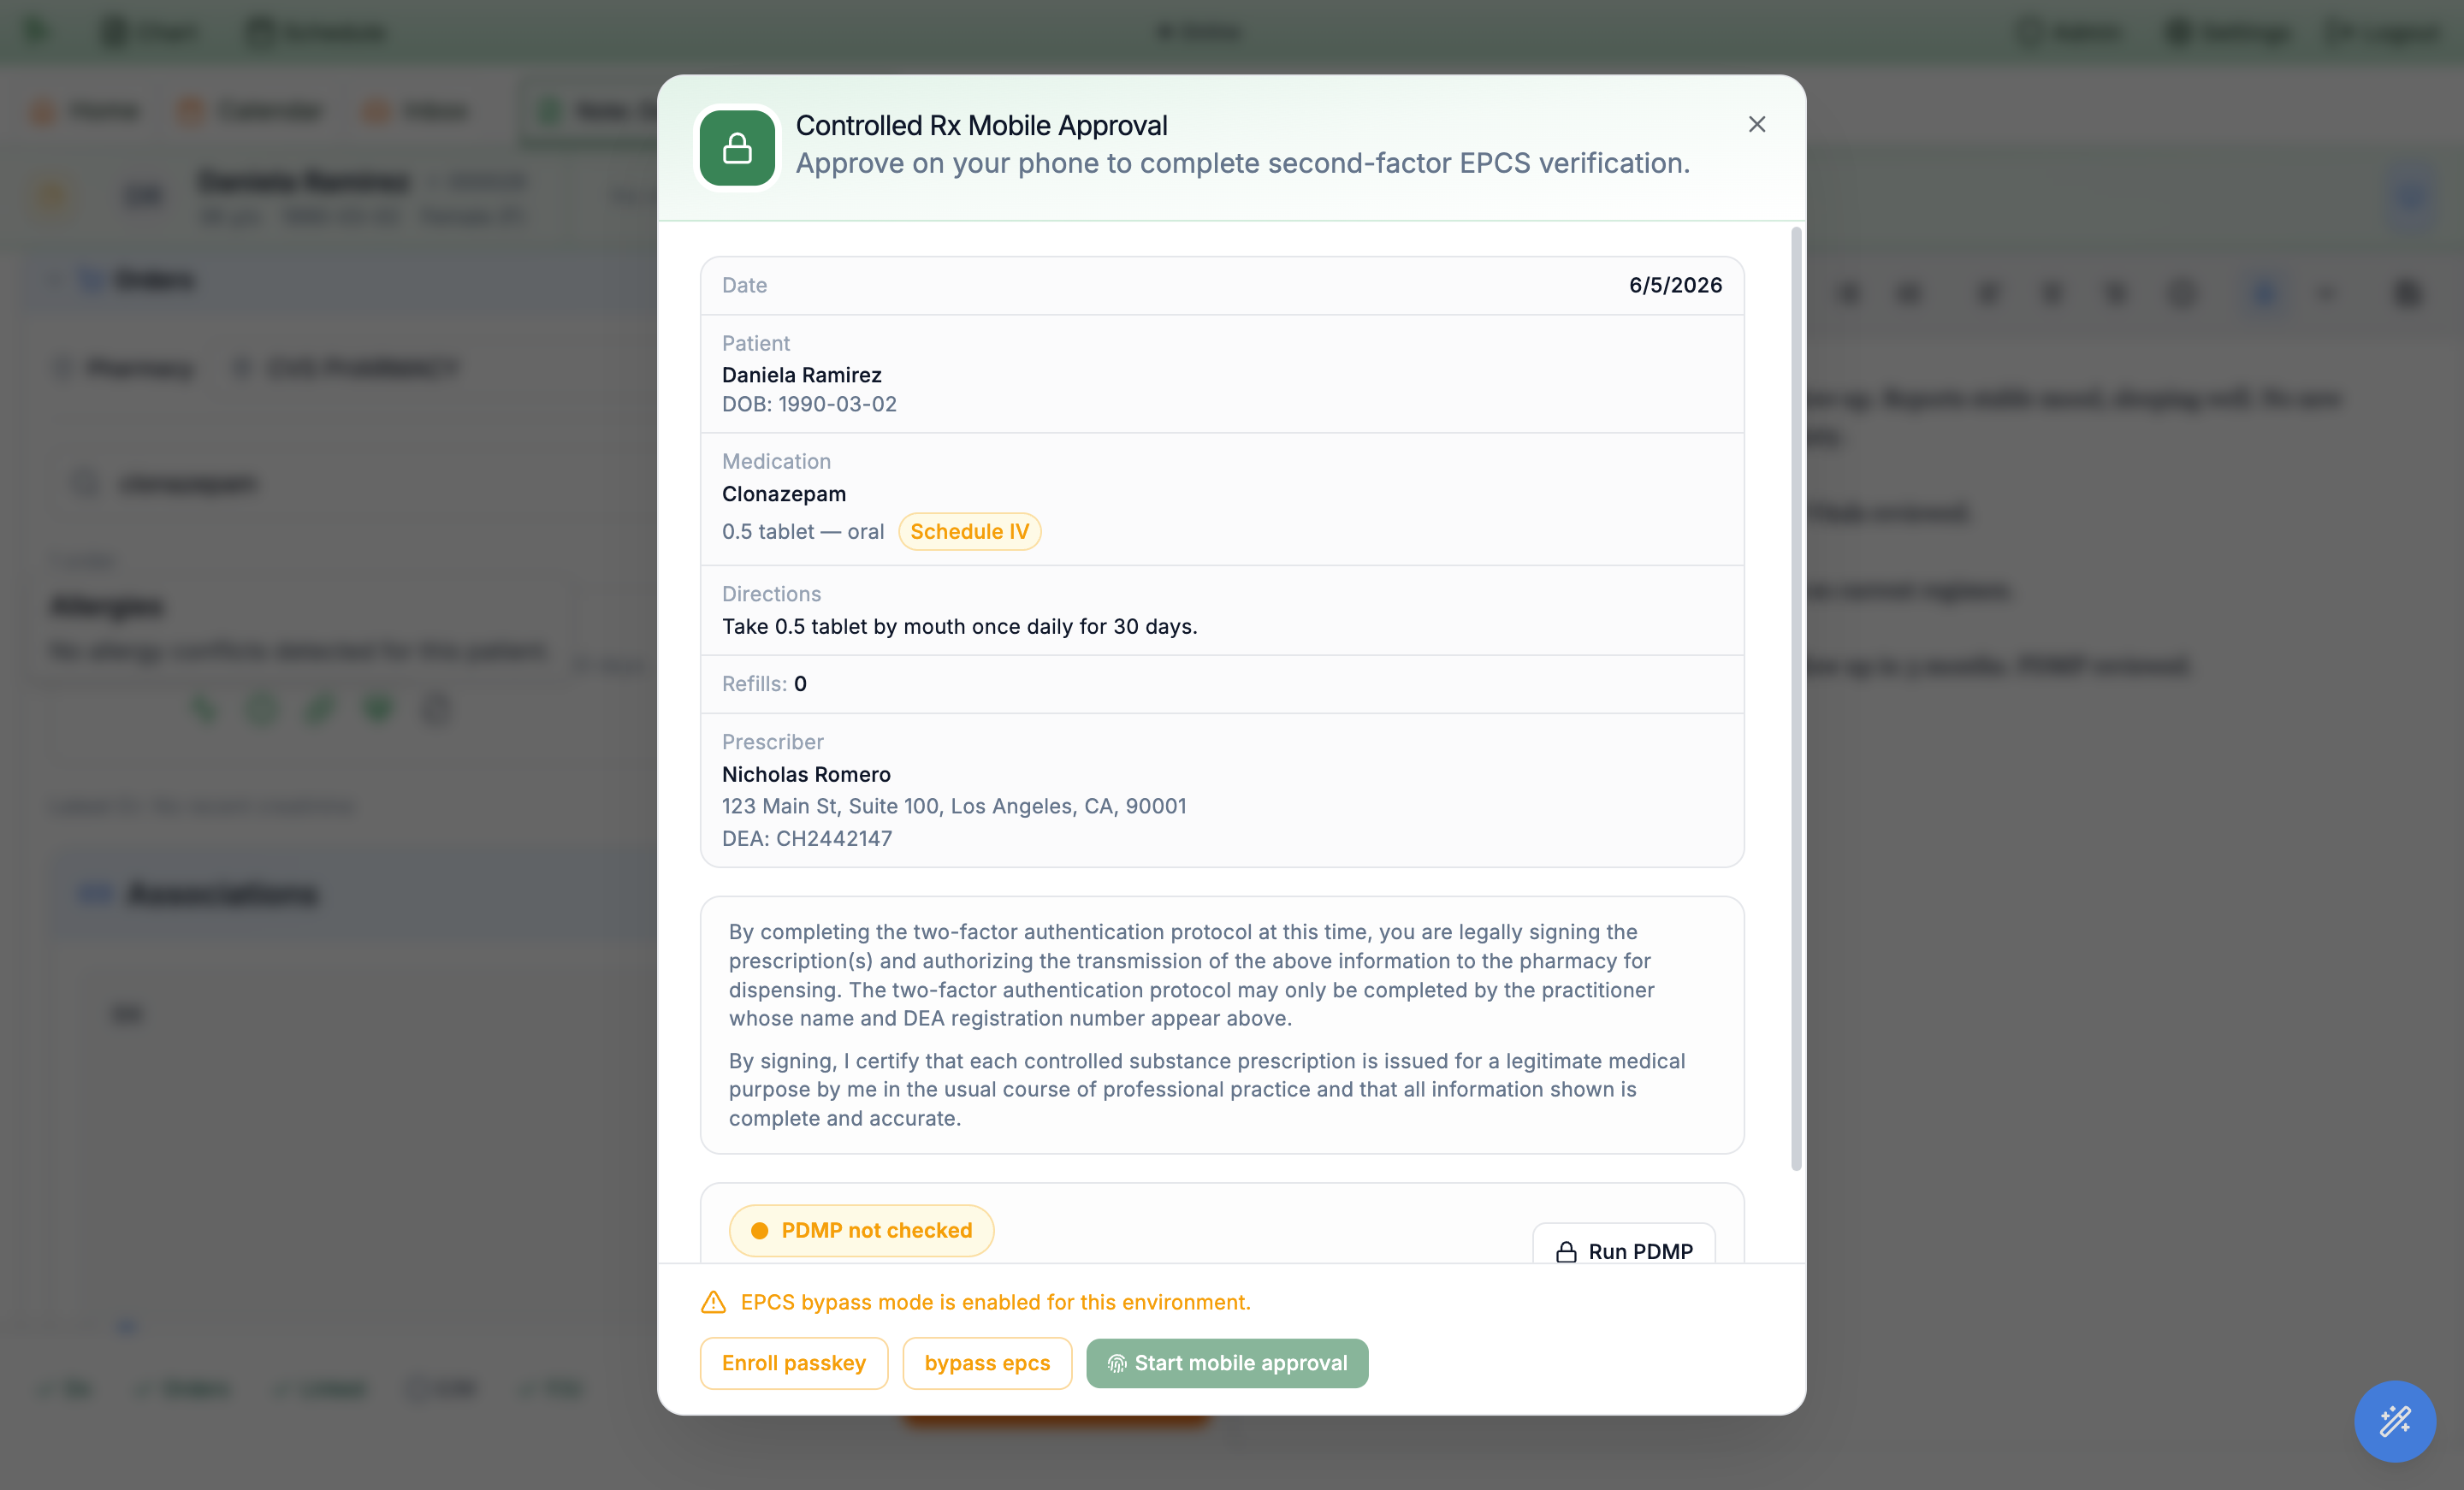
Start mobile approval the dialog also offers Route to supervising physician, which sends the prescription to an MD or DO in your practice to sign instead — see Supervisory signing.Route a controlled prescription to a supervising physician
Some states require a physician to sign all, or some, of the controlled-substance prescriptions that nurse practitioners and physician assistants write. In Hero EMR the NP or PA prepares the prescription and routes it to a supervising physician (MD or DO) in the practice instead of approving it on their own phone. The physician reviews it in the Inbox Rx view with everything needed to decide, and then signs it, edits it first, or returns it with a reason. The prescription goes out under the physician’s name, DEA registration, and PDMP check — the physician is the prescriber of record, and the NP or PA is recorded as the one who prepared it.
For the NP or PA: route the prescription
-
Prepare the order as usual.
Build the prescription, choose the pharmacy, and link a diagnosis, exactly as for any controlled prescription (Signing controlled prescriptions). Then click the order’s
Sign & Send. -
Choose
Route to supervising physician. It sits besideStart mobile approvalat the bottom of the Controlled Rx Mobile Approval dialog. The dialog becomes Route for supervising signature — “A supervising physician reviews this prescription and signs it under their own DEA registration.” You don’t approve on your phone, pick a DEA location, or run the PDMP for a routed prescription; the physician does those when signing.Backreturns you to signing it yourself. -
Pick the physician.
The
Supervising physicianlist shows your default first (markedDefault), then your favorites, then everyone else, and your default is preselected. Click a physician’s star to add or remove a favorite, andMake defaulton the selected physician to preselect them next time. A physician who can’t sign controlled prescriptions yet is greyed out with Not set up for EPCS; No DEA registration in WA (or the patient’s state) warns that they have no DEA registration there. With more than eight physicians, aFind a physiciansearch box appears. -
Add a note and send.
The optional
Note to Dr. …box (up to 1,000 characters) travels with the request — “Anything the physician should know before signing.” ClickSend to Dr. … for signature; a pharmacy has to be selected first. If a severe drug interaction is flagged, the warning’s confirm button readsRoute anyway. -
Follow it on the order row.
The row shows where the prescription stands:
Awaiting Dr. …’s signature,Dr. … is signing,Signed & sent by Dr. …, orSending failed. While it waits,EditandRemoveare locked (“Waiting for Dr. … Withdraw it to make changes.”). You can finish and close the visit while a request is waiting.
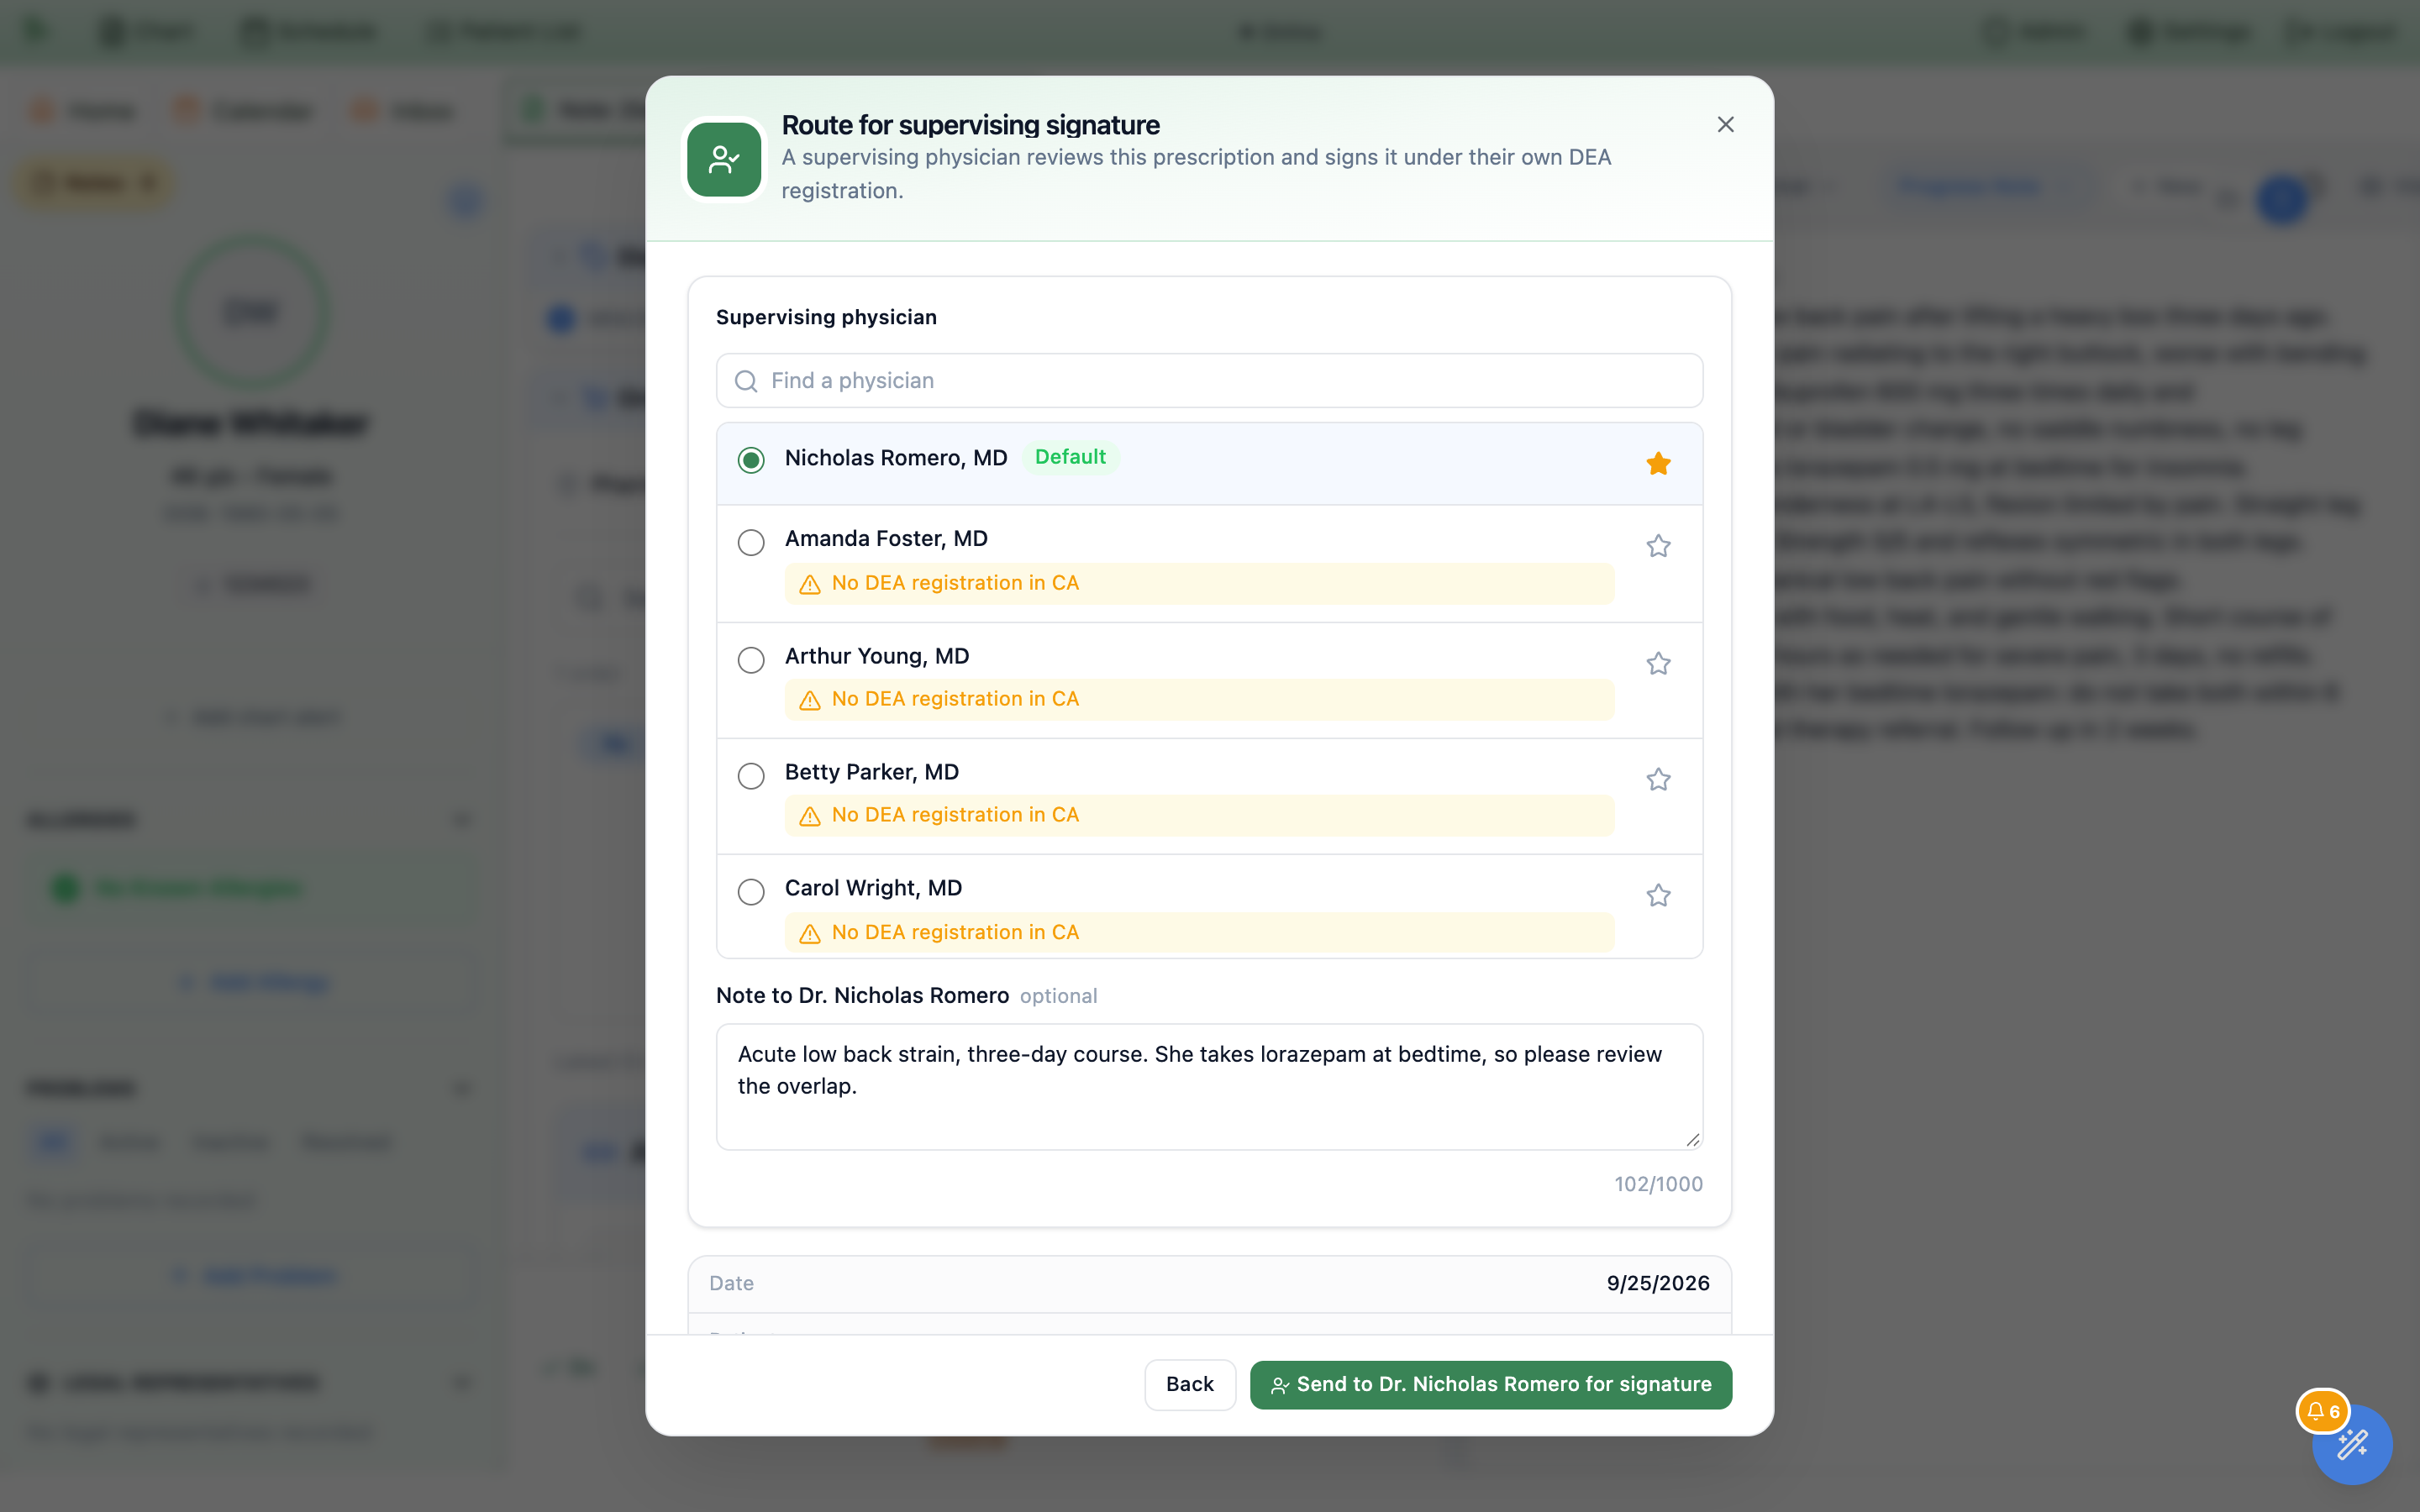
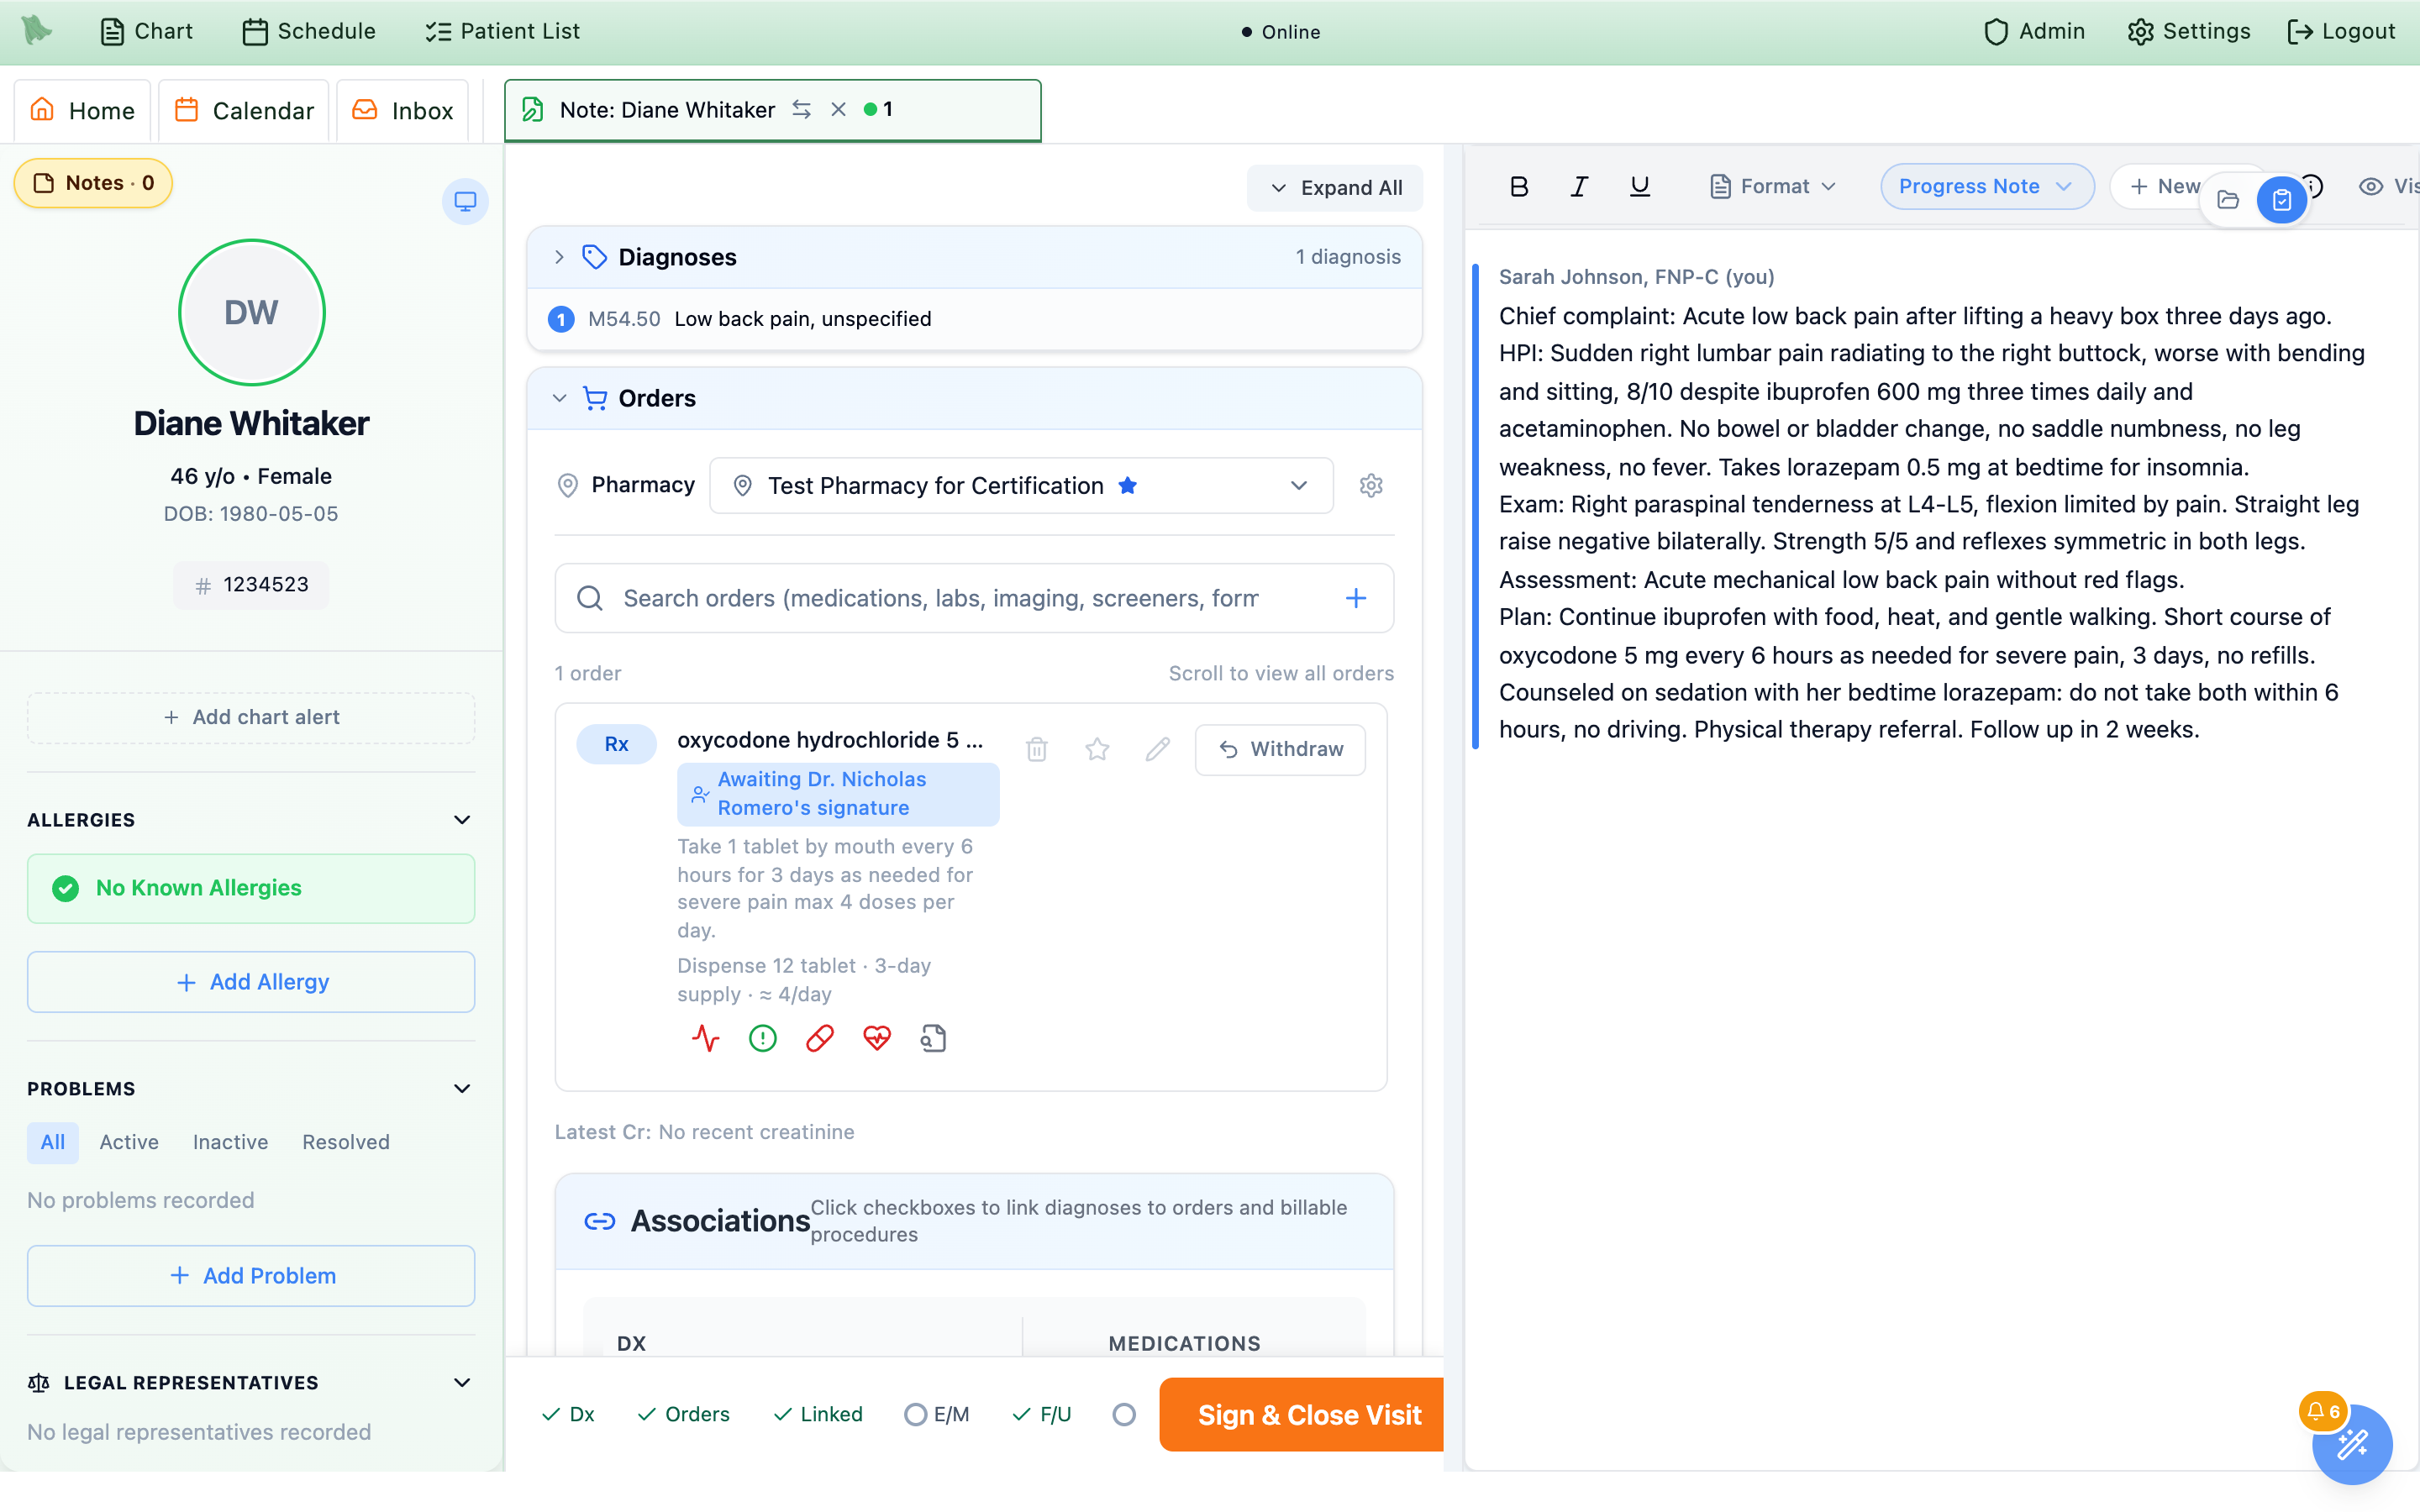
Withdraw takes it back.Withdraw on the order row takes the prescription back from the physician, unsigned, so you can edit it, sign it yourself (when your practice allows), or route it again. A prescription waits on one physician at a time — to send it to someone else, withdraw it and route it again. Once the physician has signed and sent it, it can no longer be withdrawn.For the supervising physician: review, then sign, edit, or return
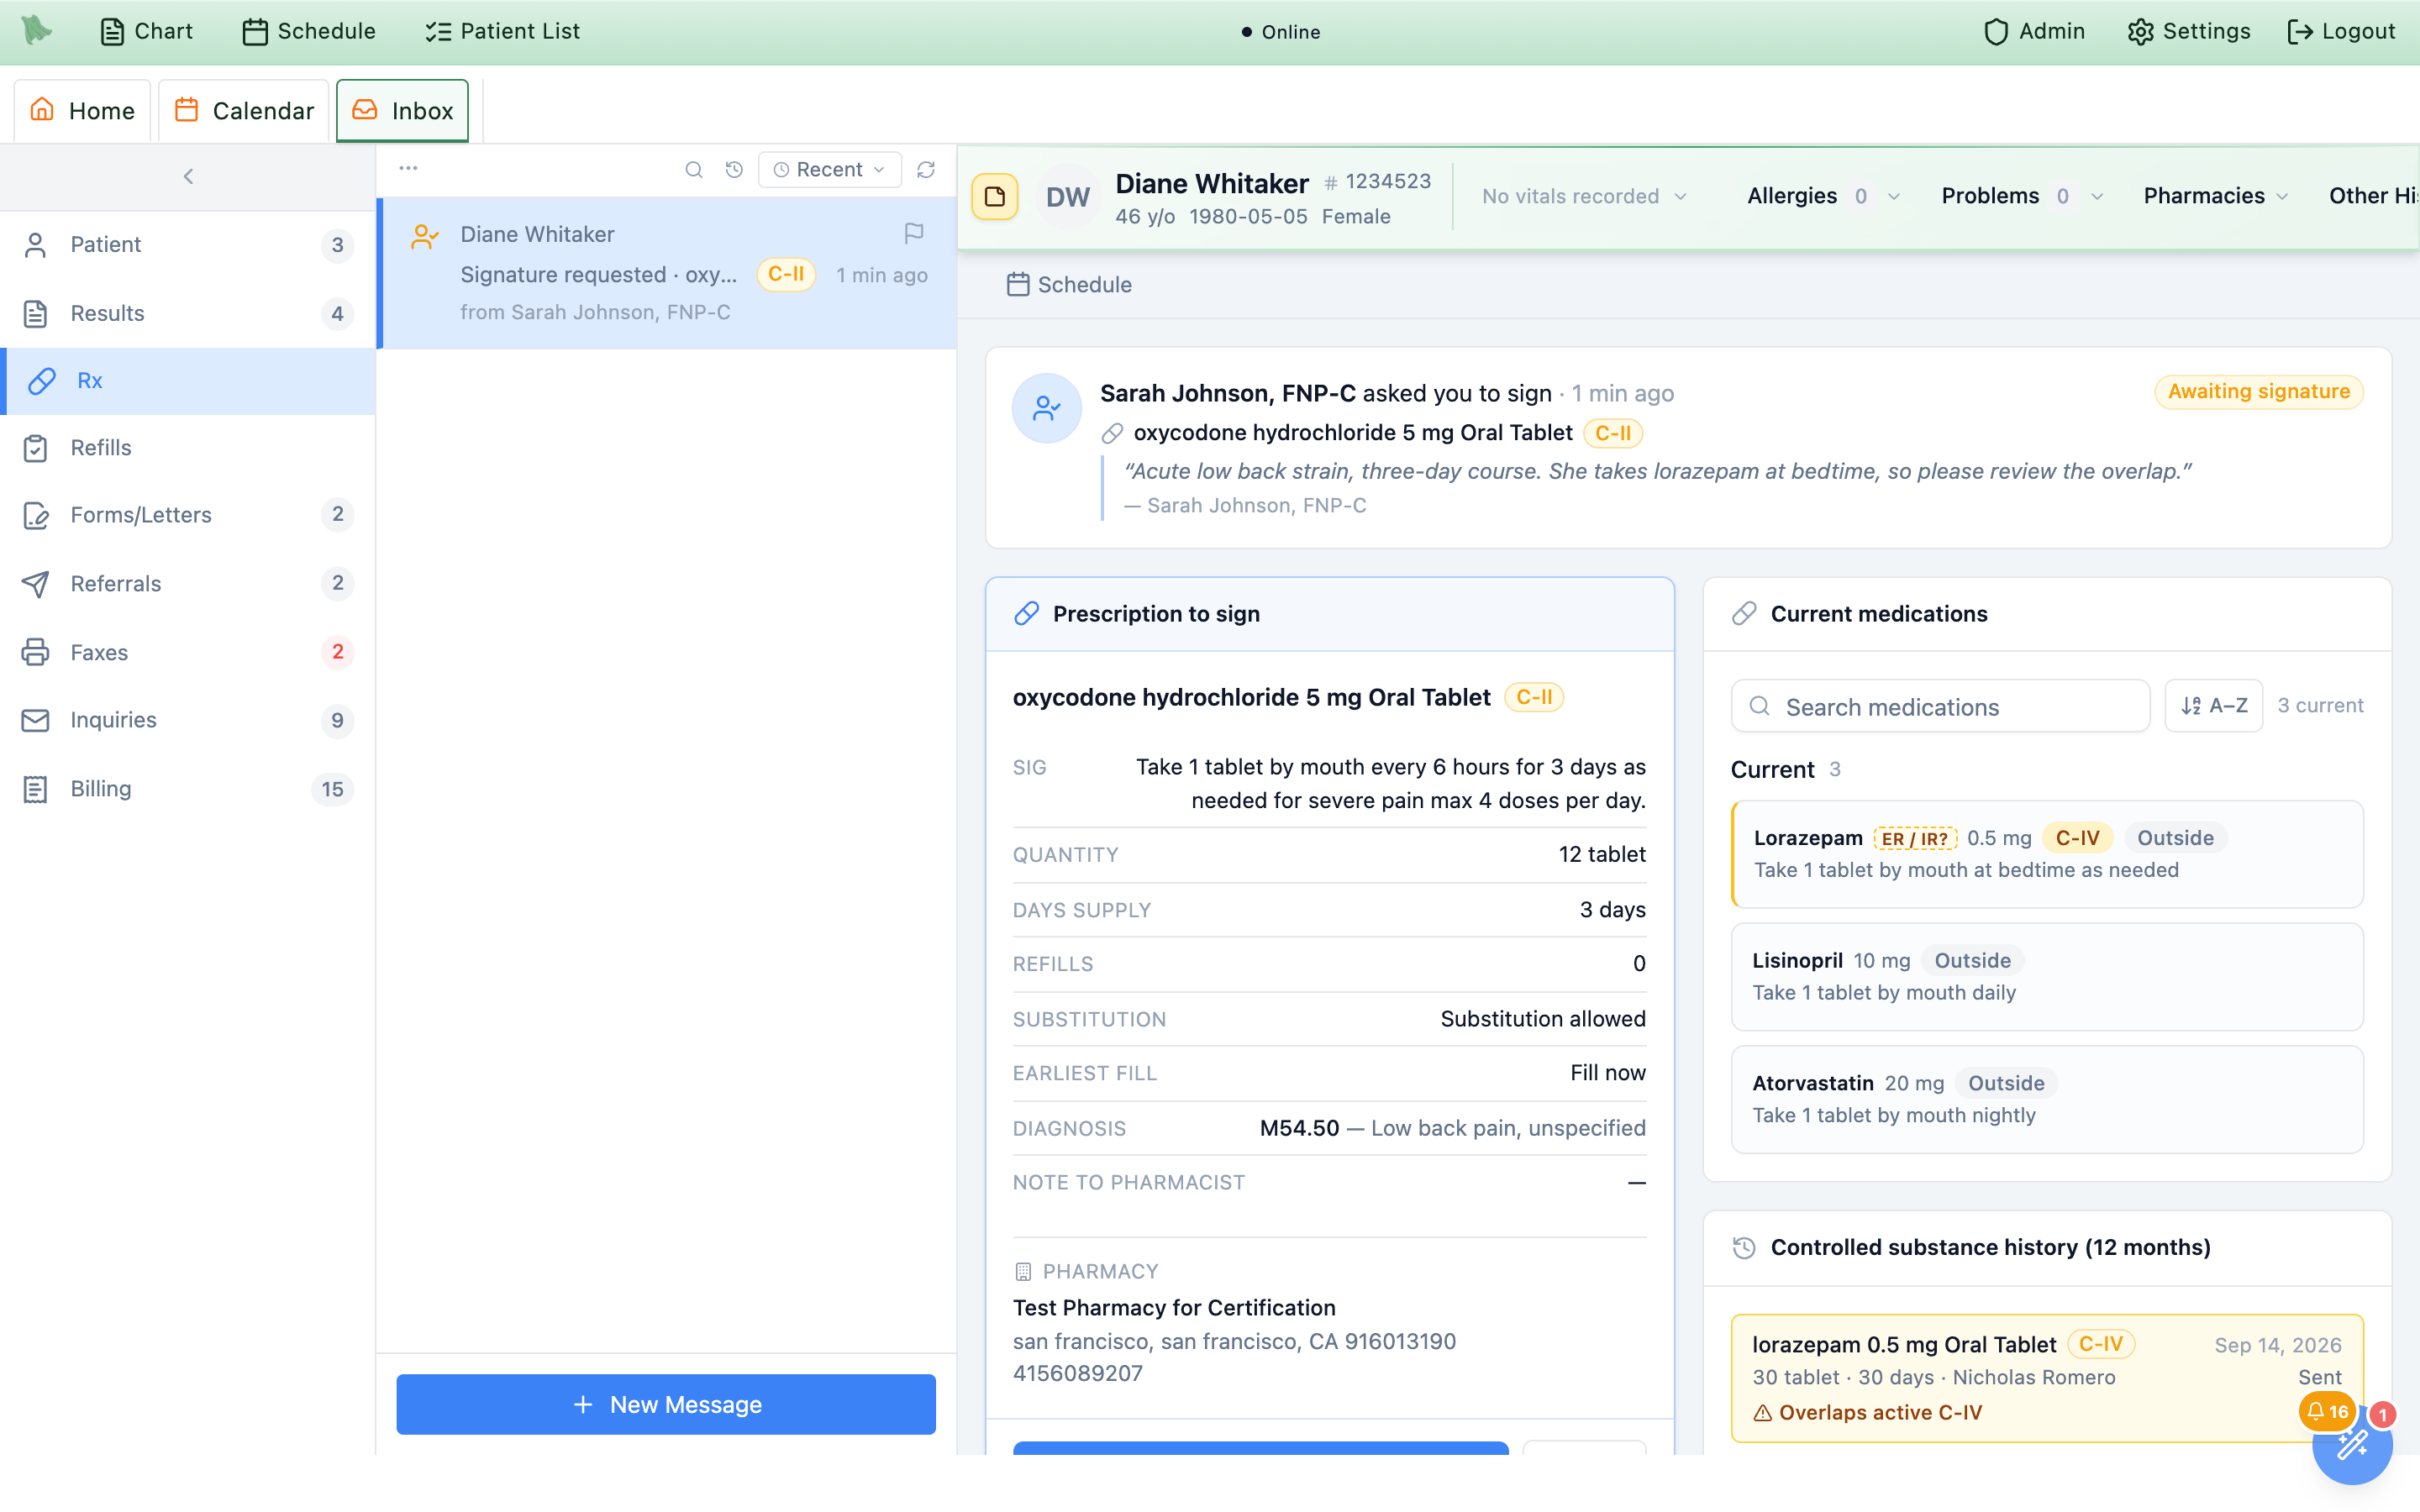
A routed request brings everything you need to decide onto one screen:
Prescription to sign
Sig, quantity, days supply, refills, substitution, earliest fill date, diagnosis, note to pharmacist, and the pharmacy.
Current medications
The patient’s medication list with controlled substances first, each marked with its schedule and an amber edge.
Controlled substance history (12 months)
Every controlled prescription in the past year. Overlaps active C-II and Within this Rx’s 30-day window flag the ones that overlap this request.
PDMP
When you last checked the state PDMP for this patient and what it showed — or a reminder that you can run it when you sign.
Visit note
The note from the visit the prescription belongs to, marked Signed or Draft — not yet signed.
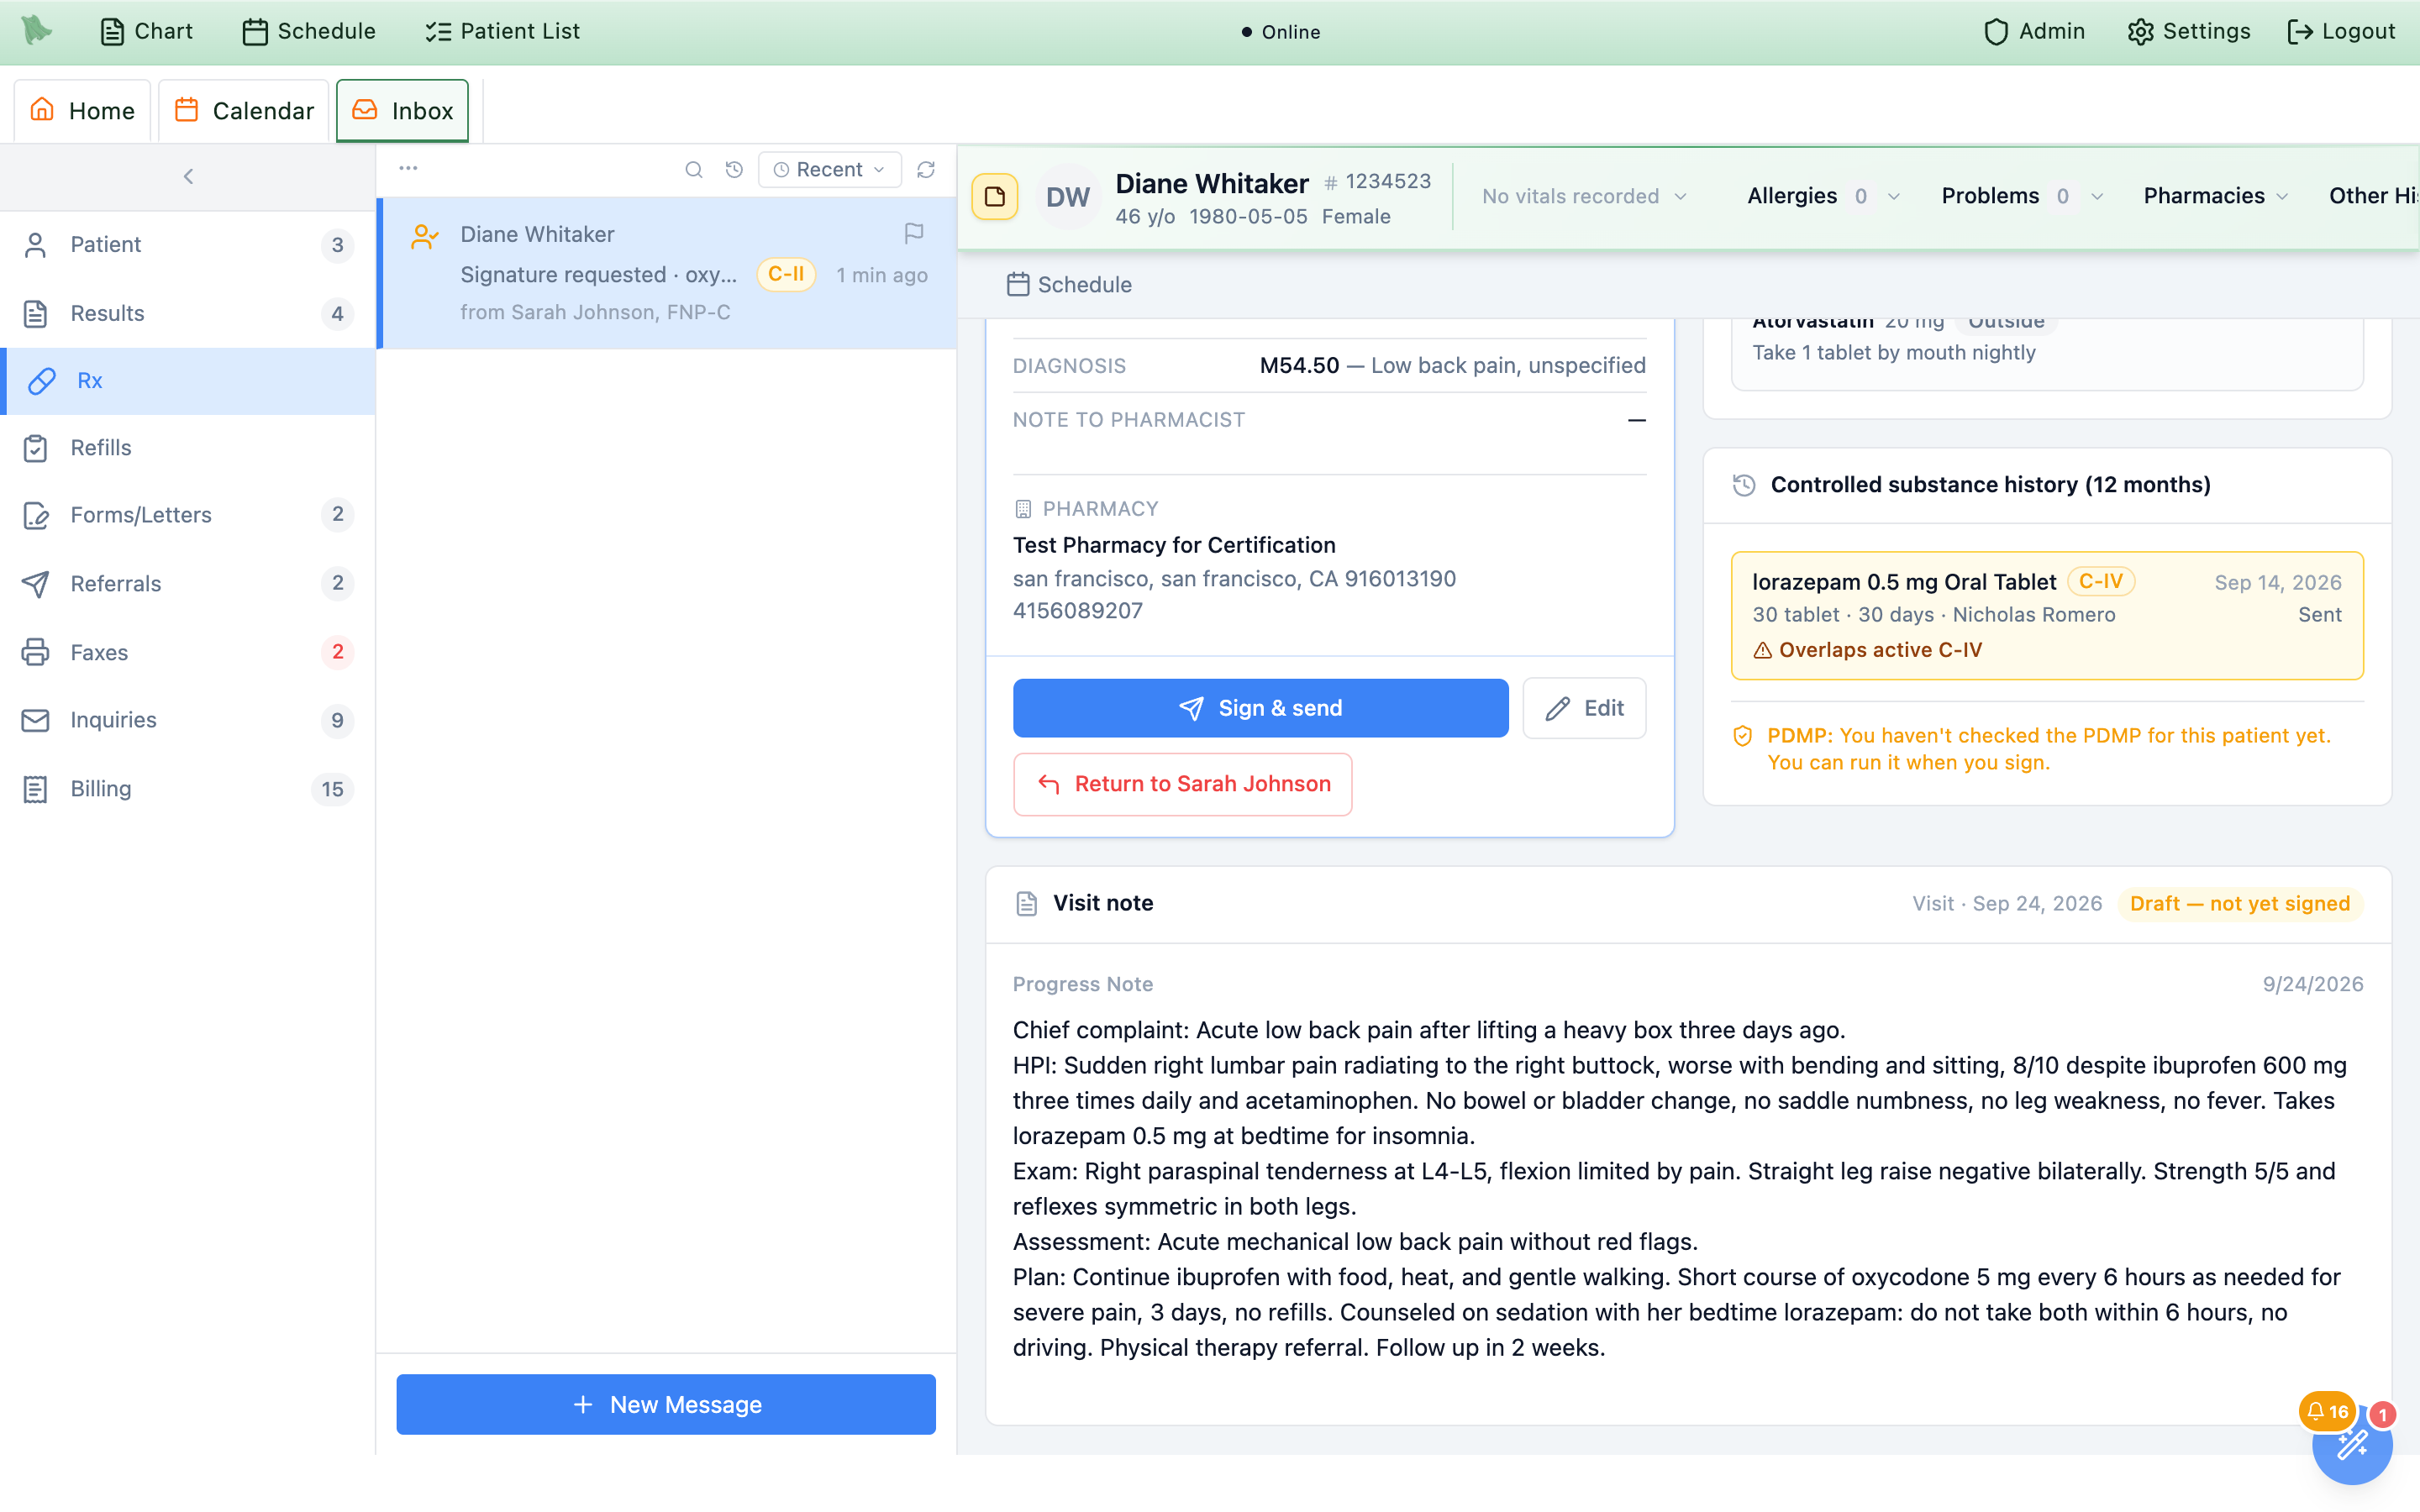
-
Open the request.
Click
Inbox, then theRxview. A request readsSignature requested ·drug, with the schedule chip (for exampleC-II) and “from” the NP or PA who prepared it. Opening it shows who asked you to sign and when, anAwaiting signaturestatus, their note, and the panels above. -
Edit it if something needs to change.
Editopens Edit Prescription;Use these changeskeeps your version. Nothing is sent from there — the request is marked Edited by you, your changes are saved to the prescription when you sign, and both of you can see what changed.Discard editsgoes back to what was routed. A compound can’t be edited here; return it instead. -
Sign and send.
Sign & sendopens Sign controlled prescription, the same EPCS signing you use for your own prescriptions: run or refresh the PDMP, confirm theDEA prescribing location(matched to the patient’s state automatically), check the summary — you are thePrescriberand the NP or PA appears as Prepared by — and chooseStart mobile approvalto approve on your phone. “Signed and sent” confirms it is queued for the pharmacy. -
Or return it with a reason.
Return toname asks why: Needs a visit, Dose or quantity change needed, Not clinically indicated, PDMP concern, or Other (which needs a note). Nothing is sent to the pharmacy.
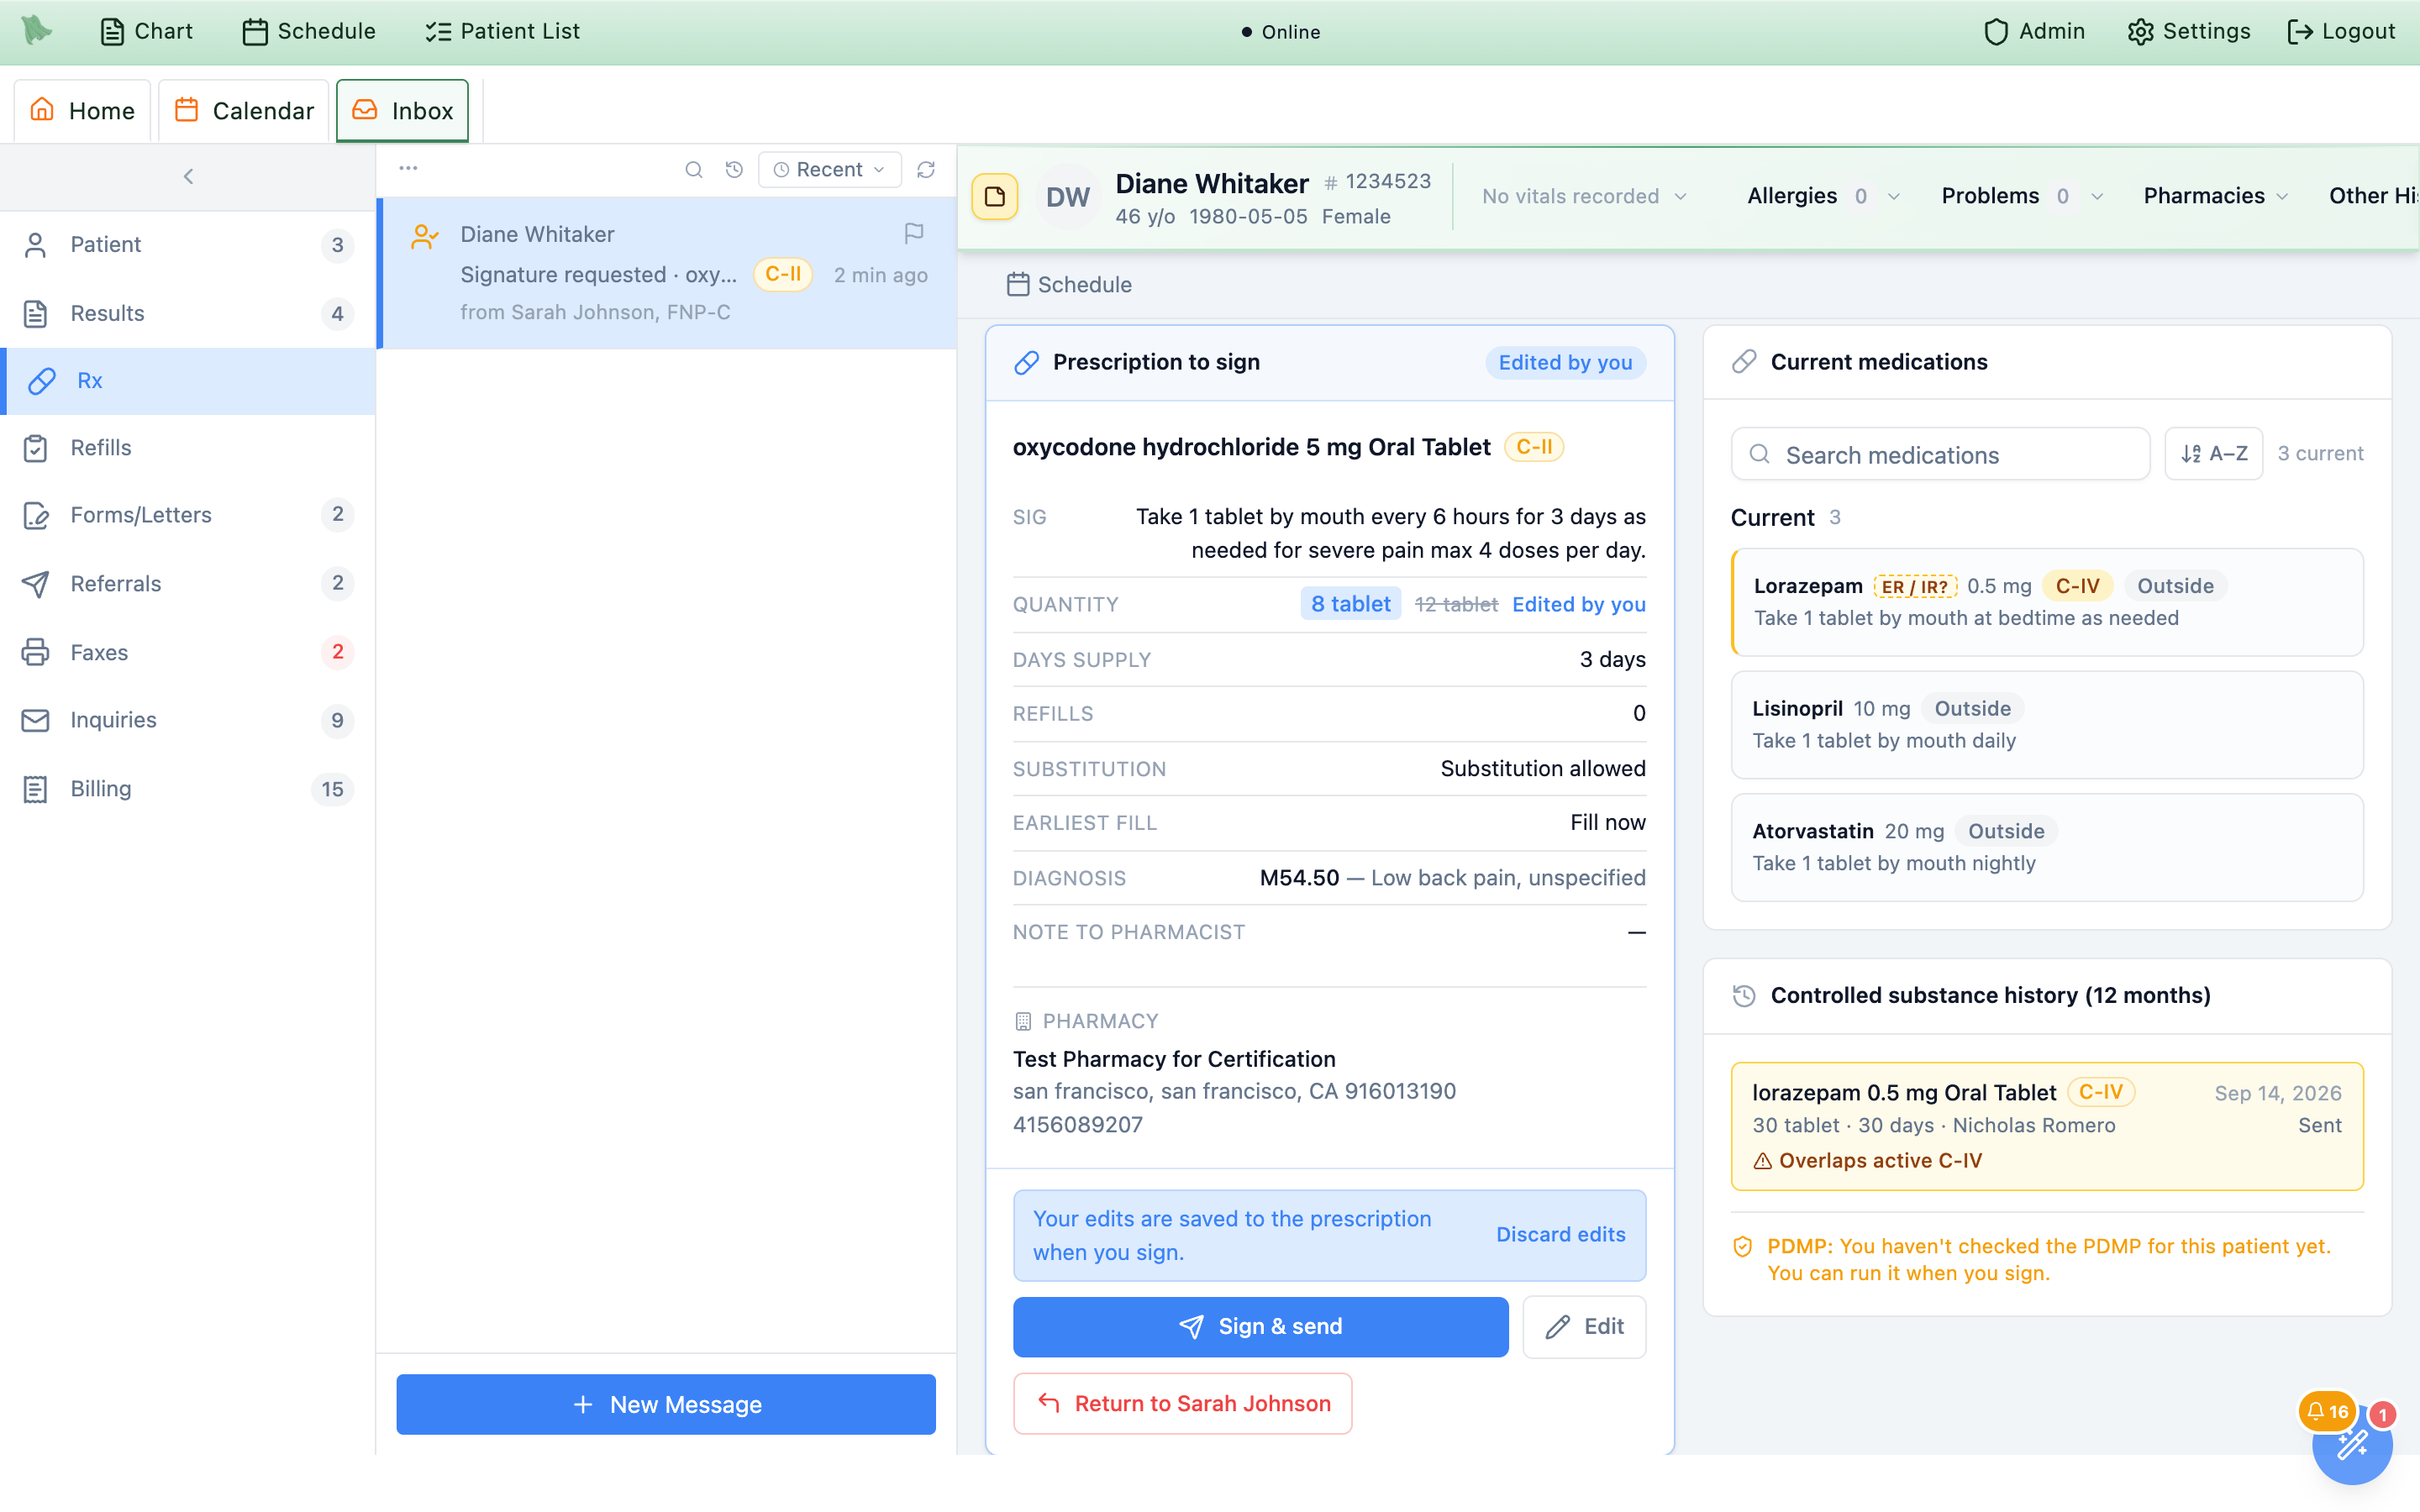
Edit: the change is shown old → new and applied only when you sign.When a prescription comes back
A returned prescription lands in the NP’s or PA’s own Rx view as Returned by Dr. …, and the order row reads “Returned by Dr. …: reason — note”. From the returned item they can Edit & re-route it (the dialog asks “What changed since it was returned”), Open visit while the visit is still open, Discard prescription, or Dismiss the item. If the physician signed but the send didn’t reach the pharmacy, the row shows Sending failed: the physician can return it to the preparer, or the preparer can withdraw it to fix and resend. Finished requests stay in the Rx view for seven days.
Practice settings (admins)
Set the practice policy under Admin → Prescriptions → Supervisory signing, then Save changes.
| Setting | What it does | Default |
|---|---|---|
Routing — “Let NPs and PAs route controlled prescriptions to a supervising physician” | Adds Route to supervising physician to the controlled-prescription signing dialog. | On |
Required signature — “Require a supervising physician’s signature for mid-level prescriptions of:” Schedule II, Schedule III, Schedule IV, Schedule V | NPs and PAs can’t sign the ticked schedules themselves. Their signing dialog opens straight to routing with “Your organization requires a supervising physician to sign Schedule II prescriptions written by NPs and PAs.” Requires routing to be on. | None ticked |
Prescribers | Read-only: how each prescriber is classified — Physicians (MD/DO), NP/PA, or Credentials not recognized — from the credentials on their provider profile. Fix credentials in provider profiles opens Physician Management. | — |
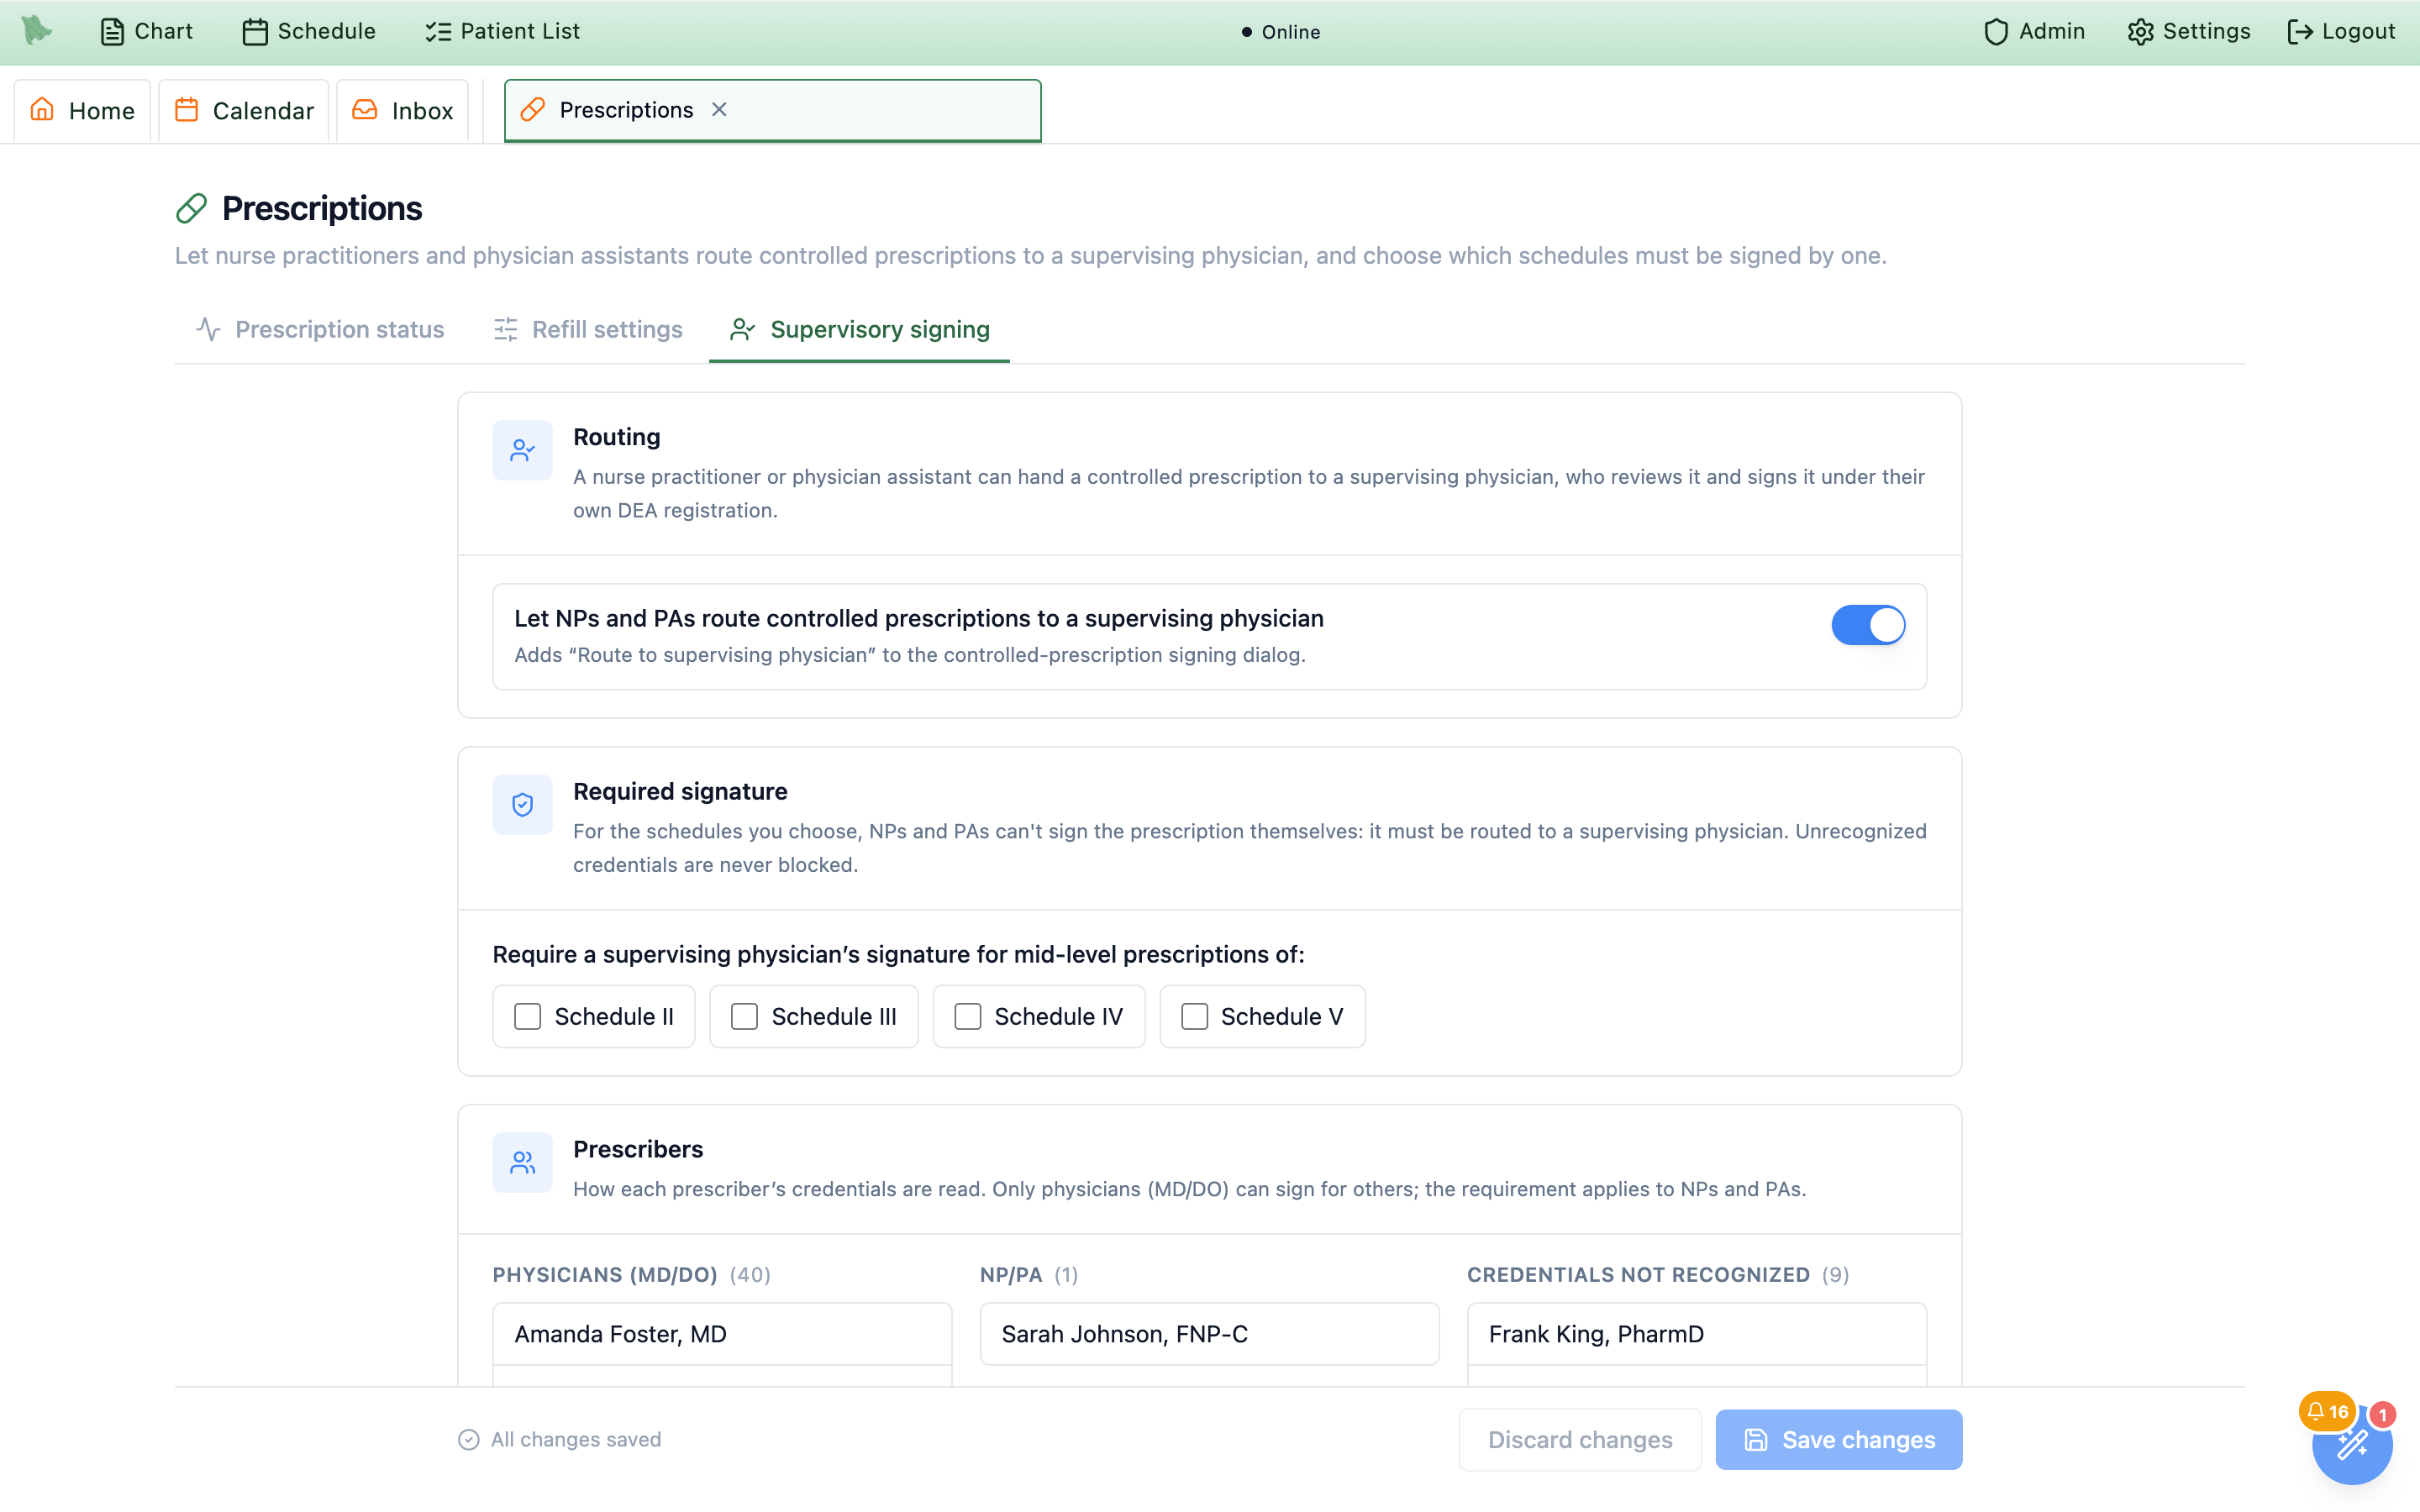
Admin → Prescriptions → Supervisory signing: routing on by default, no schedules required until you tick them.Credentials not recognized can still route but is never blocked by the requirement, so fix their credentials for the policy to apply. Hero enforces the schedules you tick — set them to match your state’s rules and your supervision agreements.Need help? Email support@heroemr.com.