Encounter completion — charges & finalize
Close out the visit: E/M and CPT charges, patient instructions, follow-up scheduling, medication reconciliation, favorites, signing the encounter — and what to do when a signed visit needs to change.
Encounter completion — charges & finalize
Close out the visit: E/M and CPT charges, patient instructions, follow-up scheduling, medication reconciliation, favorites, signing the encounter — and what to do when a signed visit needs to change.
Code the visit (E/M & CPT)
The Charges section captures the billing codes. Pick an Evaluation & Management level with one click and Hero EMR fills in the matching CPT; add any procedure or other CPT codes by search.
-
Choose the E/M level.
The buttons
Straightforward,Low,Moderate,High,New Low, andNew Moderatemap to the right code — e.g.Moderate→ 99214 — Established patient office visit, moderate complexity (30–39 min). Picking a level turns theE/Mtracker chip green. -
Add other CPT codes.
Use
Search CPT codesfor procedures, vaccines, or anything beyond the office visit.Managecurates your charge favorites, and is also where you rename or hide theNo chargebutton. -
Or close the visit without an E/M code.
Two pinned buttons sit at the front of the quick-button grid:
No charge— close the visit with no billing at all. Nothing is charged, no insurance claim is created, and the visit reports as “No billing” in the Billing Command Center. It is shown by default; you can rename it or hide it from your own charge favorites underManage.Cash pay— create a patient balance instead of an insurance claim. The caption under the button shows the configured price for this patient and visit type (a fixed Service Menu price counts even when it is hidden from patients). With no visit price but with billing codes on the visit, the cash price is worked out at signing from your CPT List Prices for those codes — and if one of those codes has no price, signing stops with “Cash pay needs a price for every signed code, and 99050 has none. Set a cash-pay amount for this visit, or ask billing to set a price for 99050 in CPT List Prices.” With no price and no codes, or for an Office review service, the caption reads Price required and an administrator or billing staff member with charge-management access enters a one-time amount before you sign. Where a price is configured, the same permission lets you override it for this visit only.
Create an insurance claim anyway in the Charges section.
Place of service
Place of service sits at the top of the Charges section, next to Manage. It is the CMS code the claim is filed with — where the service actually happened.
-
Leave it alone for an ordinary visit.
The selector starts on
Default, and the option names the code Hero EMR will use — for example Default · 11 Office, Default · 10 Telehealth, patient at home for a telehealth visit type, or Default · 22 On-campus outpatient hospital for a visit booked with an outside-facility visit type. Nothing changes from how visits have always been billed. -
Override it when you worked somewhere else.
Pick the code that matches:
22on-campus outpatient hospital,21inpatient hospital,24ambulatory surgical center,19off-campus outpatient hospital,23emergency room,31/32skilled nursing or nursing facility,49independent clinic,71public health clinic,12home, or11office. An explicit choice is badgedOVERRIDE, and the claim is filed with it — the Billing Command Center will not flag it as the wrong place of service. -
Go back to the default.
Choose
Default …again at the top of the list. - The facility on the claim. When the code is a hospital or facility setting, Hero EMR puts the facility's name, NPI, and street address on the claim as the service facility (CMS-1500 box 32): the facility chosen when the visit was booked with an outside-facility visit type, or, for a visit booked at one of the practice's own locations, that location. Keep those details current under Visit Config and Locations.
Rounding visits linked to a hospital admission are the exception: their place of service comes from the admission's patient class, so the selector is not offered there.
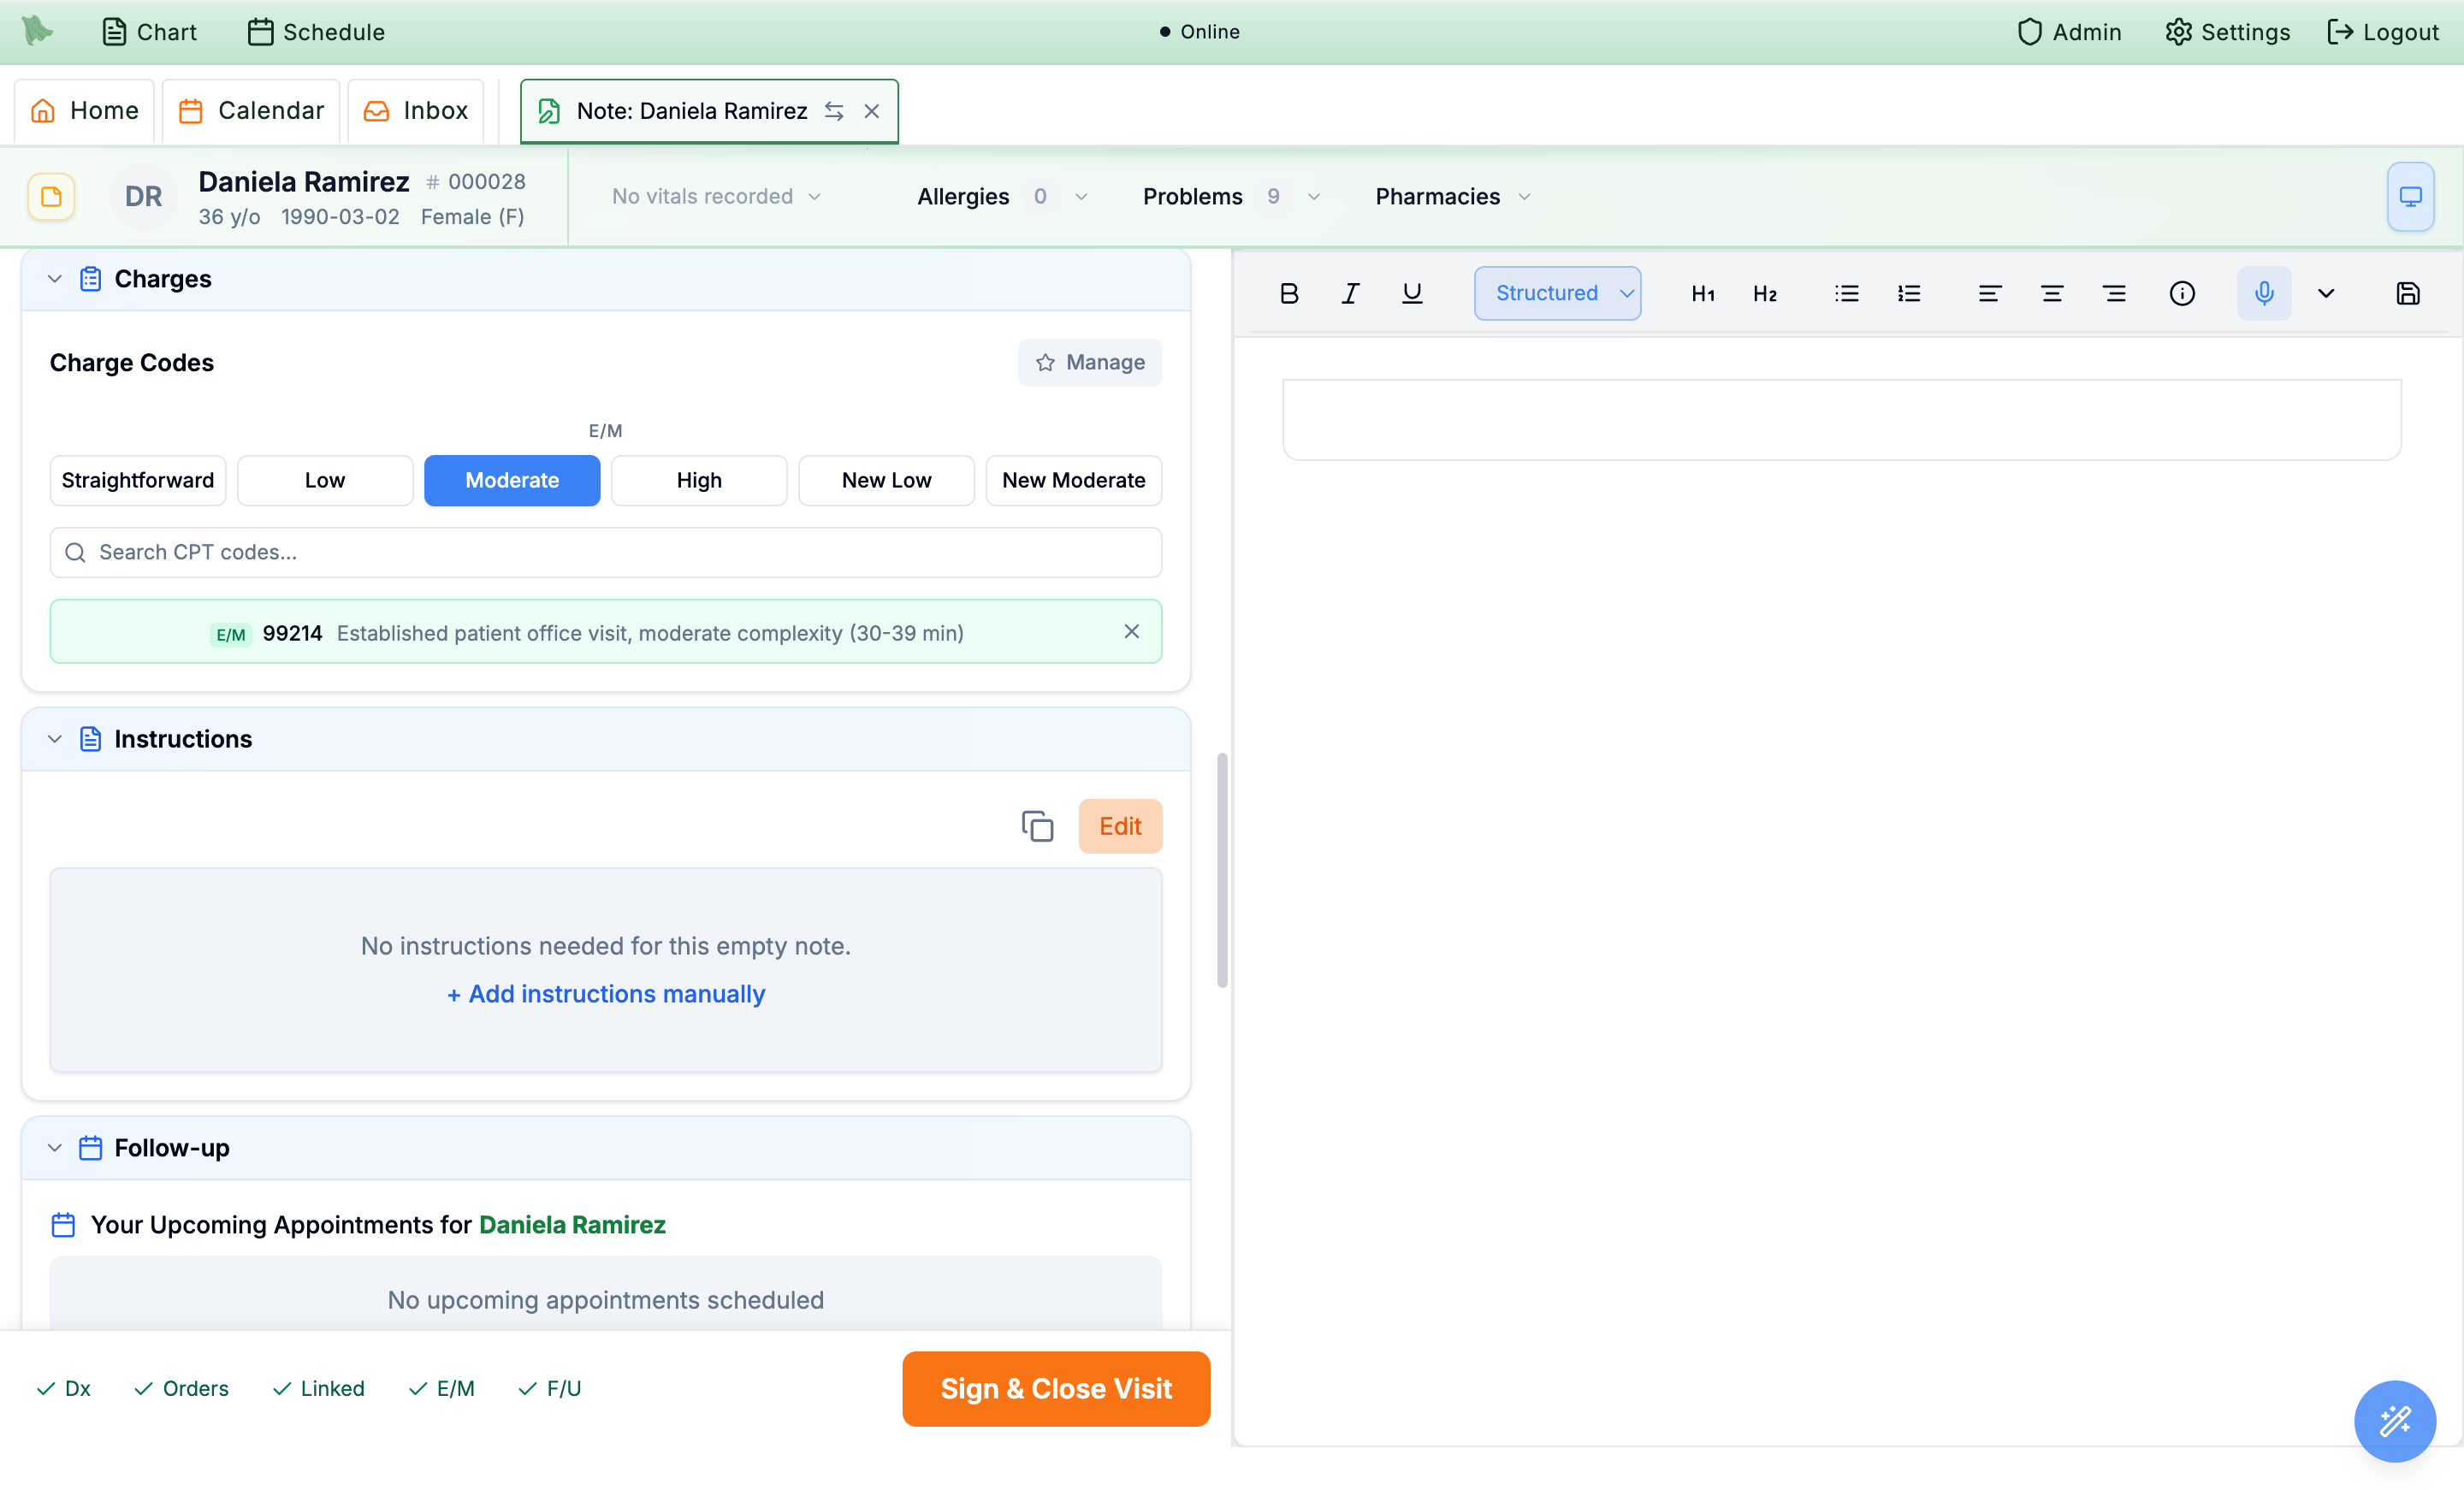
E/M tracker.Patient instructions
Hero EMR drafts after-visit patient instructions from your note. Review them, edit, or write your own, then they travel with the visit summary the patient receives.
- Review the draft. The
Instructionssection proposes plain-language instructions based on the note’s plan. - Edit or add your own. Use
Editto revise,+ Add instructions manuallyto write from scratch, orCopy to clipboardto reuse elsewhere.
Schedule the follow-up
The Follow-up section is pre-set from your note’s plan and lets you confirm the timing and book the next visit without leaving the encounter.
-
Check what’s already booked.
Your Upcoming Appointmentsat the top of the section lists this patient’s scheduled visits (date, time, visit type) so you don’t double-book a follow-up that already exists. -
Confirm the timing.
Pick
2 weeks,1 month,3 months,6 months, orCustom. Hero EMR shows a Recommended follow-up date based on your choice. -
Set the visit type and book.
Choose the
Visit Type.Durationbeside it is a read-only readout — it comes from that visit type’s default duration, so change the duration by changing the visit type (or its definition under Visit types). The star inside each visit-type option saves it as your default follow-up type (tooltip: Set as default follow up type).Schedule Nowdoes not create the appointment on the spot. It opens the scheduler in its own tab with the chosen visit type selected, on the follow-up’s due date — or the first day with openings after it — with that day’s first open time picked and a note such as “Follow-up due Nov 21 → first opening Mon, Nov 23” (or “Follow-up due Nov 16 has openings”). Change the time if you like, then pressBook. The booked visit is linked back to this follow-up.- Or leave it as a follow-up request to be booked later. The
F/Utracker chip turns green once set.
-
Once a visit is on the calendar.
The request UI is replaced by a
Follow-up appointment scheduledpanel showing the date, time, and visit type, withRescheduleandCancel appointmentbuttons. As it says there, the automatic follow-up request is turned off while that appointment is on the calendar — the two are mutually exclusive.
Review medications during the visit
The Medications section shows the same list as the chart’s Medications tab in a compact form. It has the same groups (Needs review, Current, Scheduled, On hold and Past), the same names and release badges, the same supply lines and the same buttons. It adds two things only the visit knows about: what you are prescribing today and what you are stopping when you sign. Collapsed, the section header sums it up, for example 7 current · 2 to review · 1 stopping at sign · 1 new prescription.
-
Watch the footer chip.
The footer always shows a
Medschip next toDx,Orders,E/MandF/U, for exampleMeds 7 · 2 to review. It turns amber while anything needs review, and clicking it jumps to this section. Its numbers always match the section’s group headers and the chart tab. With medication reconciliation on, it also shows(N pending)or(N to reconcile). -
Check
Prescribing today. Prescriptions in this visit’s Orders that are not on the list yet appear at the top, each markedDraftorSent. The block isRead only. Change a prescription in Orders. -
Work
Needs review. Rows that ran out, that the patient reports not taking, that couldn’t be matched or that were imported without a status offer the same buttons as on the chart:Renew,Still taking,Specify,Merge, andStop at signin place ofStopped. The chart tab explains what each one does. -
Renewadds the prescription to this visit. Inside an open visit,Renewdoesn’t open a separate order. It adds the renewal to this visit’s Orders, filled in from the last prescription with the product, directions, quantity and days’ supply, set to 0 refills and linked only to diagnoses already on the visit. Hero then expands Orders and opens the prescription inEdit Medicationso you can check it. The summary at the bottom of the dialog showsLast sent to:and the earlier pharmacy. If this visit’s pharmacy is different, it says so, so you can switch underPharmacyif the patient wants the earlier one. The renewal is signed and sent with the visit like any other order. ClickingRenewagain opens the one already staged (“already in this visit’s orders”) instead of adding a second. The renewal is for the product the chart lists, so if you usedSpecifyto pick the ER form, the ER form is what gets renewed. If there is no prescription on file to copy, or Hero can’t confirm the product or how it is dispensed, nothing is added. Instead Hero opens the order search with the medication’s name (“Choose the product for …”) so you pick it. A signed visit takes no new orders, so renew from the chart instead. -
Stop a medication at sign.
Rows in
Current,ScheduledandOn holdcarryStop at sign. Clicking it turns the row amber with aStopping at signchip and aDiscontinuation reasonbox, so you can document why. The button becomesKeepin case you change your mind. The row leaves the counts straight away, and the medication is discontinued when you clickSign & Close Visit. The note above the list says so: “Use ‘Stop at sign’ to discontinue a medication when this encounter is signed.” -
Check stops Hero suggested.
When Hero reads a stop in your note, it queues it for you. The row shows
Stopping at signplus aSuggestedchip, and it will be discontinued at sign like your own stops. If the patient should stay on it, clickKeep. With medication reconciliation on, suggestions work differently: nothing is queued, and the row showsSuggested stopwithDiscontinueandDismiss(see The workspace).
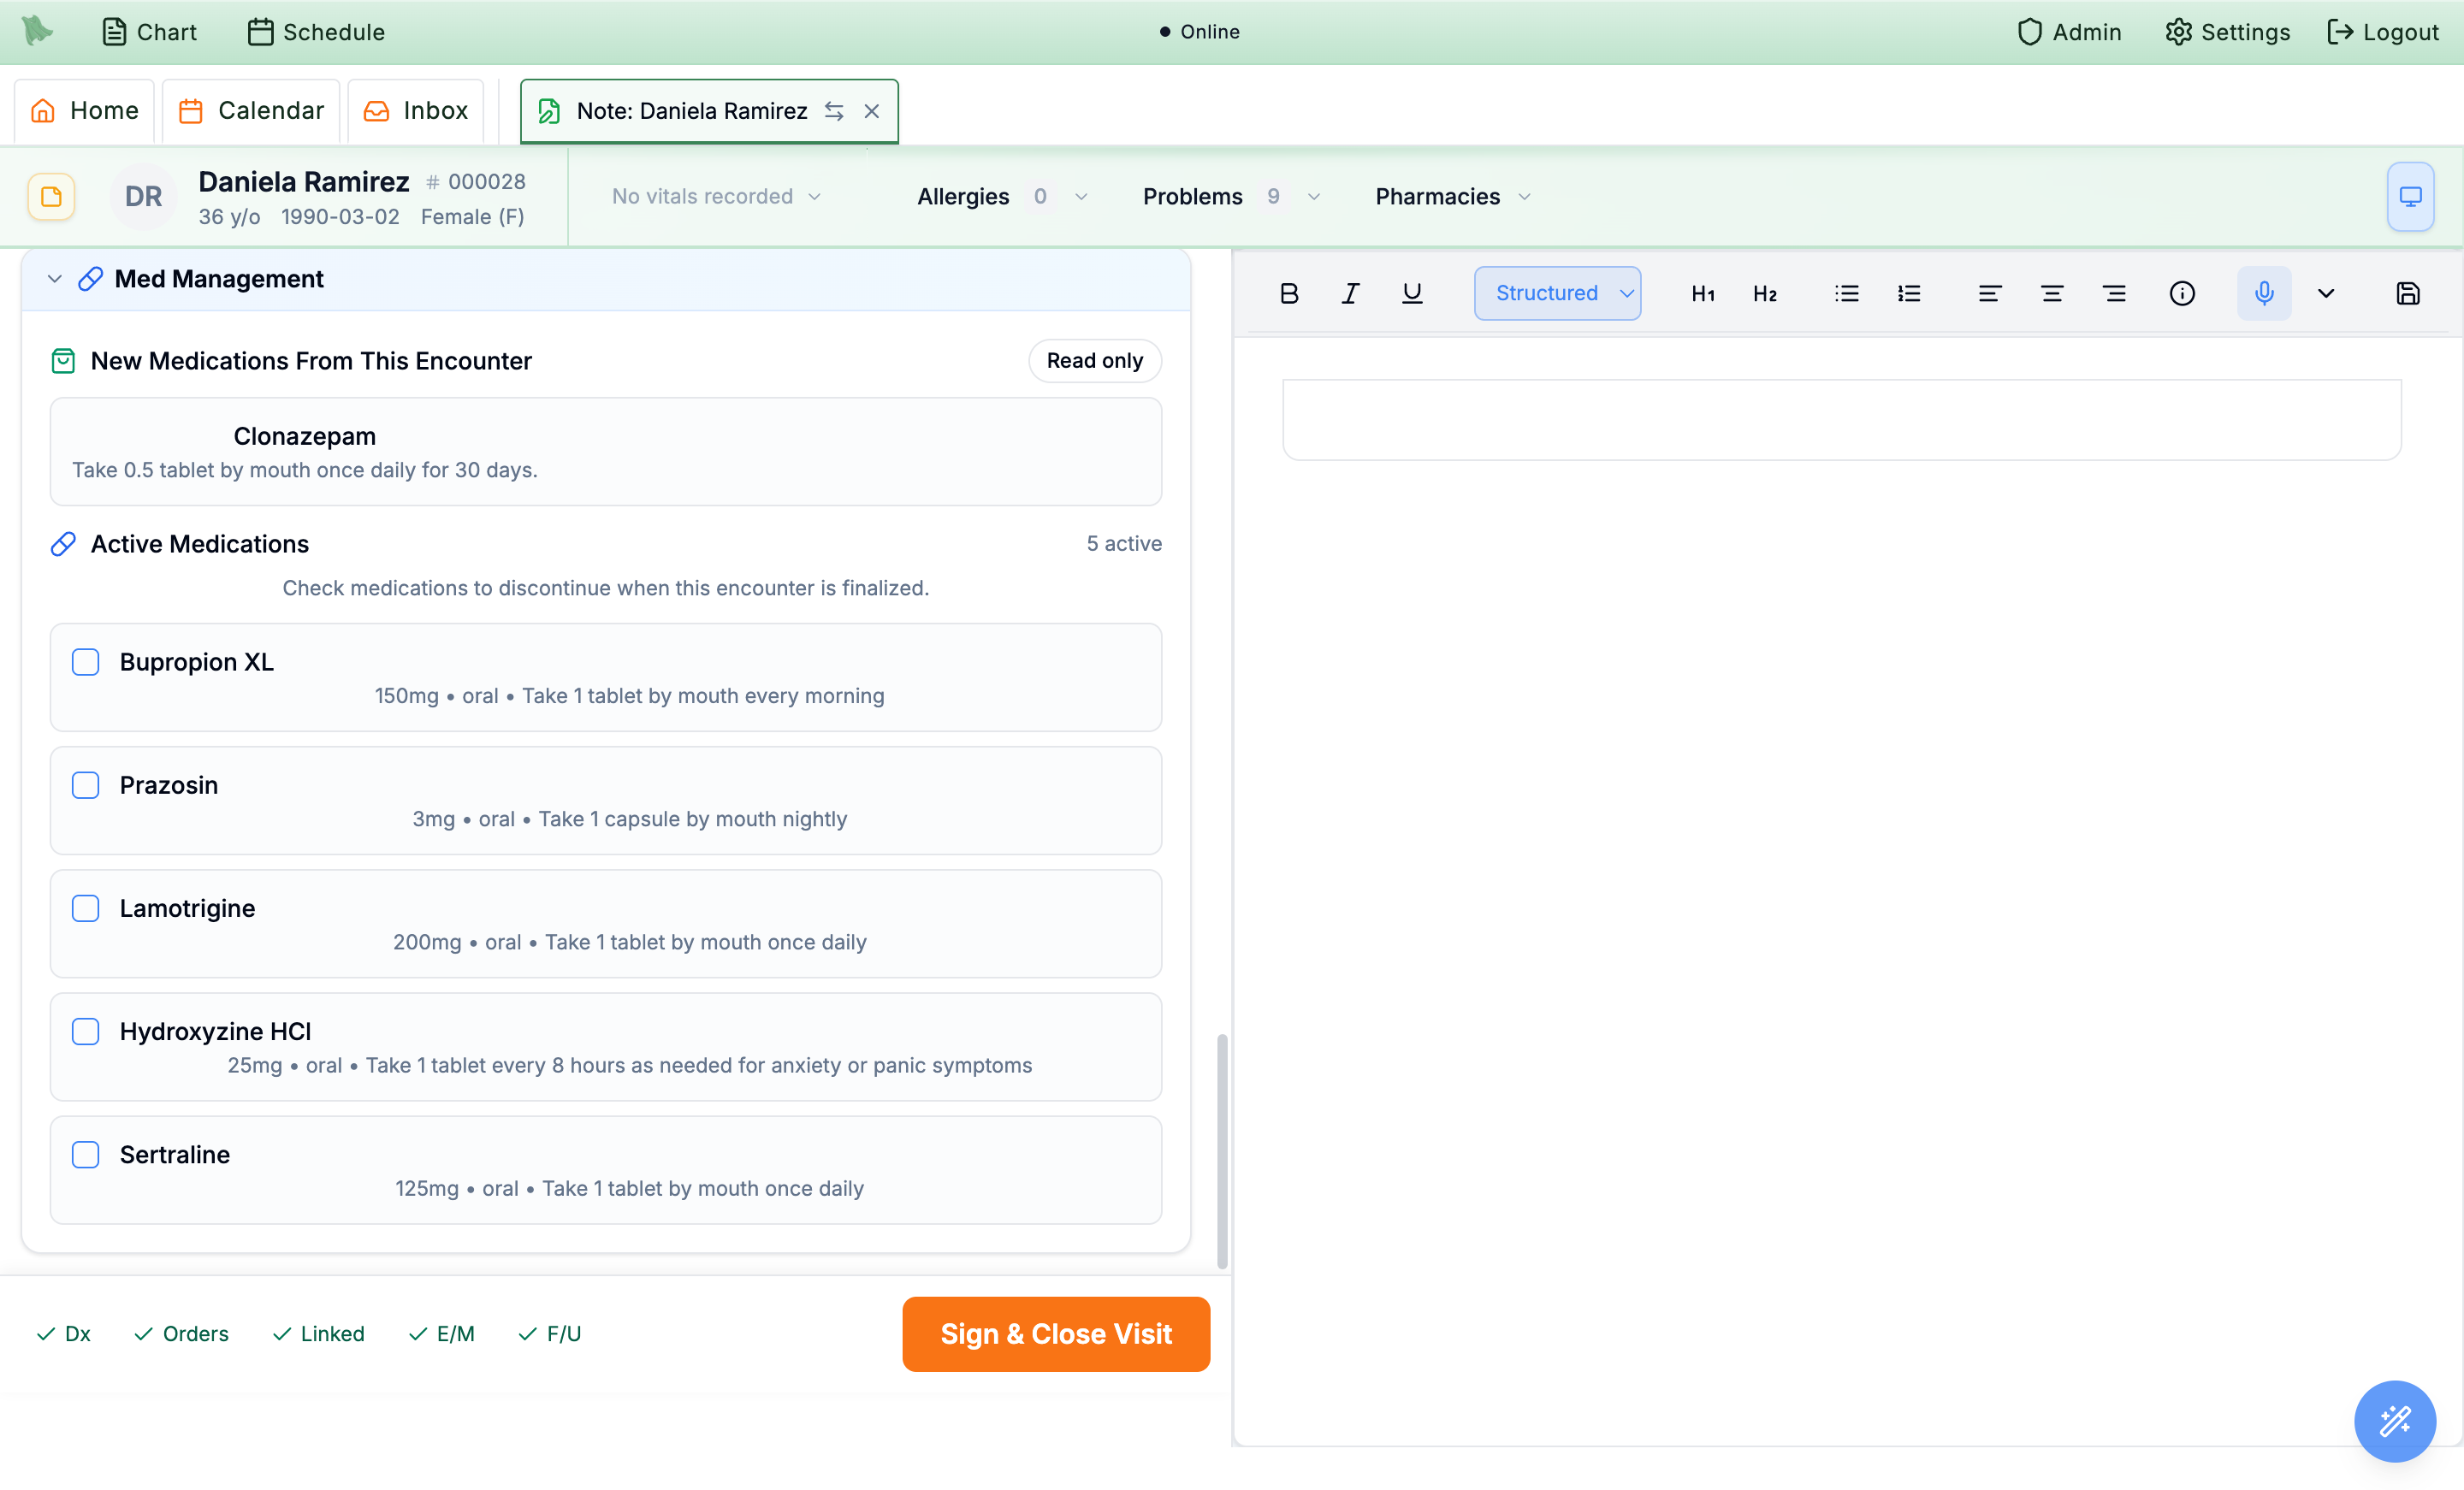
Prescribing today, one row is queued to stop at sign (with a reason box and Keep), and the footer chip already leaves the stopping row out of the count.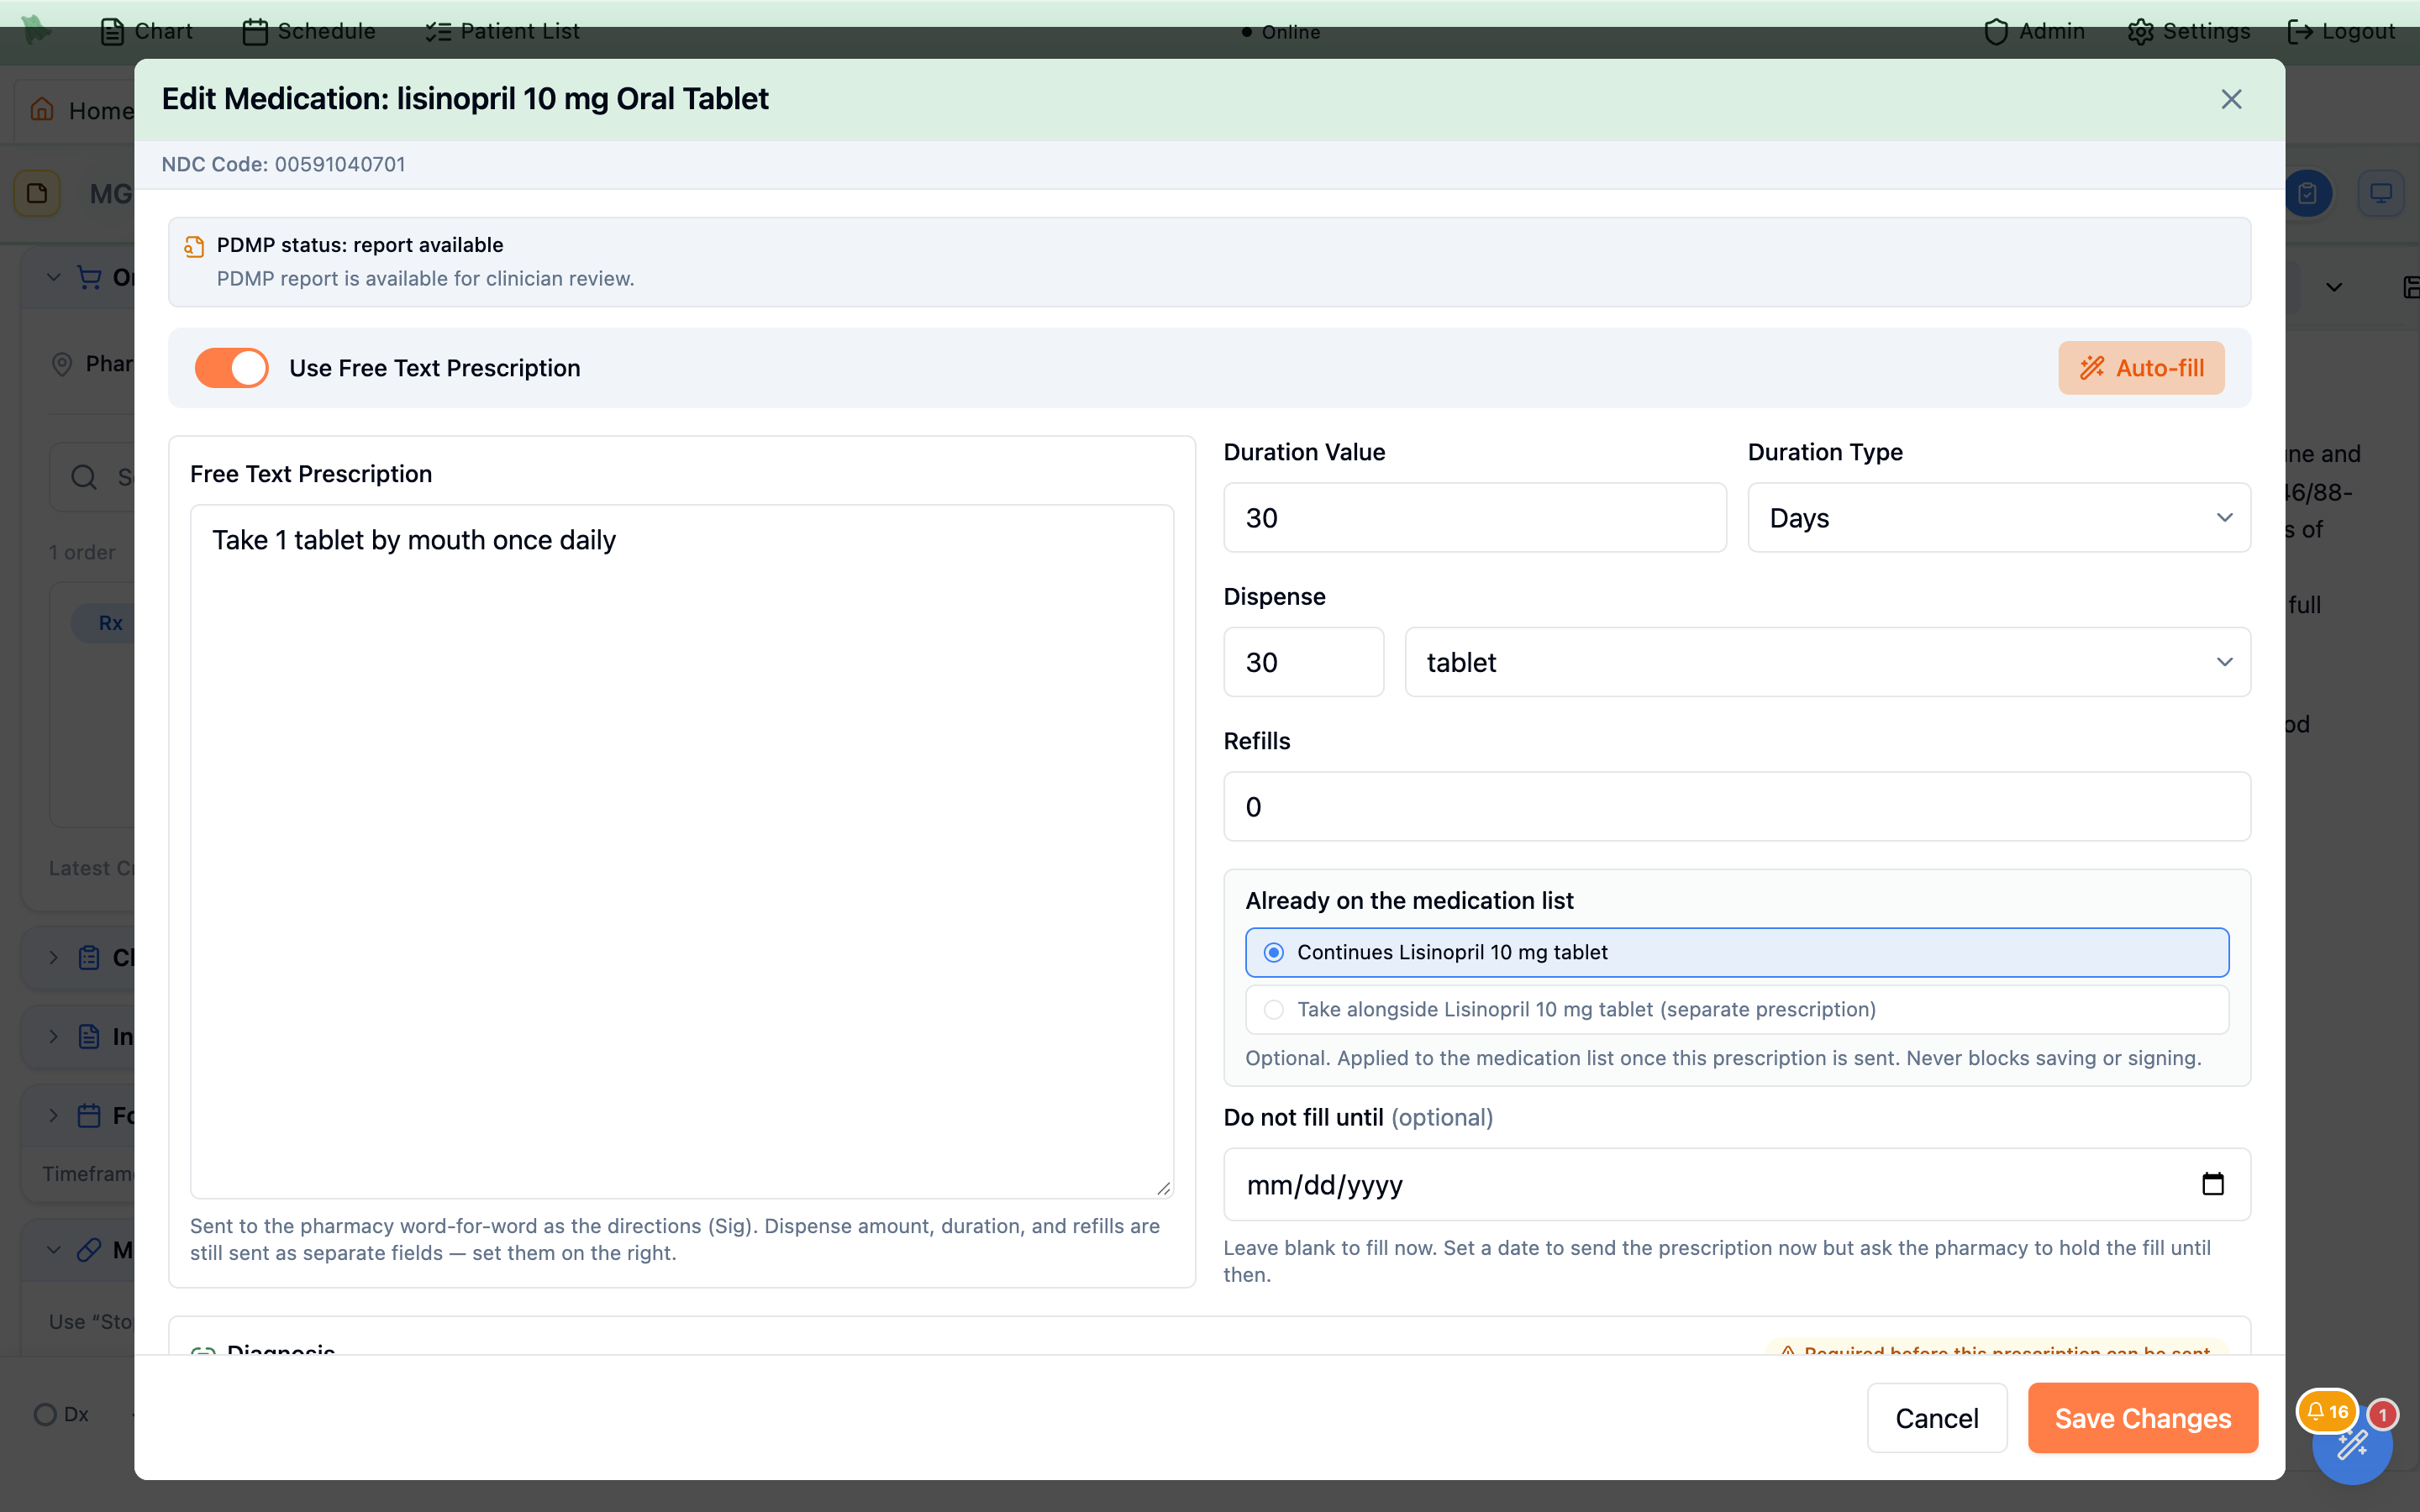
Renew inside a visit. The prescription lands in this visit’s Orders and opens for review, filled in from the last prescription with 0 refills. Continues means it simply renews the entry that’s already on the list.Still taking, Specify and Merge, which apply at once. Queued stops are applied and renewals are sent by Sign & Close Visit. If you close the visit unsigned, they wait in the draft.Build favorites to move faster
Favorites turn the codes and orders you use most into one-click chips. They’re personal to you and appear at the top of the matching section.
Diagnosis favorites
Open Manage Favorite Diagnoses from the gear (or Add favorites). On the Search tab, click a row to add that code to your favorites (the column header says so: “Click row to add to favorites”). The My Favorites tab lists what you’ve saved, with Delete all Favorites to clear the list. Favorites show as quick-add chips under My Favorite Diagnoses.
Order favorites
Click the star on any order to save it, then re-add it later from the Favorites tab in the Search Orders window.
Charge favorites
Use Manage in the Charges section to keep your common CPT/E/M codes one click away. A charge favorite can also carry a place of service: each row in Manage has a place-of-service picker that starts on Don't change place of service — the way every favorite saved before this worked. Set it to 22 (for example) and choosing that favorite documents the code and the place of service in one click, so “the hospital version of 99214” is a single button. If you add a favorite while the visit already has a place of service selected, the new favorite captures it for you.
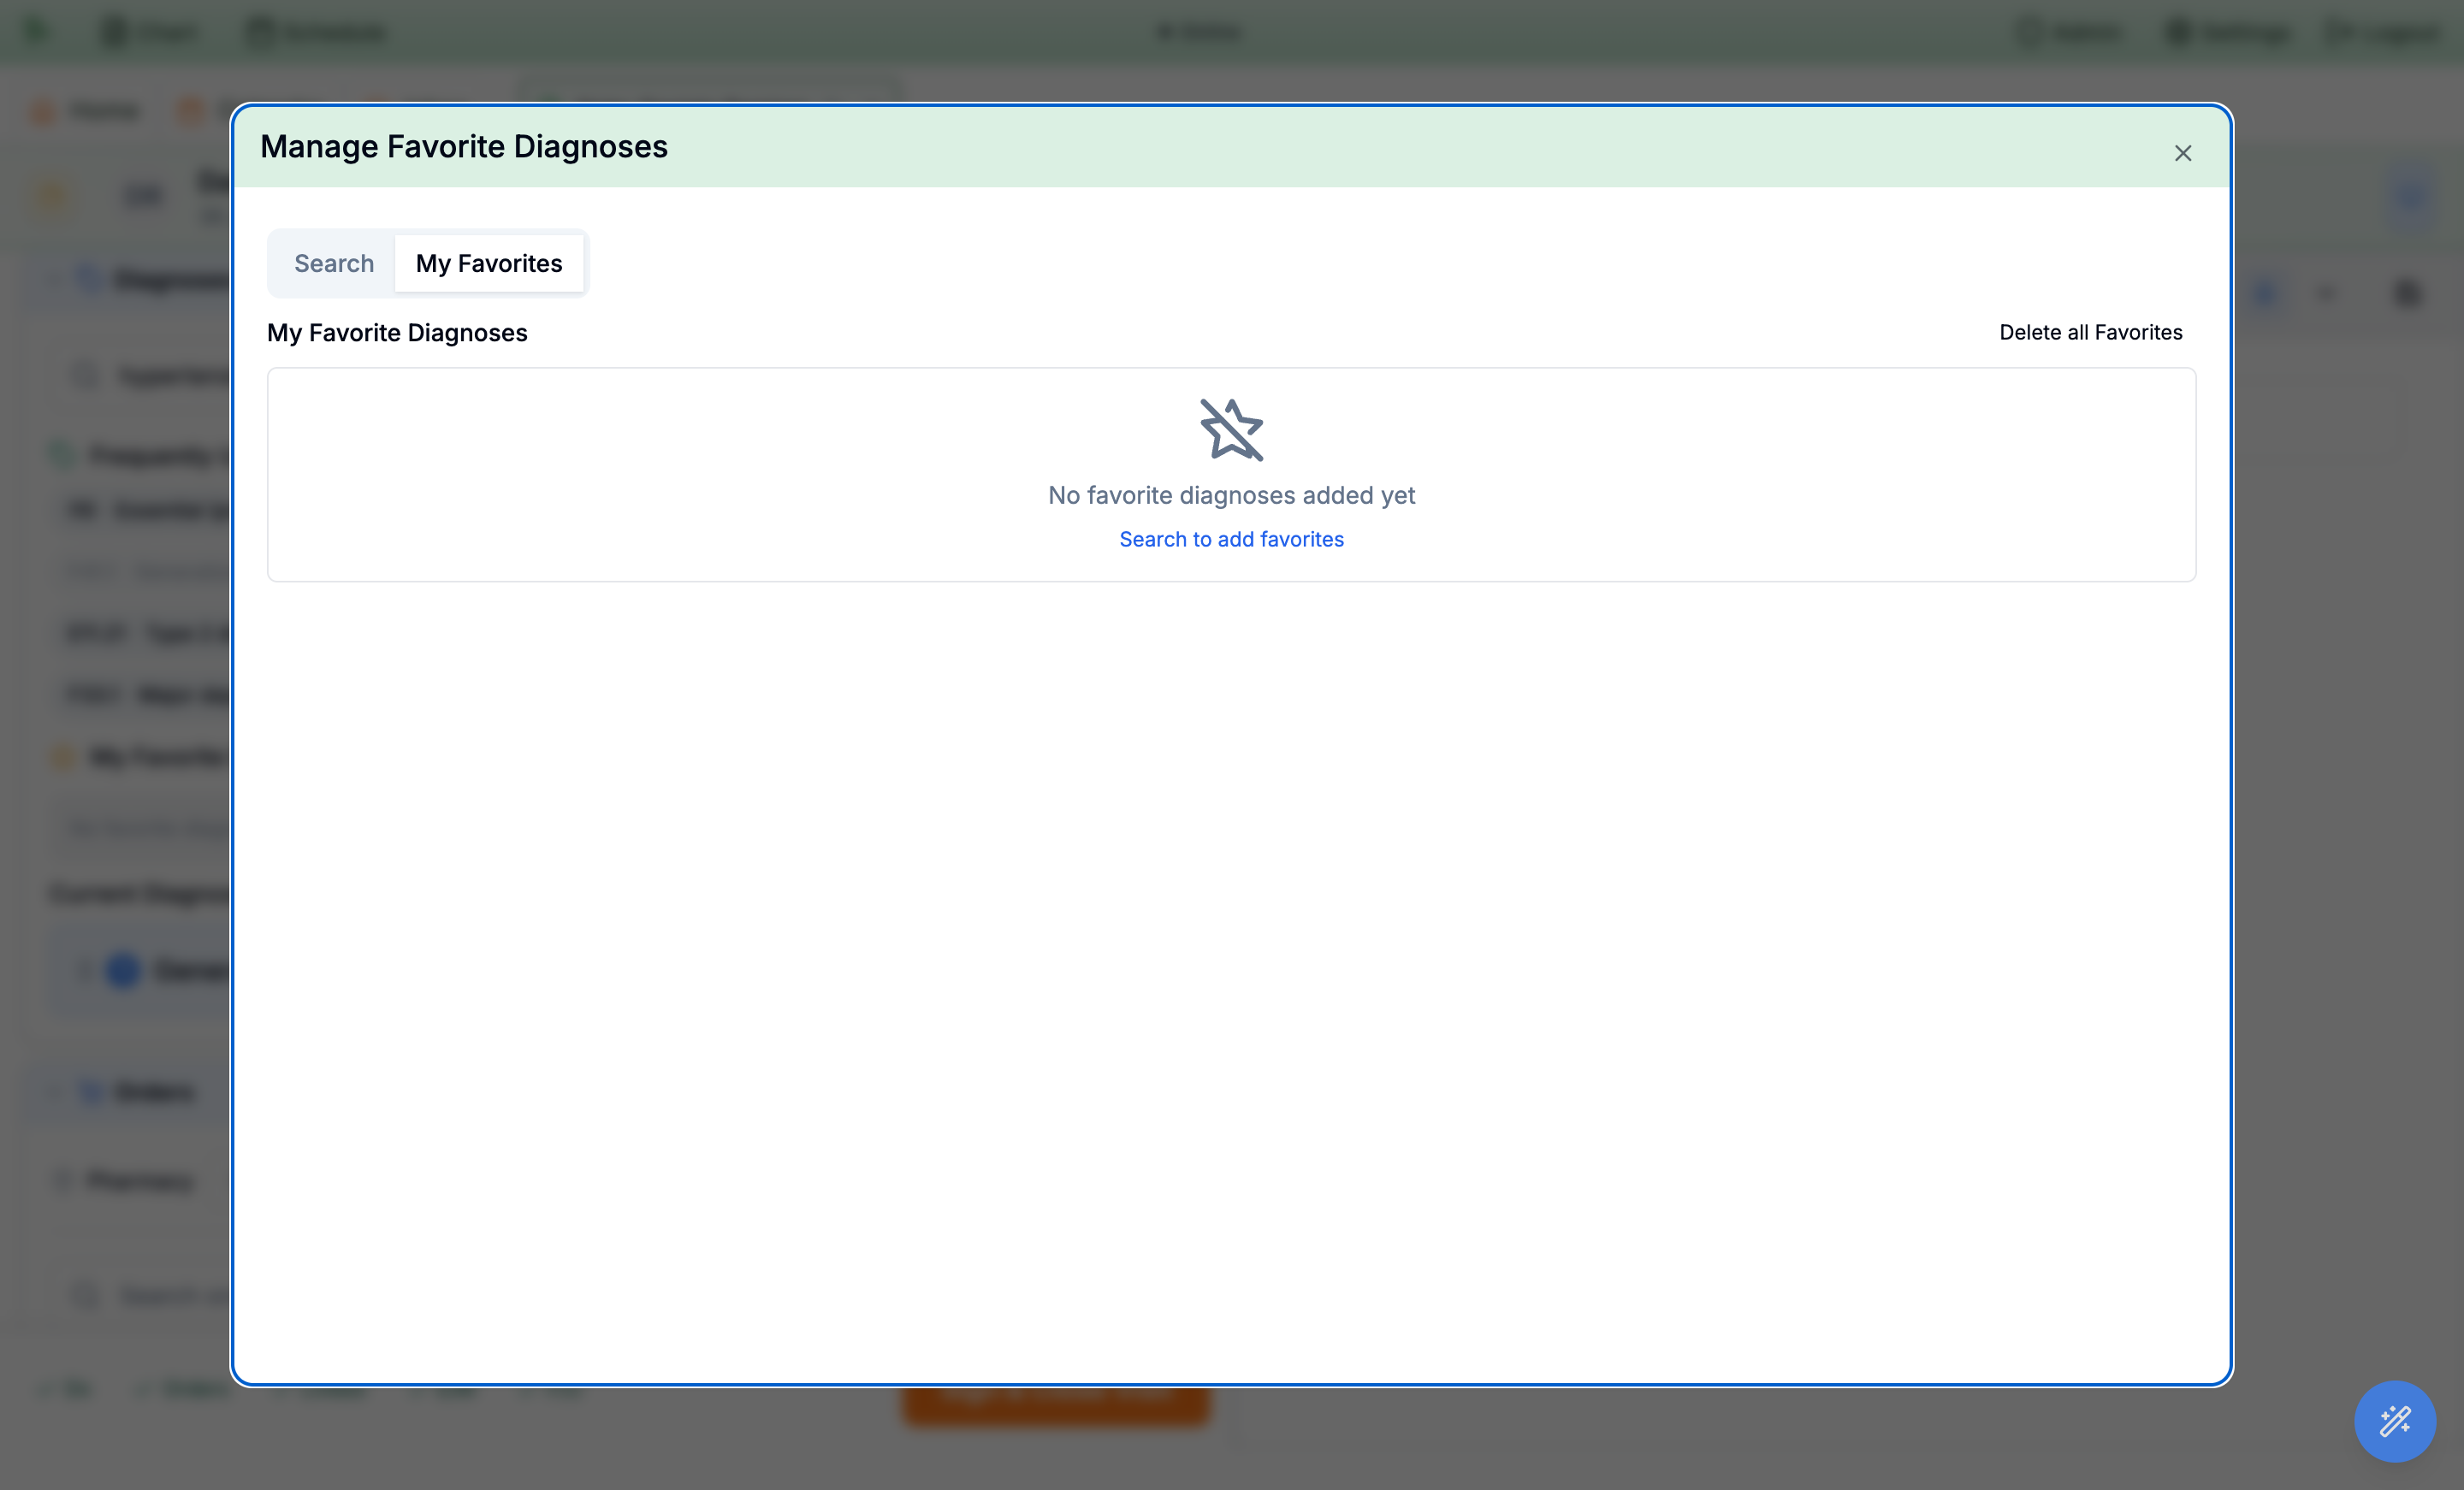
Search tab and it becomes a quick-add chip.Sign and close the visit
Sign & Close Visit finalizes the visit at once. It is the single action that turns your worksheet into a signed, billed, transmitted encounter. The footer chips are a progress hint, not the gate — the real requirements are checked when you click, and anything missing is reported inline and scrolled to instead of signing.
-
Meet the requirements that actually block signing.
- At least one diagnosis. “Encounter requires at least one diagnosis before completion.”
- Charges. An E/M code or at least one procedure code — unless you chose
No chargeorCash pay, either of which satisfies this on its own (see Charges & E/M). - Every order linked to a diagnosis. If any medication, lab, imaging, referral, or screener has no diagnosis association, signing stops and the Associations grid is highlighted.
- A pharmacy, if any prescription is still unsent. “Select a preferred pharmacy before signing since you have unsent prescriptions.”
OrdersandF/Uchips are progress hints only — a visit with no orders and no follow-up signs perfectly well. -
Sign controlled prescriptions first.
Any controlled order must be signed via EPCS before it can be transmitted, and an unsigned one keeps
Sign & Close Visitdisabled until you go back toOrdersand sign it. -
Answer the billability advisory if it appears.
On a visit that will be billed to insurance, Hero EMR checks your diagnosis codes first. If any is a category header or an unrecognized code — a guaranteed clearinghouse rejection — a Some diagnoses can’t be billed as-is dialog opens with one-click billable subcodes. Pick a subcode, or choose
Fix diagnosesto go back to the Diagnoses section.Sign anywayproceeds and records that you acknowledged the codes. This advisory never blocks you, but dismissing the dialog counts as “I’ll fix it” and does not sign. -
Click
Sign & Close Visit. Finalizing signs the note, sends any orders and prescriptions you haven’t already sent individually, submits the charges to billing, applies any medication discontinuations, and creates the follow-up request — in one step. Ctrl/Cmd+Enter does the same thing from the keyboard.
Change a visit after you’ve signed it
A signed note is the legal record of the visit, so Hero EMR never lets you type over one. When something needs to change afterwards — a result came back, you forgot to document the counselling time, a diagnosis was wrong — you write an addendum. Hero EMR copies the signed note into a fresh, editable version, you make the change there, and you sign again. The version you signed the first time is kept in full and stays readable.
Everything else about the visit carries on as it was: the encounter keeps its signed date, the charges you already submitted stay submitted, and orders you already sent stay sent. An addendum adds to the visit; it doesn’t reset it.
-
Open the signed visit.
There are two ways in, and both land in the note writer:
- From the calendar — double-click the appointment row (Ctrl/Cmd+click does the same thing). Don’t go looking for the hover ▶ Begin encounter button: it disappears once a visit is signed or complete, and that’s expected.
- From the chart — open the patient, stay on the
Encounterstab, and single-click the visit’s row. The split-pane preview opens with a thin action strip on top of it, readingEncounteron the left and anOpen encounterbutton on the right. Click that. (Double-clicking the row opens the same preview as a full-screen window instead — useful for reading, but it has noOpen encounterbutton, so use the single-click preview when you actually want to get in.)
-
Answer the
Encounter Already Closeddialog. It opens by itself the first time the note writer loads this visit. It reads “This visit has been signed. Create an addendum to reopen the note and update encounter details.”, with a smaller line underneath: “The prior signed note will be copied as a starting point.” Two buttons:-
View read-only— you just wanted to read it. Nothing changes and the visit stays signed. Three things tell you where you are: the note is locked, with a grey chip above it reading “This note is finalized. Use the addendum flow to change it.”; down in the completion footer,Sign & Close Visitis greyed out beside the hint “Reopen this encounter to create an addendum before signing.”; and a smallEncounter signedpill sits at the right-hand end of the patient header strip, just above the note. Click that pill whenever you want the dialog back.- Remember the pill. The dialog is a first-look prompt, not a permanent gate — once you’ve dismissed it, returning to the same visit later in the session opens it quietly, with the pill and no dialog. If you came back intending to amend and nothing popped up, that’s why.
Create addendum— Hero EMR copies the signed note into a new, editable version of itself and hands it to you.
-
- Write the change into the copy. You are now editing a new version of that note, not the signed one. It starts as a word-for-word copy, keeps the same note label and the same position in the visit, and carries over the note’s patient-portal visibility settings, so a note you had hidden from the portal stays hidden. Add your addendum text however your practice prefers — most clinicians add a dated Addendum: paragraph at the end rather than rewriting the body, so the change is obvious to anyone reading later. The left pane is the same Encounter Completion checklist you used the first time, still carrying the visit’s diagnoses, orders, charges, and follow-up.
-
Let completion re-read the note, if you want it to.
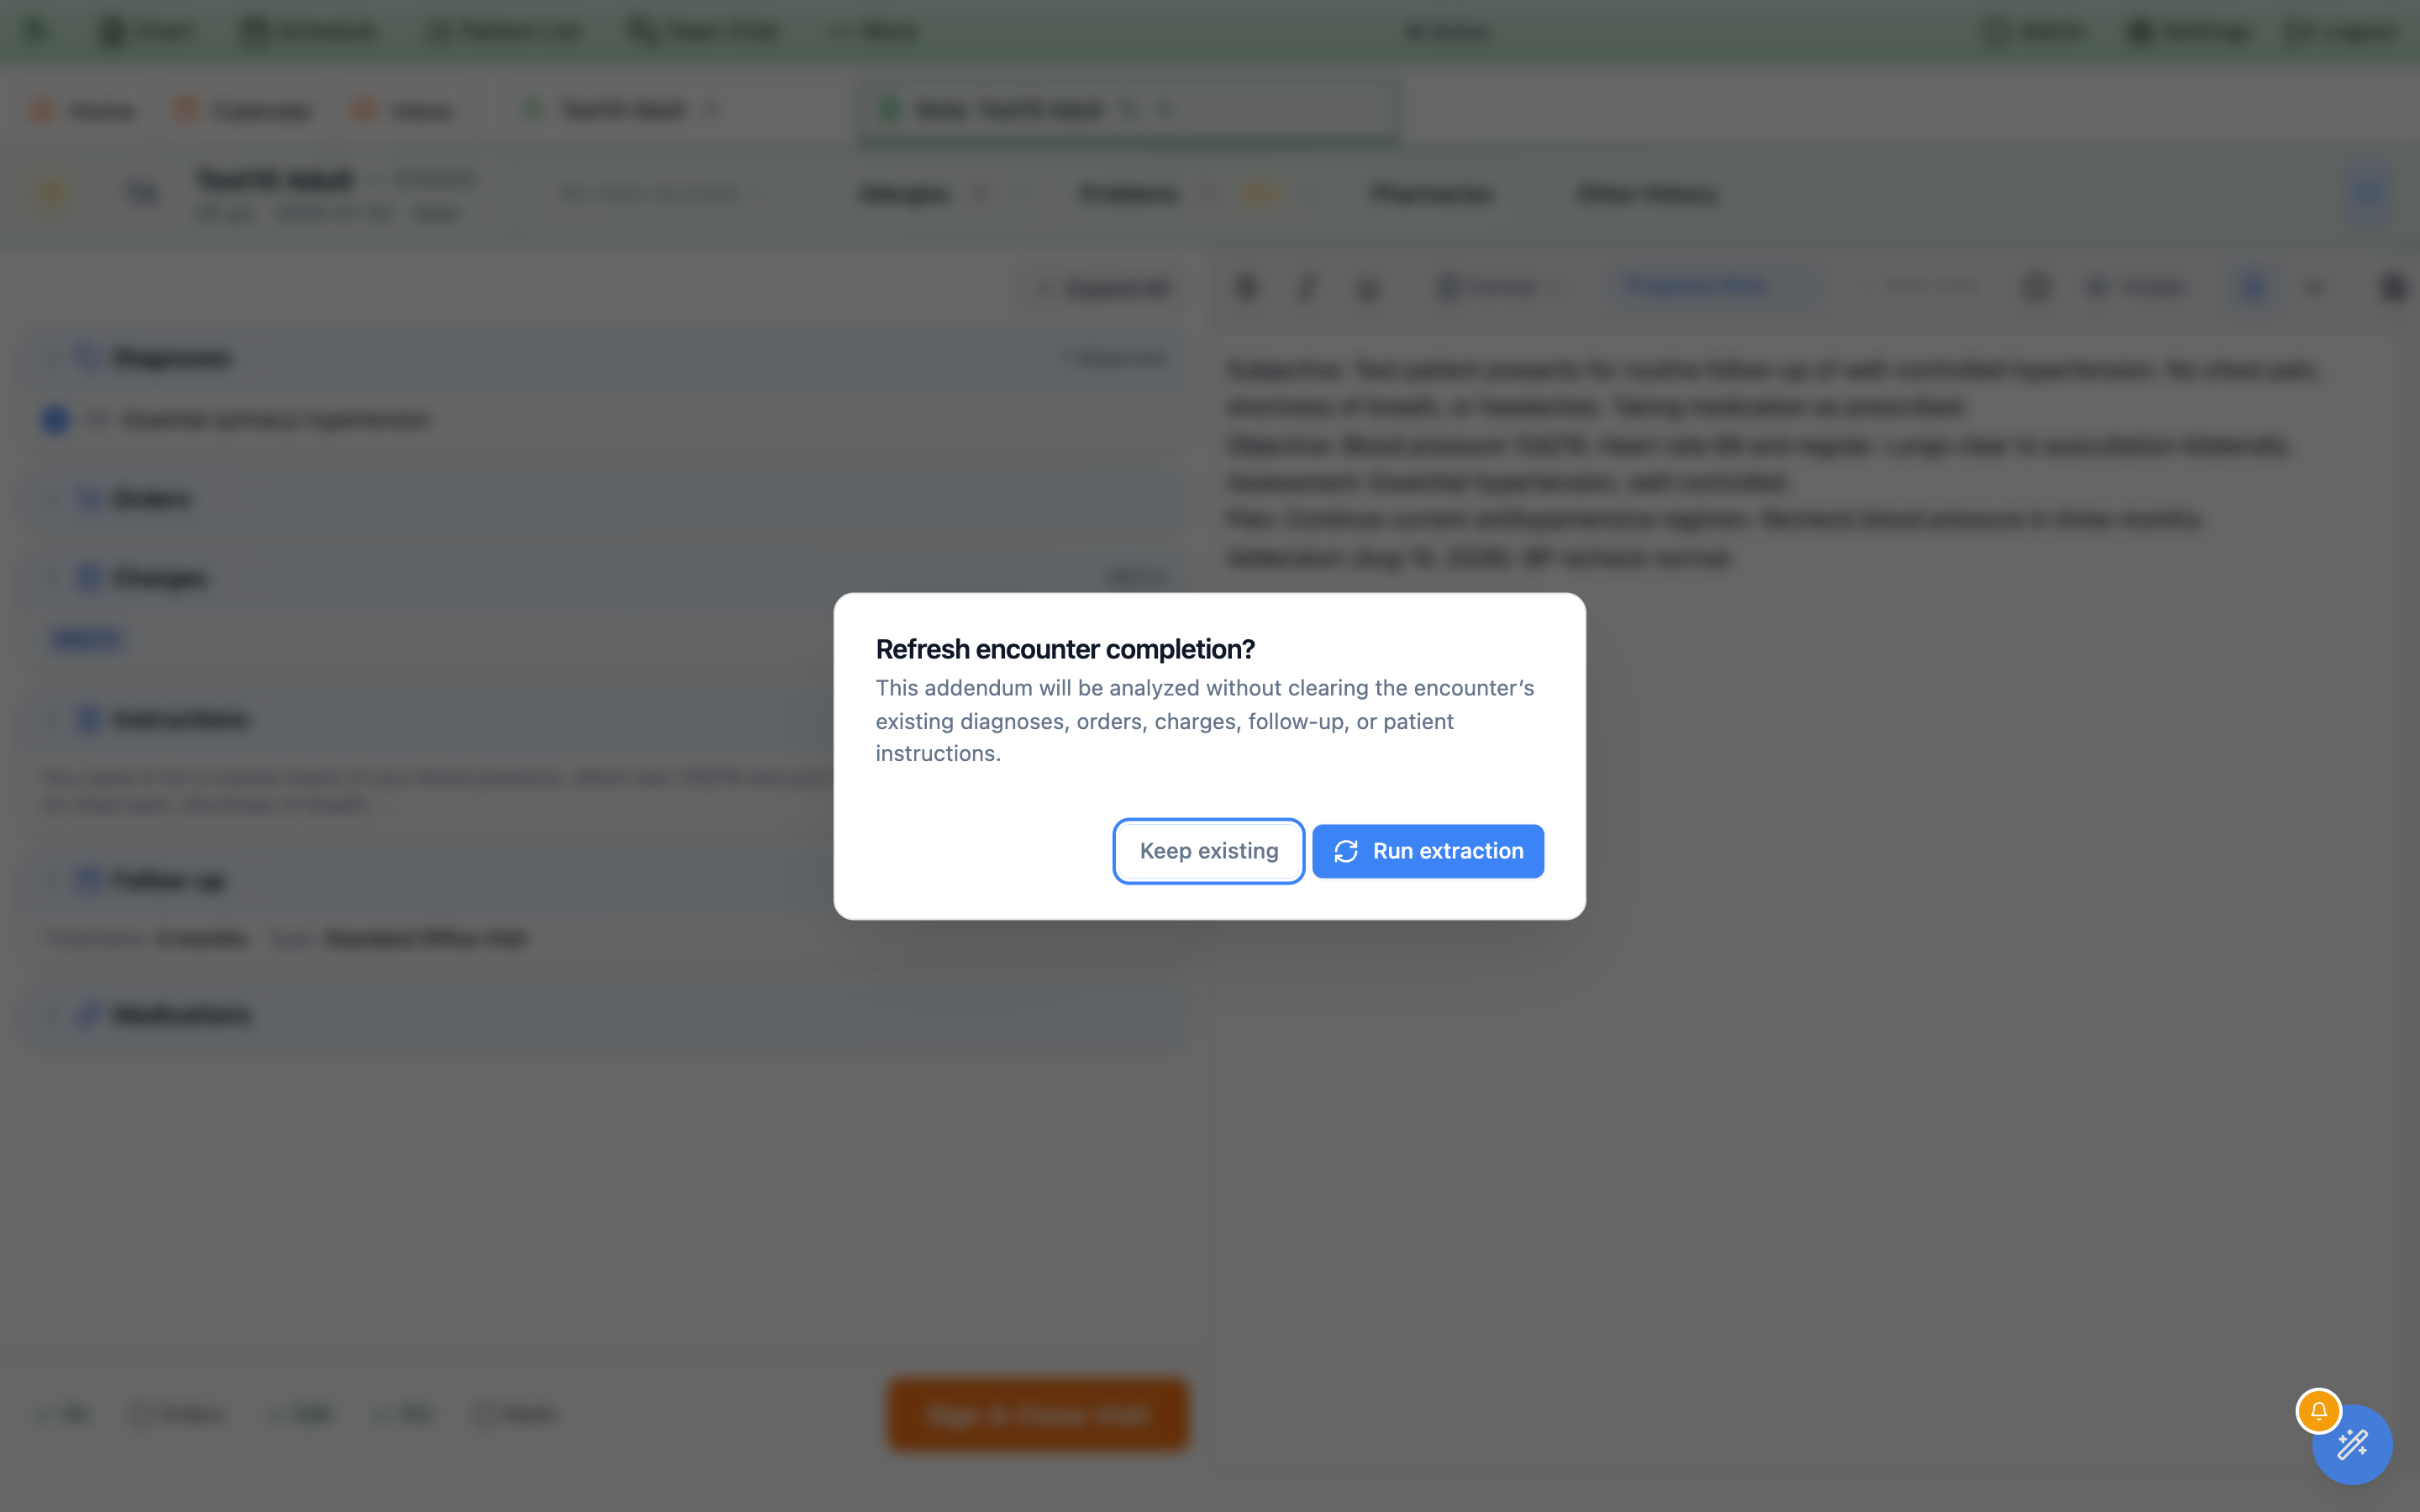
Press
Save Noteand, because the visit already has completion data, theRefresh encounter completion?dialog asks first. On an addendum it says so plainly: “This addendum will be analyzed without clearing the encounter’s existing diagnoses, orders, charges, follow-up, or patient instructions.”Run extractionreads your new text and adds what it finds — a new diagnosis joins the list rather than replacing it, and orders you already sent are never disturbed.Keep existingskips the re-read entirely. Either way you can still edit any section by hand. -
Sign the addendum.
Finish with
Sign & Close Visit(or Ctrl/Cmd+Enter), exactly as you did the first time. The same requirements apply — at least one diagnosis, charges or an explicitNo charge/Cash pay, every order linked to a diagnosis, and any controlled prescription signed through EPCS (see Sign and close the visit). Your addendum becomes the current version of the note, and the version you signed before it is kept underneath it.
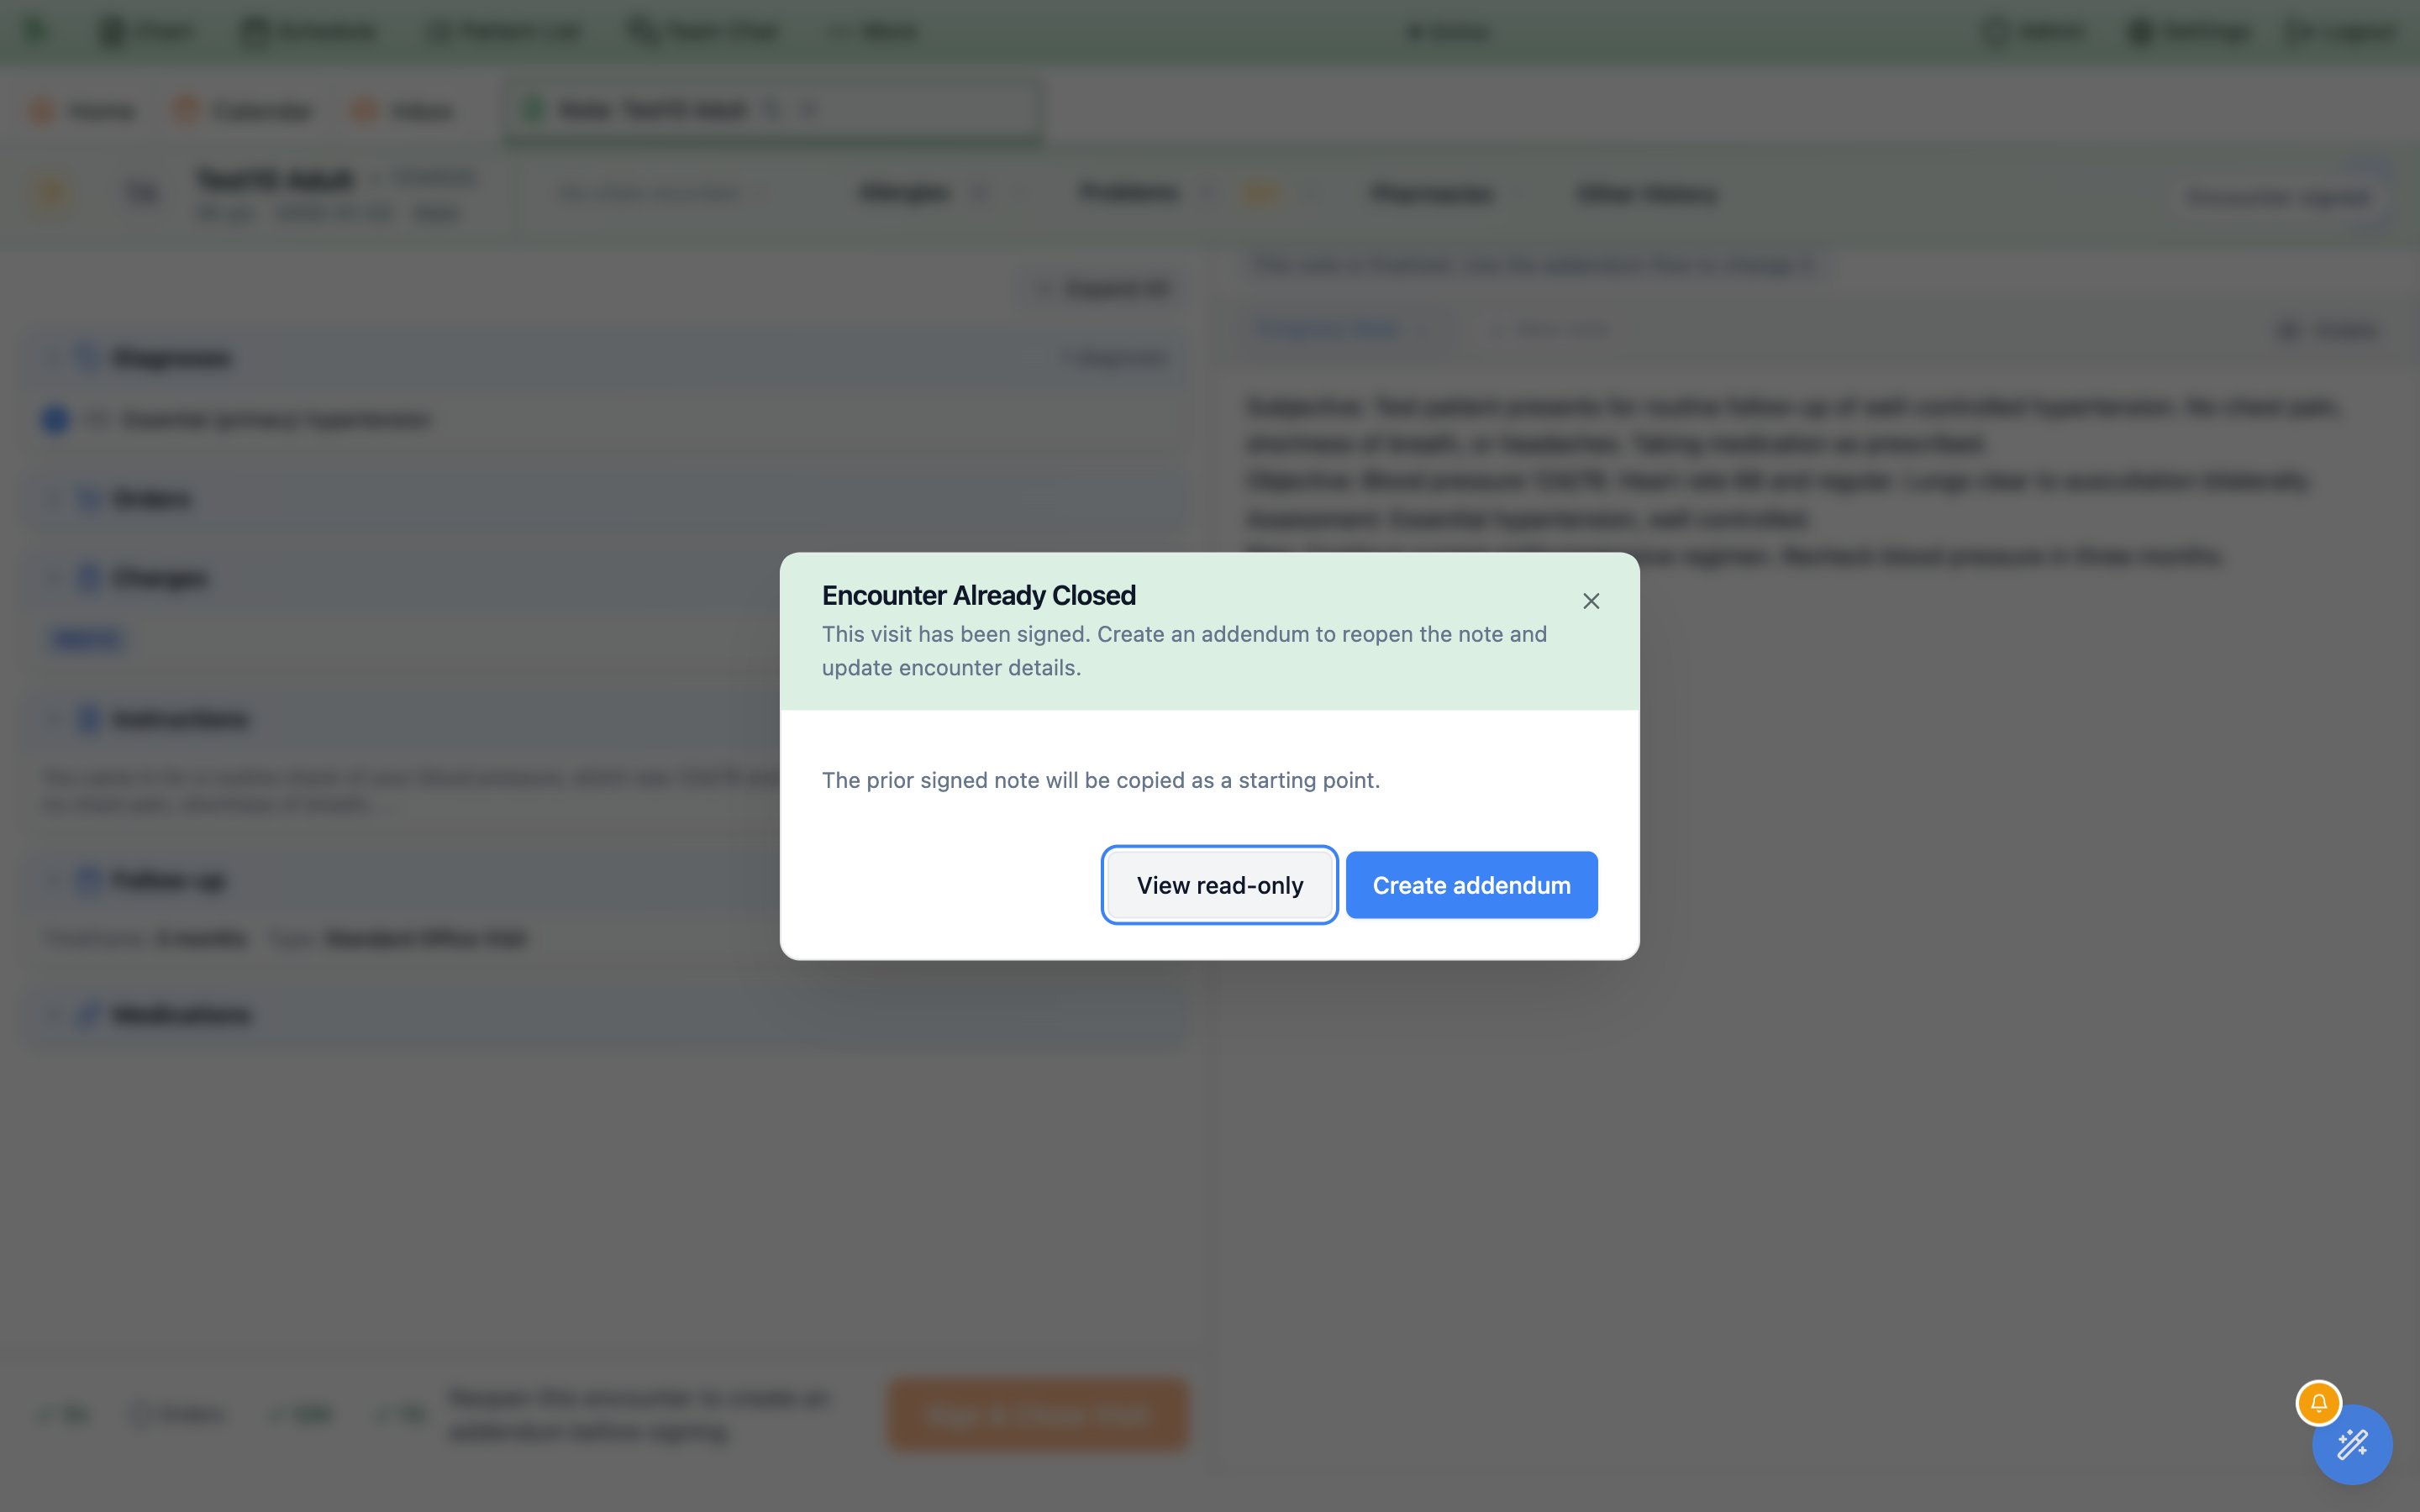
View read-only leaves the record exactly as it is.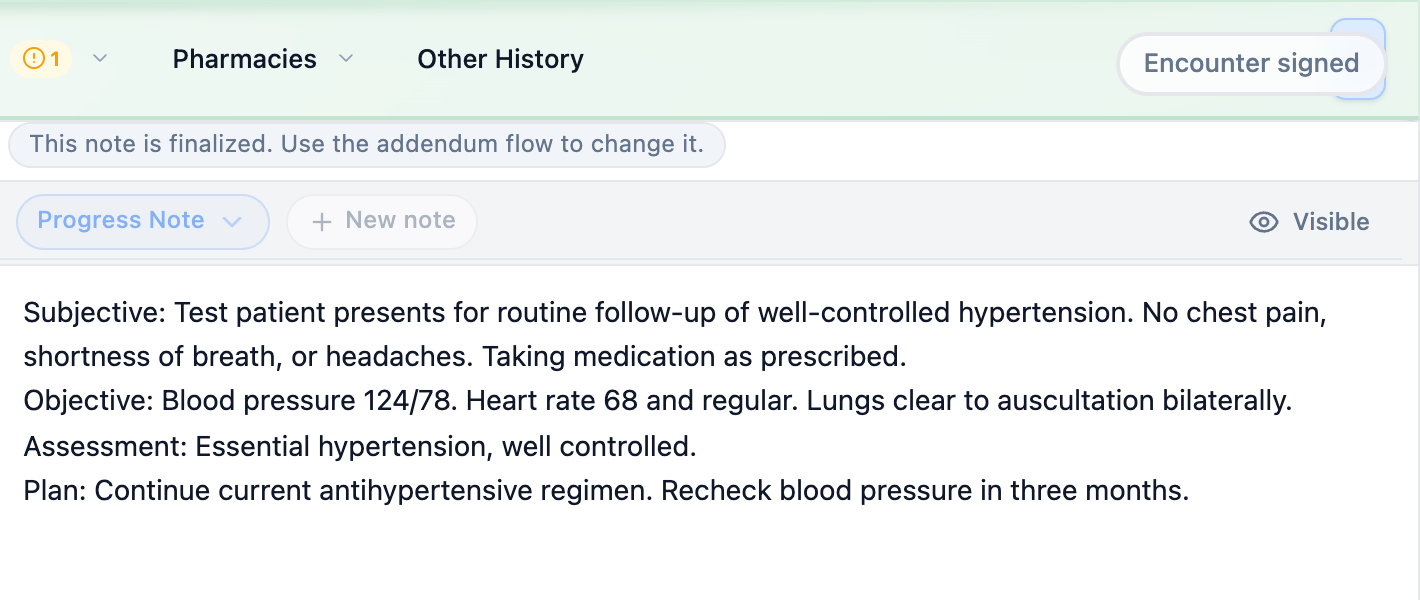
View read-only the note is locked and labelled This note is finalized; the Encounter signed pill on the header strip is how you get the prompt back.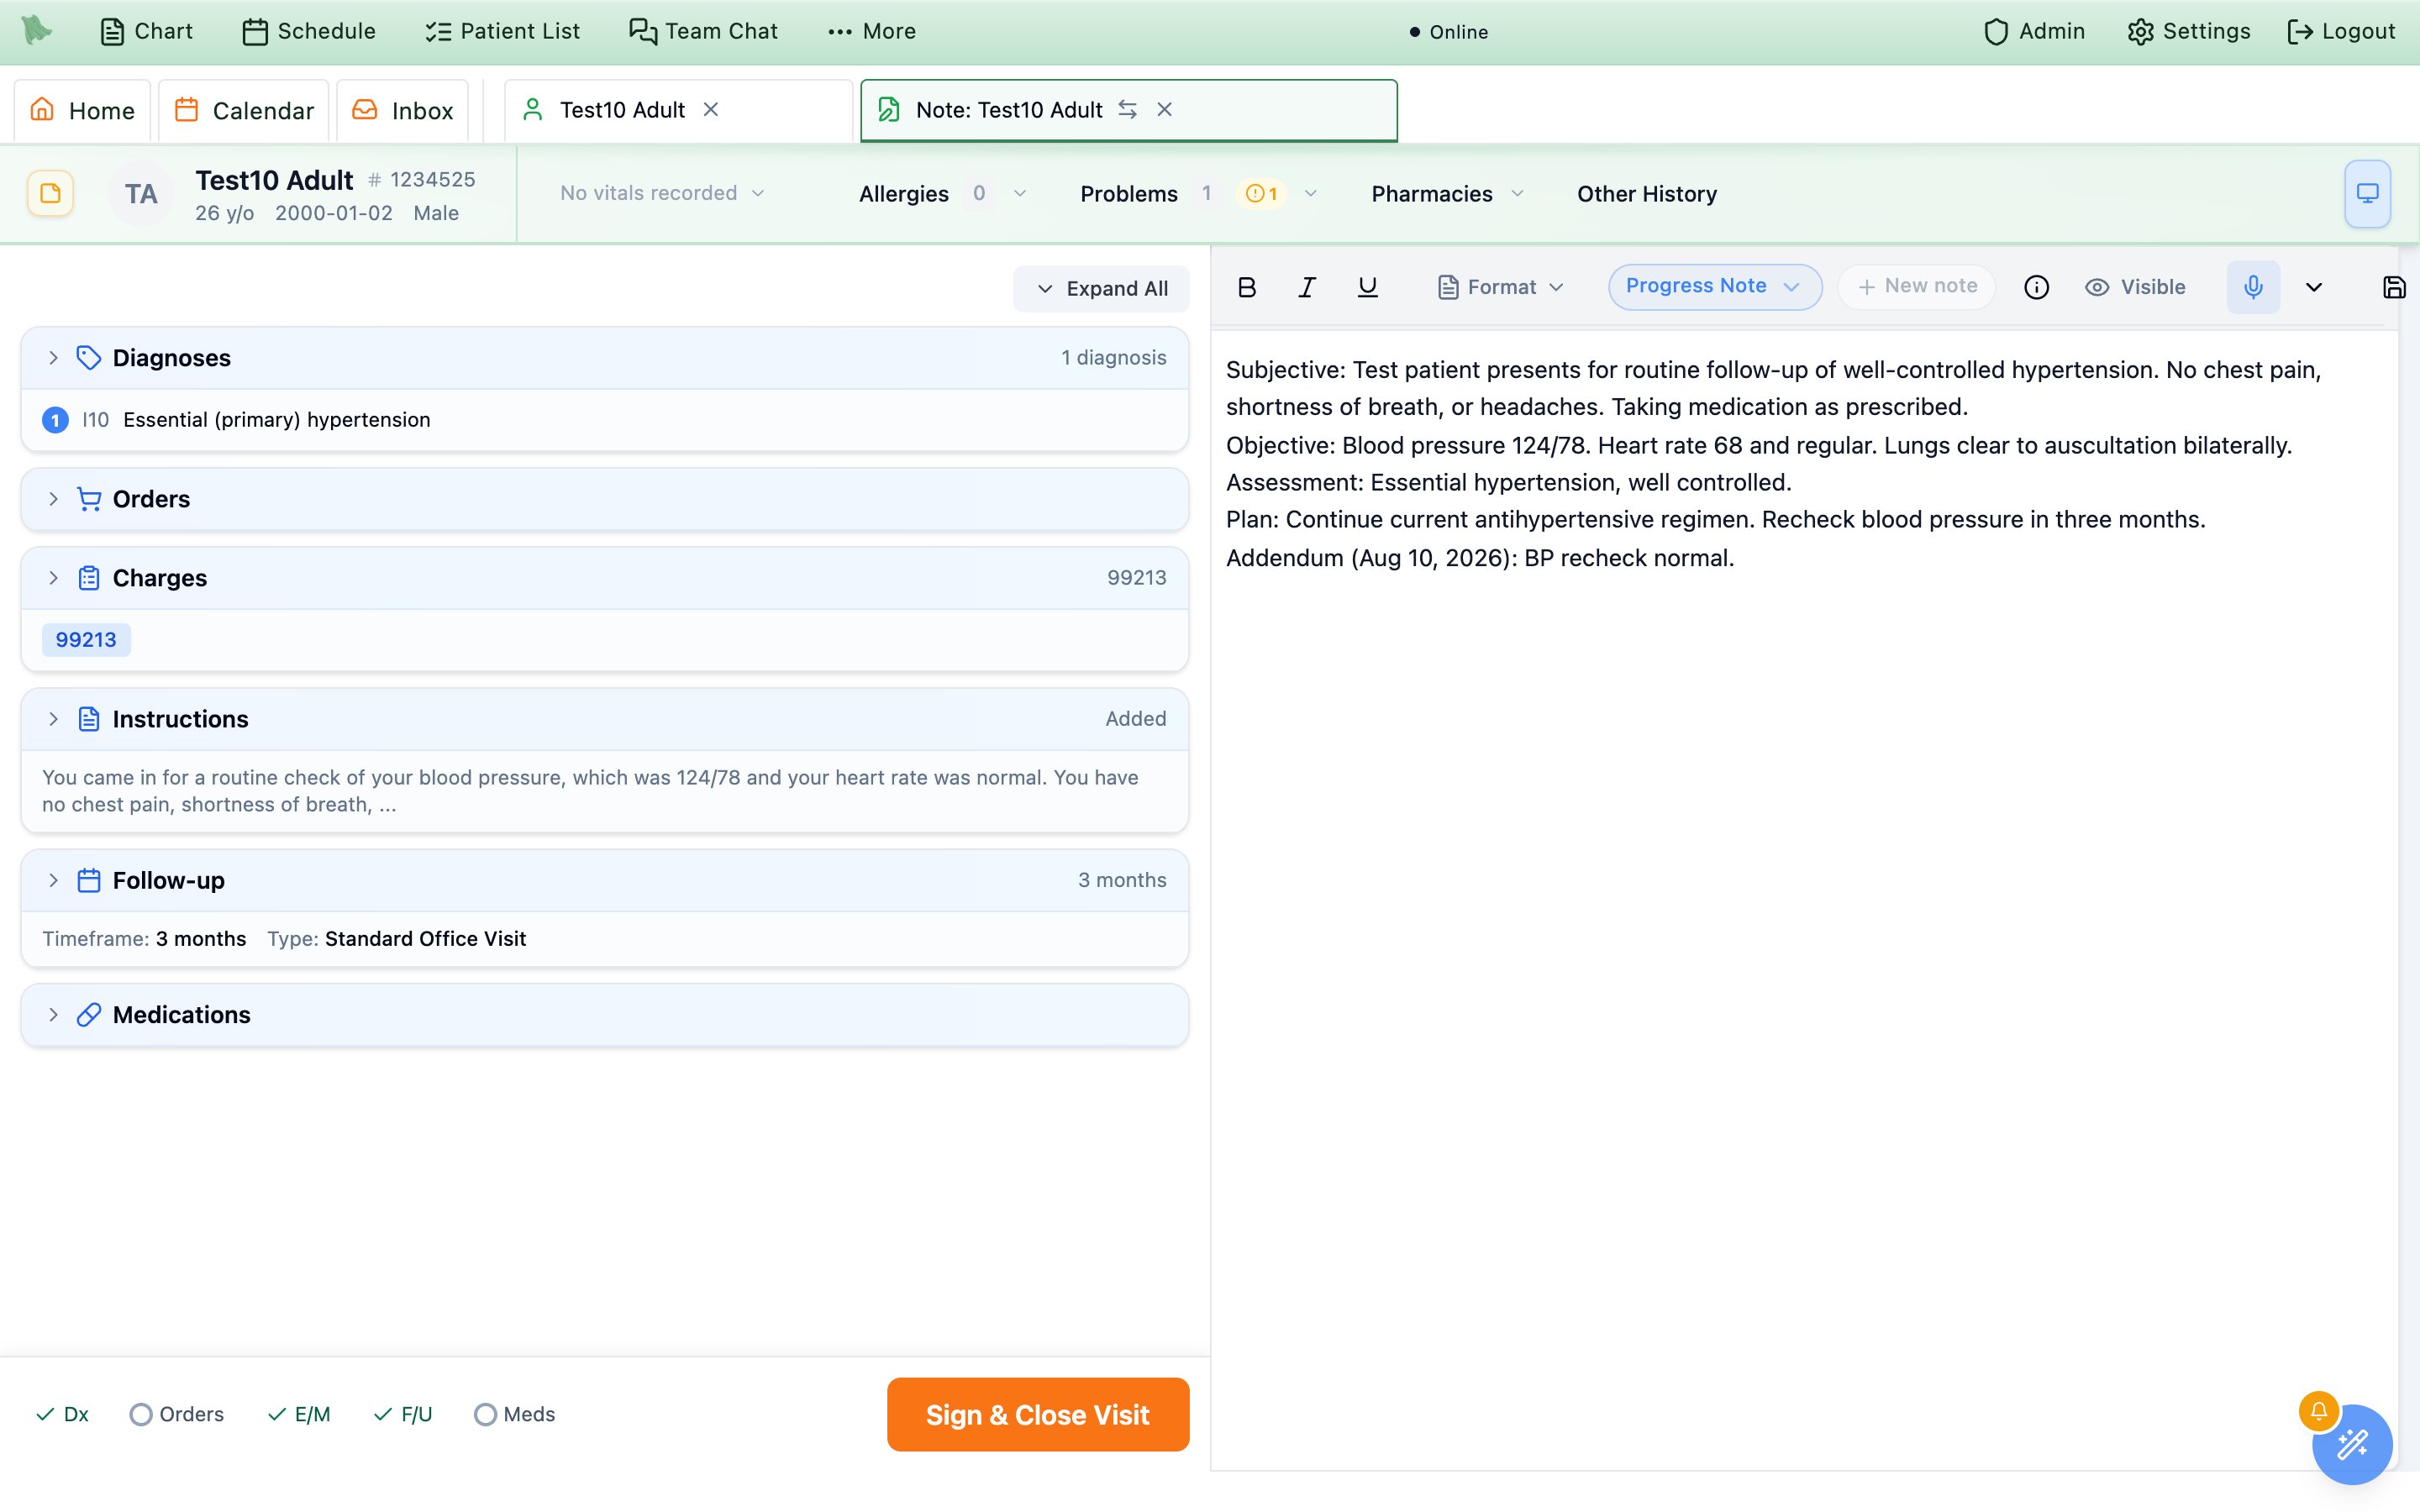
Create addendum, and Hero EMR hands back the draft you were already working on rather than starting a second one — your unsigned text is still there. A visit can only have one addendum open at a time; if you try to amend a different note on the same visit while one is in progress, Hero EMR stops you with “An addendum is already open on another note for this encounter. Finish or discard it before amending a different note.” Finish or sign the one you have, then start the next.
Create addendum; if none is selected, the button sits in a loading state until Hero EMR knows which note you mean. While an addendum is open the other tabs are locked, so you can’t accidentally type your amendment into a sibling note — sign or finish the addendum first, then switch.
Who can write an addendum
Physicians and practice administrators can always create one. Staff accounts need both encounter permissions on their profile:
encounter.amend
Listed in the staff permission catalog as Create addendum drafts on signed encounters. This is the one that unlocks the Create addendum button at all.
encounter.edit_draft
Edit unsigned note drafts. The addendum is a draft note, so without this a staff member could start one but not type in it.
A staff member holding only one of the two sees the same dialog with a different message — “This visit has been signed. You do not have permission to create addenda for signed encounters.” — and only the View read-only button. Ask an organization administrator to add the missing permission to the staff profile (see Staff accounts & permissions). Signing the finished addendum is still a physician action, exactly as it is for a first-time visit.
What the chart shows afterwards
-
One note, not two.
On the chart’s
Notestab the addendum replaces the note it grew from — you see one row for that note, showing the current version, with itsSigned:date. The earlier version isn’t deleted; it’s tucked underneath. The same is true of the note tab strip inside the visit. -
Read the earlier version from
History. Select the note on theNotestab and clickHistory— the clock button in the preview’s toolbar, sitting next toPrint(its tooltip reads View version history). AVersion Historycolumn opens beside the note listing every version by date and time with the author’s name. Click any entry to read that version in full — chief complaint, subjective, objective, assessment, and plan as they stood then. The sameHistorybutton is on the toolbar of the full-screen note window.- Two badges, two different things.
Currentmarks the version you are reading now — that’s the one that tells you which is live.Activeappears on every version whose full text is still stored and instantly readable; once a version passes your practice’s retention window (90 days by default) it is moved to long-term storage and readsArchivedinstead, and has to be retrieved before you can open it.
- Two badges, two different things.
- Nothing is re-billed by accident. Re-reading the note during an addendum deliberately leaves the visit’s charges alone, and it does not redraft the after-visit patient instructions. If the addendum genuinely changes what should be billed, change the Charges section by hand before you sign.
draft and clears the signature — signed date, signer, and digital signature all come off, an encounter-level version snapshot is filed for the audit trail, and the visit is unsigned until you sign it again. Its dialog is titled Encounter Already Signed and reads “This encounter has already been signed. You can reopen it to make corrections… A version snapshot will be saved for audit purposes. After making corrections, you’ll need to sign the encounter again.”, with Cancel and Reopen Encounter. It is a correction tool for a visit that was signed in error, not the routine way to add to a finished note — and because it un-signs a visit that has already been billed and released to the patient, reach for the addendum unless you specifically need the signature undone. Staff can never reopen an encounter, whatever permissions they hold.
Addendum, and tapping it asks “This encounter has been signed. Create an addendum?” with Cancel and Create addendum before anything opens. See Encounters on the phone.
Need help? Email support@heroemr.com.